Key takeaways
- Verify actual lumber dimensions: A nominal 4×4 measures 3.5″ x 3.5″, but some brackets are cut for 3.6″ pressure-treated stock. Measure your boards before ordering or the fit will be sloppy or impossible.
- Steel gauge matters more than marketing: Look for 13-gauge or heavier. Thin stamped steel flexes under rafter load and telegraphs every wind gust into the frame.
- Match the roof pitch to your climate: Flat-top brackets suit dry regions and shade cloth. A 30° slanted kit sheds rain and snow and works better if you plan to add polycarbonate panels later.
- Count your corner types: Freestanding four-post pergolas need 4-way brackets at intersections and 3-way at perimeter corners. Confirm the piece count covers your layout before you start cutting.
- Check the coating, not just the finish: Powder coat over galvanized steel outlasts painted mild steel. Any exposed cut edge or drilled hole is a rust starting point, so keep touch-up paint handy.
What's inside
Standing in the lumber aisle with a tape measure and a rough sketch, most of us hit the same wall: the joinery. Cutting clean rafter notches and keeping six posts plumb across an uneven patio is where weekend pergola projects stall out. Bracket kits sidestep that problem entirely by turning a carpentry job into a bolt-and-level job, but the market is crowded with look-alike hardware sets that vary wildly in steel gauge, fastener quality, and whether the post bases actually match the lumber you can buy locally.
This guide breaks down the pergola kits worth your Saturday in 2026, covering both hardware-only bracket systems for makers sourcing their own lumber and one fully packaged cedar kit for anyone who wants the material list solved. I’ve focused on steel thickness, coating durability, slope options, and how forgiving each system is when your posts aren’t perfectly spaced.
As an Amazon Associate we earn from qualifying purchases.


How to Choose a Rated Pergola Kits (2026)
- Verify actual lumber dimensions: A nominal 4×4 measures 3.5″ x 3.5″, but some brackets are cut for 3.6″ pressure-treated stock. Measure your boards before ordering or the fit will be sloppy or impossible.
- Steel gauge matters more than marketing: Look for 13-gauge or heavier. Thin stamped steel flexes under rafter load and telegraphs every wind gust into the frame.
- Match the roof pitch to your climate: Flat-top brackets suit dry regions and shade cloth. A 30° slanted kit sheds rain and snow and works better if you plan to add polycarbonate panels later.
- Count your corner types: Freestanding four-post pergolas need 4-way brackets at intersections and 3-way at perimeter corners. Confirm the piece count covers your layout before you start cutting.
- Check the coating, not just the finish: Powder coat over galvanized steel outlasts painted mild steel. Any exposed cut edge or drilled hole is a rust starting point, so keep touch-up paint handy.
The Best Rated Pergola Kits (2026)s Reviewed
Backyard Discovery Beaumont 12′ x 10′ Cedar Pergola Kit
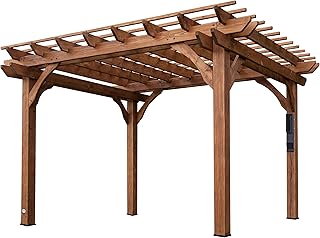
This is the pick for anyone who’d rather assemble than source, arriving as pre-cut cedar with a trellis roof, high-wind rating, and a built-in PowerPort for string lights or a fan. Expect a full day with a helper, but the pre-drilled components mean your measurements come from the factory rather than your driveway.
Heavy-Duty Pergola Bracket Kit for 4×4 Posts (3-Way & 4-Way)
Built for 3.6″ actual posts, which makes it a smart match for damp pressure-treated lumber that hasn’t finished shrinking. The mix of 3-way and 4-way brackets plus post bases covers a standard freestanding four-post build without add-on purchases.
13-Gauge Steel Pergola Bracket Kit (12 pc)
The 13-gauge steel here is noticeably stiffer than budget alternatives, and you feel it when you torque the lag bolts down. Twelve pieces is the sweet spot for a single-bay pergola over a patio or garden path.
Heavy Duty Rust-Proof Pergola Bracket Kit
A solid all-rounder with 3-way and 4-way corners sized for standard 3.5″ lumber and a rust-resistant coating that holds up through freeze-thaw cycles. Best suited to flat-roof designs where you’ll layer shade cloth or slatted rafters on top.
30° Slanted Pergola Whole-Set Kit (14 pc)
The 30° pitch does real work here, shedding water instead of pooling it, which makes this the right call for carports or covered seating in wet climates. Fourteen pieces gives you enough hardware for a complete slanted frame including post bases.
Frequently Asked Questions
Do I need concrete footings for a bracket-based pergola?
For anything freestanding, yes. Post bases anchor to concrete piers or an existing slab with wedge anchors. Surface-mounting to pavers or bare soil will not hold up in wind.
What lumber should I use with these brackets?
Pressure-treated pine is the budget standard, cedar the upgrade for rot resistance and looks. Let pressure-treated stock dry a few weeks before staining, and check it for crown and twist at the yard.
Can one person install a bracket kit?
The post bases and brackets, yes. Lifting and setting beams solo is asking for trouble, so plan on a second pair of hands or temporary bracing for that stage.
How long does a DIY bracket pergola take?
Budget a weekend: footings and post setting on day one, beams and rafters on day two. Add a day if you’re mixing concrete rather than mounting to an existing slab.
Final Thoughts
If you want a finished structure without a lumber run, the Backyard Discovery Beaumont cedar kit is the most complete package on this list. Makers sourcing their own material should look at the 13-gauge steel bracket kit for flat-roof builds, or the 30° slanted whole-set kit if drainage and snow load are part of your reality.