Key takeaways
- Calibrate the finder on a blank section of wall first.
- Slide slowly; moving too fast causes missed or false readings.
- Confirm each stud from both directions to pinpoint its true center.
- Use a magnetic finder like the Zircon to double-check by locating the drywall screws.
Garage walls are prime storage real estate, but a shelf loaded with paint cans and power tools can weigh well over a hundred pounds, and drywall alone will never hold it. The secret to shelving that stays put is anchoring into the wall studs, the vertical wooden framing hidden behind the drywall. A stud finder locates that framing in seconds, turning a risky guess into a secure, professional installation.
This guide teaches you how to use a stud finder correctly and then mount heavy garage shelving that will hold up for years. Whether you use an electronic detector like the HART 9-sensor model or a battery-free magnetic finder such as the Zircon StudScout, the process of finding, marking, and anchoring into studs is the same, and getting it right is the difference between a shelf and a disaster.
Our top picks


As an Amazon Associate we earn from qualifying purchases at no extra cost to you. Ratings are shown as listed on Amazon.
⚡ Save on Your Next PC — Amazon Prime
Prime members get fast free shipping on the systems above, plus early access to Prime Day & Black Friday PC deals. New members get a 30-day free trial.
Watch: How to Use a Stud Finder to Mount Shelving in Your Garage — Video Review
How Studs and Stud Finders Work
Wall studs are typically spaced 16 inches apart on center, sometimes 24 inches, and run vertically from floor to ceiling. Electronic stud finders like the HART with 9 sensors detect the change in density behind the drywall, while magnetic finders such as the Zircon StudScout locate the metal screws or nails that fasten the drywall to each stud. Knowing the standard spacing helps you predict where the next stud sits once you find the first.
Locating and Marking the Studs
Place the stud finder flat against the wall a few inches to one side of where you want the shelf, press the button to calibrate, and slide it slowly sideways until it signals a stud edge. Mark that spot, continue until it signals the opposite edge, and mark the center between them, that is your fastening point. Then measure 16 inches over to find the next stud and confirm it with the finder before committing.
- Calibrate the finder on a blank section of wall first.
- Slide slowly; moving too fast causes missed or false readings.
- Confirm each stud from both directions to pinpoint its true center.
- Use a magnetic finder like the Zircon to double-check by locating the drywall screws.
Choosing the Right Shelving and Anchors
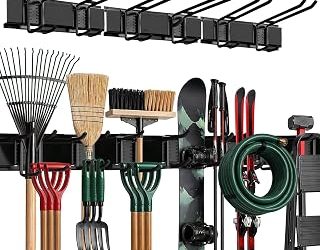
For heavy garage loads, choose stud-mounted steel shelving rather than plastic brackets. Systems like the StoreYourBoard garage wall shelves, rated to hold 200 to 500 pounds, and the Pro Tool Finder rack with welded hooks rated to 650 pounds are built to bolt directly into studs. Drive lag bolts or heavy screws through the shelf bracket into the marked stud centers, never relying on drywall anchors alone for anything heavy.
Mounting the Shelf Level and Secure
Hold the shelf or its mounting rail against the wall, align your fastener holes with the marked stud centers, and use a level to keep it straight before drilling pilot holes. Pilot holes prevent the studs from splitting and make driving the lag bolts easier. Tighten each fastener firmly into solid wood, then tug and lean on the installed shelf to test it before loading it with weight. A ceiling-mounted rack like the HyLoft follows the same principle, anchoring into ceiling joists.
Tips
- Mark with painter’s tape: Note stud centers on tape so you can reposition the shelf without pencil marks all over the wall.
- Always pilot drill: A pilot hole stops the stud from splitting and keeps lag bolts driving straight.
- Distribute the load: Anchor into at least two studs and keep the heaviest items centered over fasteners.
- Verify with a magnet: A magnetic finder confirms an electronic reading by snapping to the drywall screws in the stud.
Frequently Asked Questions
How far apart are wall studs usually?
Most homes space studs 16 inches apart on center, though some use 24 inches. Once you locate the first stud, measure over 16 inches to predict the next and confirm it with your finder, since spacing can vary near corners, doors, and windows.
Electronic or magnetic stud finder, which is better?
Electronic finders like the HART locate the stud itself and often mark its edges precisely, while magnetic finders such as the Zircon are foolproof, need no batteries, and find the drywall screws. Many DIYers keep a magnetic one as a reliable backup to confirm electronic readings.
Can I mount shelves without hitting a stud?
For light loads you can use rated drywall anchors, but for heavy garage shelving holding tools and paint, you must anchor into studs. Drywall anchors alone will eventually pull out under heavy weight, dumping the shelf and its contents.
What fasteners should I use for heavy shelving?
Use lag bolts or heavy-duty structural screws long enough to bite deep into the stud, typically driven through the shelf bracket after drilling a pilot hole. Match the fastener to the shelf’s rated capacity, like the 500-pound StoreYourBoard or 650-pound Pro Tool Finder rack.
Conclusion
Mounting garage shelving is straightforward once you can find the studs. Calibrate your stud finder, locate and mark the stud centers, choose heavy-duty stud-mounted shelving like the StoreYourBoard or Pro Tool Finder rack, pilot drill, and anchor firmly into solid wood with a level to keep it straight. Do it right and your walls will carry hundreds of pounds of gear safely for years to come in 2026.