To learn how to seal a garage door, start by finding the specific opening that lets air, water, insects, or debris through. Most sectional garage doors rely on three separate barriers: a flexible bottom gasket, weatherstripping along both jambs and the header, and sometimes a threshold attached to the floor. Replacing the wrong one rarely solves the underlying gap.
Quick Answer: Close the door and locate daylight around its edges. Match the existing bottom-seal profile to its retainer, replace cracked or flattened rubber, install flexible stop molding along the sides and top, and add a floor threshold only if the floor condition calls for one. Retest normal door movement and the opener’s automatic reversal system afterward. Do not adjust springs, cables, or track hardware to make a seal fit.
Sealing is a modest DIY project when the door is structurally sound and moves correctly. If it hangs crooked, drags on one side, or has damaged lifting cables, weatherstripping is not the repair. A qualified garage-door technician should evaluate the moving system first.
As an Amazon Associate we earn from qualifying purchases.
By DIY Ideas 4 Home Editorial Team
Identify the Source of the Garage Door Gap
Garage-door leaks are not interchangeable. Water running beneath the center of the door may indicate a deteriorated bottom gasket or a sloped slab. Daylight down the vertical edges usually indicates worn stop molding. Water appearing beside the frame can originate in exterior trim, flashing, siding, or grading rather than the door seal itself.
Check the Bottom, Both Sides, and the Top
On a dry day, close the garage door and switch off the garage lights. Stand inside and inspect the full perimeter for light. Mark gaps with removable tape. If your door has windows, distinguish light through glazing from an actual perimeter opening. Have a helper observe the outside only while the door is stationary.
Pay special attention to the corners where the bottom gasket meets the side seals. A seal may appear complete across a straight section yet leave a triangular gap at either end. Also inspect the rubber for compression set, brittle spots, tears, and shrinkage. These symptoms typically call for replacement rather than another layer of adhesive.
Rule Out Door Alignment and Drainage Problems
Check whether the bottom edge follows the slab evenly. If the door is visibly out of level, one corner touches before the other, or the door binds during travel, stop. These conditions can reflect track, roller, cable, or spring problems that are not safe weatherstripping adjustments. Likewise, standing water outside the opening requires attention to driveway slope, drainage, and surface runoff.
A threshold may help redirect shallow wind-driven water at the edge, but it is not a substitute for a drain or grading correction. High floodwater can pass around or over a threshold. Do not permanently block required drains or install material that creates a tripping hazard on the pedestrian path.
Choose the Right Weatherstripping and Tools
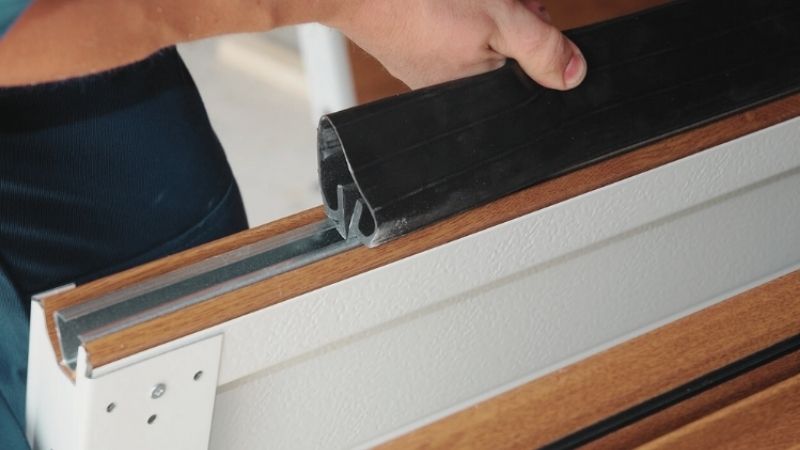
Clopay’s garage-door seal guidance distinguishes retainer-mounted bottom seals, perimeter stop seals, and floor thresholds. Match the existing mounting system before purchasing materials. A gasket that is the correct width but has the wrong T-end or bead profile may not fit the aluminum retainer.
| Location | Suitable Material | How to Choose | Common Mistake |
|---|---|---|---|
| Door bottom | Compatible vinyl, rubber, or EPDM-style bulb/U/T gasket | Match retainer channel and door width; verify product temperature rating | Buying by width without checking end profile |
| Side jambs and header | Garage-door stop molding with flexible fin | Choose enough length for two sides and the top; compatible mounting surface | Pressing fin so tightly that it binds the moving door |
| Concrete floor | Garage threshold strip and manufacturer-approved adhesive | Assess floor flatness, vehicle clearance, and drainage | Using a threshold to hide an unbalanced door |
| Fixed gaps outside frame | Exterior-rated paintable or compatible caulk and backer rod | Fit the substrate and joint width | Caulking an operational door panel to the jamb |
Measure the Existing Bottom Seal Profile
Raise the door only when safe to do so, disconnect automatic power during the installation, and inspect the open bottom retainer from the end without disturbing its support hardware. Common designs include twin T-ends, U-shaped bulbs, and round beads. Photograph the cross section and take measurements before shopping. Some doors require a manufacturer-specific seal.
Measure the full door width and check whether the bottom retainer has a clear entry on one side. Buy slightly more gasket length than the measured width when the product instructions allow trimming. Choose an outdoor-rated material that remains flexible under local winter conditions; cheap brittle strips can create new gaps after a cold season.
Gather a Small, Safe Tool Kit
For most replacement jobs, prepare a tape measure, flashlight, work gloves, safety glasses, soft brush, mild soap, clean rag, scissors or utility knife, and compatible fasteners for stop molding. Floor thresholds additionally require a chalk line or pencil and the adhesive specified by the threshold maker. Use a stable step stool only where the working height demands it; keep your hands away from hinges and rollers.
Never remove the bottom bracket, loosen cable anchor bolts, or reposition spring hardware to free the retainer. Those components may be under dangerous stored tension. If the bottom weather seal cannot be replaced without removing loaded hardware, have a qualified installer handle the job.
How to Seal a Garage Door in 8 Steps
This sequence assumes a typical sectional overhead door that is otherwise operating smoothly. Read the door and seal manufacturers’ instructions; an unusual door type may use a completely different gasket or fastening approach.
Step 1: Document the Draft and Make the Door Safe
Take photos of the gaps and identify which parts require replacement. Clear boxes, bicycles, cords, and tools from the opening. Fully close the door before disconnecting opener power so it cannot move unexpectedly while you work. Never pull the emergency-release cord on an open door that might be unbalanced; an open door can drop unexpectedly.
Inspect visible springs and cables from a distance. If a cable is frayed, a spring has a visible separation, or one side is noticeably lower, do not continue. Sealing cannot correct a mechanical fault. For a sound door, plan separate installation steps for bottom, sides, header, and any fixed perimeter cracks.
Step 2: Remove the Old Bottom Gasket
Access the retainer as allowed by the door manufacturer. On many doors, the old gasket slides out of one end of a bottom channel. Gently ease the strip out without levering against high-tension brackets. If the gasket sticks, clean exposed grime and use a little mild soapy water where permitted. Do not force a metal tool against a thin aluminum channel.
Photograph the old strip and compare it with the replacement. If it was retained by staples, screws, or a proprietary panel system, follow that system’s instructions instead of assuming the new gasket should slide through a track. Leave cable anchor brackets untouched.
Step 3: Clean and Inspect the Retainer
Brush out sand, salt residue, and debris. Wipe the slot with a damp cloth and dry it. Look for bent rails, loosened sections, or a corroded retainer. A damaged retainer may prevent the replacement seal from seating even when the seal profile matches.
Do not reshape structural brackets or drill near lift-cable attachment points. If the channel is crushed at a hazardous location, seek service. A clean, undamaged track lets the new gasket slide without twisting, reducing the chance that it will tear at the entrance.
Step 4: Install and Trim the New Bottom Seal
Feed the gasket into the compatible channel a little at a time. Keeping both ends aligned matters more than pulling hard; a helper can support the unused length and keep it straight. Use only installation lubricant or soapy water expressly allowed by the gasket manufacturer. If resistance increases, stop and look for a fold or retainer obstruction.
Center the gasket and trim any excess according to product instructions. Leave enough length for its ends to sit properly inside the corners; a strip cut short can create a persistent gap. Inspect the bottom edge while stationary, then proceed to the jamb seals.
Step 5: Replace Side and Top Stop Molding
Remove deteriorated stop molding from the garage-door opening frame, taking care not to damage sound trim. Clean the jambs and verify that wood or other substrate can hold new fasteners. A rotten jamb needs repair first; attaching new weatherstripping over decay does not create a durable seal.
With the door closed, position the flexible fin so it contacts the face of the door lightly. Fasten the molding to the stationary frame, not the moving door, using a schedule and fastener type suitable for the substrate. Do the top first or sides first as the product design directs. Maintain uniform contact at the corners without crushing the fin.
Step 6: Seal Stationary Trim Cracks
Examine the seam between fixed door trim and surrounding wall materials. If daylight appears through a stationary exterior joint, remove loose old caulk, clean the surface, and apply an exterior sealant appropriate for the substrate and expected movement. Large joints may require foam backer rod before caulking.
Do not caulk a door panel to the frame, bridge expansion joints without appropriate products, or block intentional drainage channels. On attached garages, remember that the door between the garage and the house also needs a good seal to reduce transfer of exhaust and other pollutants; exterior garage-door work does not replace that separation.
Step 7: Add a Floor Threshold Only If Needed
If the bottom gasket is sound but a shallow floor depression admits wind-driven rain, a properly selected threshold may help. With the door closed, dry-fit the strip and mark its position. Check that it does not interfere with the bottom gasket, door closing limit, vehicles, or floor drainage. Clean and dry the concrete, then bond the threshold according to its manufacturer.
Allow the specified curing time before opening the door or driving across it. Do not assume all products need exactly one day; adhesive temperature and humidity requirements vary. A damaged slab, repeated flooding, or a large uneven opening usually calls for a more extensive repair.
Step 8: Restore Operation and Test the Safety System
Once the seal and any adhesive are ready, restore opener power, clear the doorway, and watch a full open-and-close cycle. The door should move freely, without the new stop molding catching on panels or rollers. Confirm that the bottom seal compresses rather than folds and that daylight has been reduced at the target locations.
Test the photo-eye sensors and the opener’s contact-reversal system following the model manual. Chamberlain specifies reversal when the closing door contacts a 1-1/2-inch object or a 2×4 laid flat. If the test fails, stop using the automatic opener and arrange professional correction; never increase closing force merely to overpower fresh weatherstripping.
Troubleshoot Remaining Garage Door Leaks
Why Is There Still a Gap Under One Corner?
A localized gap can be caused by an uneven slab, a bottom gasket that is too short, or a door that does not hang level. Inspect with the door stationary. If the door moves normally and the slab has a minor depression, use a manufacturer-approved bottom seal suited to uneven floors. If the door looks crooked or binds, stop and request a mechanical inspection.
Why Does the New Side Seal Make Closing Hard?
Weatherstripping should touch the door without becoming a brake. Overcompressed molding, misplaced fasteners, or a warped jamb can make the door labor or reverse. Remove the obstruction or refit the stationary stop molding; never change opener force settings to hide the interference. A heavy or sticky door can damage the opener and defeat its safety behavior.
Can Weatherstripping Stop Heavy Rain and Flooding?
It may reduce minor rain splash and wind-driven water, but a garage door is not a flood barrier. If water pools against the opening during storms, improve drainage and inspect the driveway pitch. For repeated water entry, consider a drainage specialist or a waterproofing contractor. Treat claims that a stick-on threshold alone will stop floodwater with skepticism.
FAQs About Garage Door Sealing
Should I Put a Seal on the Garage Door or the Floor?
Begin with the door’s existing bottom gasket and perimeter molding. A floor threshold is an optional second measure when the slab is uneven or shallow water entry persists. Choose based on the actual leak location and the door manufacturer’s design.
Can I Replace a Garage Door Bottom Seal Myself?
Often yes, if the retainer and weather seal are accessible without touching tensioned components. A slide-in replacement can be straightforward. Stop if replacing it requires removing the cable anchor, adjusting springs, or working on a poorly balanced door.
What Is the Best Material for Garage Door Weatherstripping?
The best choice is the compatible one that remains flexible in your climate. Rubber-like EPDM, flexible vinyl, and other purpose-made garage-door profiles may all be suitable. Profile geometry, dimensions, UV exposure, and temperature rating are more important than material labels alone.
Do I Need to Seal the Door Between My Garage and House?
Yes, attached garages should be separated from living space with appropriate weatherstripping and an intact, code-compliant door assembly. The EPA recommends sealing leaks between garages and occupied rooms to reduce pollutant transfer. Do not compromise fire-rated or self-closing requirements.
How Often Should I Check Garage Door Seals?
Inspect them when seasons change and after extreme weather, or whenever you see water, debris, pests, or daylight. Replace seals that are torn, brittle, permanently flattened, or no longer seated. The actual interval depends on climate and door usage, not a fixed calendar date.
Final Thoughts
The practical way to approach how to seal a garage door is to diagnose before buying. Fit the correct bottom gasket, replace the side and top seals, repair stationary frame gaps, and reserve floor thresholds for cases where they address a real floor-related leak. A straight, smoothly operating door should remain the priority.
Finish with a visual gap check and both opener safety tests. If the door is misaligned, noisy, unusually heavy, or unable to reverse properly, do not keep adding seal material. Mechanical repairs belong with a qualified garage-door professional.