Learning how to insulate exposed pipes starts with a simple job: measure the water line, choose insulation made for its temperature and location, fit the material snugly, and seal each seam and joint. On accessible household supply pipes, pre-slit foam sleeves are usually a practical DIY option. The details matter, though. A sleeve that is too large, a bare elbow, or a damp seam can undermine the job, while insulation alone may not keep a pipe from freezing in an unheated garage or crawl space.
Quick Answer: First confirm that the pipe is a safe, intact domestic water line. Measure its outside diameter and exposed length; buy compatible closed-cell foam sleeves with the correct inside diameter. Clean and dry the pipe, cut sleeves to fit, close the longitudinal seams, insulate bends and tees, seal adjoining pieces with approved tape, and check that shutoffs and service points remain accessible. For outdoor exposure, extreme cold, high-temperature equipment, or suspected asbestos insulation, use a location-specific plan rather than ordinary indoor foam.
The goal is not just to hide shiny metal or plastic. Hot-water insulation slows unwanted heat loss. Cold-water insulation can limit moisture forming on a chilled pipe in humid air. In cold areas, it may delay freezing, but it does not generate heat. This guide explains an insulation-installation project, not how to winterize an entire plumbing system or thaw a pipe that is already frozen.
As an Amazon Associate we earn from qualifying purchases.
By DIY Ideas 4 Home Editorial Team
Before You Start: Identify the Pipe and Its Exposure
Not every exposed pipe is the same. A half-inch water line beneath a kitchen sink faces different conditions from a copper hot-water run beside a gas water heater, a pipe above an unheated garage, or a steam-heating line. Identify both the piping system and the environment before cutting a sleeve. If you cannot confidently identify the line, stop and ask a plumber or qualified technician.
Which Exposed Water Pipes Should You Insulate?
Prioritize accessible domestic hot-water lines near the water heater and along the route to fixtures. Insulation helps retain heat that would otherwise be lost to a basement or utility room. Cold-water lines deserve attention where they sweat in humid conditions or pass through areas that become cold. Under-sink pipes against an exterior wall, unfinished basement runs, and safe-to-access crawl-space lines are common candidates. Check exposed sections near wall penetrations and rim joists, where air leaks may make a pipe colder than the surrounding room.
Look at the entire run rather than only the straightest portion. A bare metal fitting between two insulated sections can still exchange heat with the air. You should also notice whether the pipe is actively dripping from a leak; wrapping it before repair could hide damage and trap water against building materials.
When Is Foam Insulation the Wrong Material?
Do not assume standard polyethylene foam belongs next to a flue, on a steam line, or against equipment with high operating temperatures. The U.S. Department of Energy’s Building America guidance specifies keeping insulation at least 6 inches from the flue of a gas water heater and identifies fiberglass or mineral wool for piping near that area, subject to the equipment instructions and actual clearance. Follow manufacturer and local code requirements; when the clearance or surface temperature is uncertain, hire a professional.
Likewise, fire-sprinkler systems, refrigerant lines, boiler distribution piping, and gas piping may need specialized approved materials and service access. This DIY guide is limited to ordinary, accessible residential water-supply pipes. Do not install foam over a visibly hot, unidentified line merely because the diameter matches.
Check for Leaks, Corrosion and Older Pipe Wrap
Inspect pipe joints, nearby framing, cabinet floors, and existing coverings for dampness or stains. Repair active leaks before insulating. If a pipe is already frozen, wait until it has been safely thawed and examined for splits; insulating a frozen section is not a thawing method. Severe corrosion or a visibly unsupported pipe is also a reason to correct the plumbing first.
In older homes, some pipe insulation may contain asbestos. Do not scrape, tear, cut, sand, or vacuum suspicious old wrap. Federal health guidance warns that disturbing certain older insulation can release fibers. Arrange assessment by an appropriate trained professional before touching it. Never fit new sleeves by crushing an unknown, crumbly covering.
Choose the Right Insulation for Exposed Pipes
Selection depends on four factors: pipe outside diameter, service temperature, moisture exposure, and environmental conditions. For an everyday accessible water line in a conditioned or partially conditioned space, a closed-cell sleeve may be sufficient. Other settings need different materials, jacket systems, or supplemental freeze protection.
| Material or Method | Best Use | Important Limitation |
|---|---|---|
| Pre-slit closed-cell foam sleeve | Accessible household hot- and cold-water supply pipes at temperatures permitted by the product | Must match pipe size; ordinary foam may not tolerate high heat or outdoor UV and weather |
| Elastomeric rubber foam insulation | Cold lines where a continuous moisture-resistant vapor seal is important | Check temperature, indoor/outdoor rating, and adhesive compatibility |
| Foam or fiberglass wrap | Irregular fittings or locations a rigid-length sleeve cannot easily cover | Must be applied without open gaps; fiberglass may require a sealed facing or jacket |
| High-temperature fiberglass or mineral-wool sleeve | Selected hot piping where temperature ratings and equipment clearances demand it | May need protective jacket and professional installation |
| Approved electric heat-trace system | Selected freezing-risk pipes when allowed for the pipe type and location | Electrical/fire risks; follow the exact system instructions and use a professional when appropriate |
Foam Sleeves Versus Pipe-Wrap Insulation
Foam sleeves are fast to fit on long straight runs. Many have a factory slit and a pressure-sensitive closure; others need a compatible tape or adhesive to hold the lengthwise seam closed. Sleeves also provide a consistent thickness when they are the right size. This makes them a useful first choice for under-sink or basement supply lines with reasonable access.
Wraps are more adaptable around unusual shapes, brackets, and fittings, but sloppy overlaps create cold spots or compress the insulating layer. Use a wrap rated for the pipe and follow its manufacturer’s overlap, adhesion, and moisture-sealing instructions. Do not treat ordinary household packing tape as an insulation product.
How to Measure Pipe Diameter and Insulation Length
Measure the pipe’s actual outside diameter, not just a nominal plumbing size printed on a label. Nominal half-inch copper and nominal half-inch PEX, for example, are not universally the same physical outside diameter. The sleeve’s specified inside diameter must match the actual tube outside diameter. If you have no caliper, measure circumference with a flexible tape and divide by approximately 3.14; check the product sizing chart rather than guessing.
Measure the visible length of each section, including the areas around elbows and tees. Note the number of straight runs, bends, branch joints, and supports. Purchase enough material for those shapes and a small cutting allowance. Also check the insulation wall thickness, rated operating temperature, whether it has a closed-cell structure, and whether a UV- or weather-resistant outer jacket is required.
Supplies and Tools Checklist
For an ordinary water-supply line you can safely reach, assemble a tape measure, pencil or marker, scissors or a sharp utility knife, cleaning cloths, the correctly sized insulation, and the tape or adhesive specified by the insulation manufacturer. Preformed elbow covers or compatible wrap make complex fittings neater. Wear gloves and eye protection when cutting; keep hands behind the blade and use a stable cutting surface away from the pipe.
If you choose fiberglass or mineral wool, wear the protective clothing, gloves, goggles, and suitable dust protection recommended by the manufacturer. Use an appropriate facing or vapor barrier where needed. For accessible penetrations through a building enclosure, compatible caulk or approved foam sealant may also be required; check fire-stopping rules before sealing penetrations through rated assemblies.
How to Insulate Exposed Pipes: 8 Step-by-Step Instructions
These eight steps cover installation on a visible, sound household water pipe using properly rated pre-slit tubular insulation. Work in a dry location with stable footing. Never alter a pressurized joint, remove a shutoff, or use a powered cutting tool on the plumbing itself. Allow a water-heater-connected hot line to cool enough to work comfortably before handling it.
Step 1: Map the Run and Mark Every Fitting
Trace the pipe from one accessible endpoint to the other. Identify sections close to exterior walls, areas beneath sinks, and places where the line passes through a garage ceiling or basement rim joist. Mark branch connections, elbows, valves, hangers, and the end of your safe working area. A quick sketch prevents you from cutting every piece to the same length when some sections need special treatment.
Plan how the completed sleeve will fit around the pipe without blocking a shutoff handle, identification label, relief outlet, drain point, or manufacturer-required clearance. If a pipe is crammed behind electrical wiring or combustion equipment, do not reach or cut blindly.
Step 2: Measure and Dry-Fit the Correct Sleeve
Check the pipe outside diameter against the sleeve’s labeled inside diameter. Open the sleeve slit gently and test a short section over the pipe. It should surround the pipe neatly without forcing it closed or leaving a large loose cavity. Check that the insulation thickness fits beneath nearby shelves or brackets without crushing.
Dry-fit the length before peeling any self-sealing adhesive liner. This gives you time to adjust orientation and decide whether a bend will need two angled sections or a preformed fitting. A sleeve that is too loose should be exchanged, not packed with scrap material to make it seem snug.
Step 3: Clean and Dry the Pipe Surface
Wipe away dust, loose dirt, and surface moisture using a clean cloth. The pipe should be dry before closing insulation around it, especially on chilled lines where trapping moisture could conceal a leak or reduce the performance of an adhesive seam. If condensation immediately returns, consider whether the room has a humidity problem and select a closed, moisture-resistant installation suited to that condition.
Do not disturb older coatings, scrape suspected asbestos wrap, sand corroded metal aggressively, or apply chemical cleaners not approved for the pipe. If you find an active leak or serious corrosion during cleaning, pause the insulation job until the underlying problem is assessed and repaired.
Step 4: Cut Straight Pieces to Their Actual Lengths
Transfer each measurement to the sleeve and cut it squarely with scissors or a sharp knife. Cut on a protected surface, not while the sleeve is pressed against the water pipe. The pieces should meet end to end without a visible gap, while remaining long enough to cover the run when fully seated. Avoid stretching foam along the pipe; it may retract and open gaps later.
For long horizontal runs, work in sections that you can control easily. On a vertical line, plan a secure fit so the covering does not slide downward. If a fitting interrupts the straight run, finish the straight cut cleanly and make a shaped piece for the fitting rather than leaving it uncovered.
Step 5: Open the Split and Fit Sleeves Around the Pipe
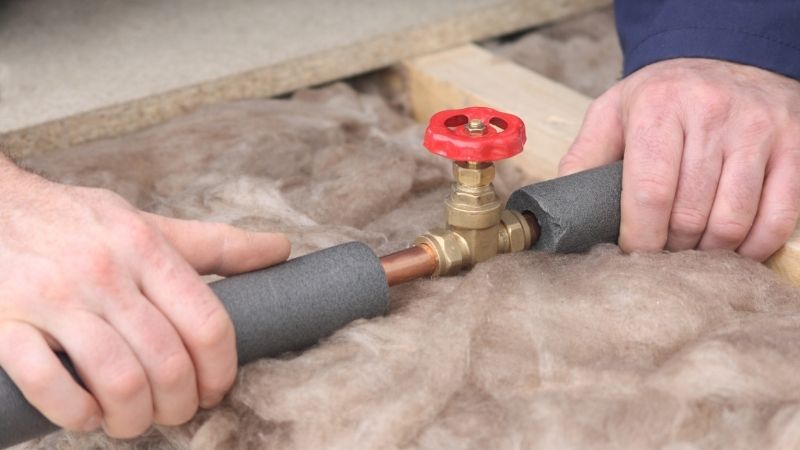
Gently open each pre-slit sleeve and press it around the water line. For conventional tubular foam, DOE’s Building America instructions show the slit facing downward. This orientation helps create an orderly closure; if your product specifies a different orientation, follow that instruction. Ensure the insulation sits against the pipe consistently and does not interfere with existing supports.
Install one section at a time. When a section meets another, bring the ends into close contact rather than relying on tape to bridge an open inch of exposed pipe. Examine the back side with a flashlight or mirror if the pipe runs near a wall. A sleeve that appears closed from the front may be open where you cannot immediately see it.
Step 6: Seal the Lengthwise Seams and Butt Joints
If the sleeve is self-sealing, remove the release liner and press the seam together along its entire length following the manufacturer’s directions. For non-self-sealing material, use an approved adhesive or insulation tape compatible with that foam and its temperature rating. DOE guidance describes adding acrylic or aluminum foil tape over seams and where sleeve lengths meet to improve durability.
Cold-water lines that sweat require particular care: a break in the outer vapor seal can allow humid air to reach the cold pipe and condense under the insulation. Seal the longitudinal seam, cross joints, and suitable fitting transitions according to the insulation system. Do not apply tape across a leaking pipe and call it waterproof.
Step 7: Shape and Cover Elbows, Tees and Transitions
Use preformed fitting covers when available. Otherwise, make accurate mitered cuts so sections meet around an elbow, or install a compatible insulating wrap designed for fittings. For a typical right-angle elbow, matching angled faces can form a tight corner. Practice with an offcut first rather than trimming toward the pipe while holding a knife in a confined space.
A tee needs separate pieces for the straight section and branch. Close the transition so as little pipe surface as possible remains exposed without sealing over a part that must be inspected or operated. Valve bodies may need specialized removable covers. Never immobilize the valve handle, obscure a drain, or bury a device’s service label behind permanent adhesive.
Step 8: Secure, Inspect and Recheck the Finished Run
Fasten the covering using the method and spacing approved for your product. DOE examples show tape, ties, clamps, or wire at roughly 1- to 2-foot intervals, but these should hold the sleeve rather than squeeze its insulating thickness flat. Check the whole line for split seams, disconnected ends, exposed fittings, crushed sections, and loose pieces at bends.
Confirm that support brackets still carry the pipe itself, not the foam. Check that valves operate and that no covering touches a prohibited hot surface. On a cold-water line, revisit the installation on a humid day to look for sweating at seams. After the first seasonal temperature change, inspect for slipped sleeves or adhesive failure and repair gaps before moisture or cold can work underneath them.
Special Locations: Garages, Crawl Spaces, Outdoors and Water Heaters
Room conditions determine whether insulation alone is an appropriate solution. A pipe can be surrounded by foam yet still fall below freezing if its surroundings remain cold long enough. The best correction may include air sealing, continuous heat, rerouting plumbing, a specialized jacket, or professionally installed freeze-protection equipment.
Exposed Pipes in an Unheated Garage or Crawl Space
Begin with a check for cold air entering around rim joists, utility openings, garage-door gaps, or crawl-space vents. Properly sealing building-envelope gaps can sometimes be as important as wrapping the pipe itself. Insulate the entire safe-to-access run and correct missing surrounding building insulation where appropriate. In very cold regions or where temperatures stay below freezing, consult a plumber about relocating vulnerable sections into a conditioned space or installing an approved freeze-protection system.
Never assume that a particular thickness of foam guarantees a pipe will not freeze. A pipe needs a heat source or enough retained heat and flow to stay above freezing; insulation can only slow the exchange. A power failure can also defeat electrically heated protection, so have a water-shutoff and emergency plan for exposed plumbing.
Outdoor Water Pipes Need Weather-Rated Protection
Indoor sleeves may degrade when exposed to sunlight, water, or physical impact. Outdoor pipes require materials specifically rated for the pipe’s temperature range and environmental exposure, often including an approved protective jacket. Seal and protect joints as the manufacturer requires, and ensure the installation sheds water instead of holding moisture around the pipe.
Outdoor faucets and irrigation branches often need draining or a different seasonal procedure; a decorative foam cover is not a substitute for properly shutting down a vulnerable line. Underground service piping and exposed backflow-prevention assemblies may also fall under local utility or plumbing requirements. Consult the responsible utility, installer, or licensed professional before changing those systems.
Hot Water Lines Near a Water Heater
Insulating accessible hot-water supply pipes can improve hot-water delivery efficiency. DOE guidance highlights insulating the sections near a water heater, and recent DOE weatherization job aids discuss insulating at least the first six feet of both hot and cold piping to specified performance levels in applicable programs. Those program details are not a universal DIY code requirement; follow the water-heater manufacturer, product rating, and local rules.
Do not block combustion-air openings, a draft hood, a gas flue, pressure-relief discharge piping, service panels, or safety labels. The Building America DIY guide instructs keeping insulation at least 6 inches from the gas-water-heater flue and using safer high-temperature materials where conditions warrant. A heat-pump or electric water heater may have different equipment clearances, so check its manual rather than copying another installation.
Cold Water Pipes That Sweat in Humid Weather
Cold water flowing through a hot, humid basement may cool the pipe surface enough for airborne moisture to condense. A closed-cell or properly jacketed insulation system works by reducing heat transfer and keeping humid air away from that chilled surface. A neat vapor seal is therefore critical: a gap at a seam or elbow can allow condensation beneath the insulation even when the rest looks complete.
If water continues to appear outside the sleeve, confirm that the moisture is really condensation rather than a pinhole leak. Then inspect the seam and consider indoor humidity control. Insulation cannot fix an active leak, basement flooding, or an excessively damp indoor environment by itself.
Mistakes to Avoid and When to Call a Professional
Most ordinary sleeve-installation problems are preventable by choosing the correct material and checking details before and after fitting. Problems involving fire, electrical heat-trace systems, suspect insulation, or hidden plumbing deserve a more cautious approach.
Five Common Installation Errors
Choosing by nominal pipe size alone: the sleeve’s inside diameter may not match the pipe’s actual outside diameter. Measure before buying. Leaving fittings bare: heat and moisture can find open elbows, tees, and branch joints. Cover compatible fittings without hiding controls. Closing insulation over water: trapped dampness may conceal a leak or encourage deterioration. Dry and inspect first.
Crushing the insulation under tight ties: excessive compression reduces thickness and makes the finish look uneven. Secure it without flattening the sleeve. Using the wrong product in the wrong location: ordinary indoor foam is not automatically rated for heat, outdoor sun, or constant wet exposure. Always match its temperature and environmental markings to the job.
Heat Tape Is Not a Substitute for Safe Installation
Some freezing-prone pipes may need an approved thermostatically controlled heat cable. However, electric heat tape is a separate electrical system, not simply another layer of passive insulation. The Consumer Product Safety Commission warns that incorrect overlap, the wrong cable for the pipe, and excess covering can create fire hazards. Some systems specifically prohibit particular types of insulation or crossings; use only the combination and installation layout authorized by that system’s instructions.
Do not wrap a random extension cord or home heating pad around plumbing. Do not cover a heat cable with foam just because it fits; follow the cable manufacturer’s exact material, clearance, grounding, and outlet requirements. In hard-to-reach spaces or where dedicated electrical work is required, hire a qualified installer.
Warning Signs That Require a Plumber or Specialist
Call a plumber for recurrent pipe freezing, unknown pipe materials, a line that passes through a sealed wall, a failed shutoff, major corrosion, or water stains that might indicate hidden damage. Consult an HVAC or boiler specialist for high-temperature steam or hydronic lines. If older pipe wrap may contain asbestos, obtain qualified evaluation before disturbing it.
Also seek professional help if the planned insulation would interfere with gas-burning equipment, required fire protection, or a serviceable mechanical component. A safe installation should leave the pipe more protected without making future inspection or emergency access harder.
FAQ: Insulating Exposed Water Pipes
Is Foam Pipe Insulation Enough to Prevent Freezing?
Not always. Foam slows the transfer of heat but does not warm a pipe. It can reduce freezing risk when water and surrounding conditions retain enough heat, yet a line in a cold garage, attic, or crawl space may still freeze during an extended cold spell. Air sealing, reliable heat, approved heat trace, or rerouting may be necessary depending on the conditions.
Should You Insulate Both Hot and Cold Water Pipes?
Often, yes, but for different reasons. Insulate accessible hot-water supply lines to reduce unwanted heat loss. Insulate cold lines where condensation is a concern or where they cross colder spaces. Prioritize the plumbing most exposed to temperature extremes and choose insulation that is suitable for that pipe, temperature, and location.
Can You Put Foam Sleeves on Copper and PEX Pipes?
Usually, provided the product is rated for the water-line temperature and environmental conditions and the inside diameter matches the specific pipe’s outside diameter. Copper and PEX plumbing with similar nominal sizes may not have identical outside diameters. Confirm the pipe dimensions and product label instead of forcing one generic sleeve onto every line.
Do You Need to Tape the Seams of Pipe Insulation?
Follow the insulation manufacturer’s closure instructions. Self-sealing sleeves use their factory adhesive; compatible tape may improve durability at seams and butt joints. On cold lines subject to condensation, continuity of the vapor seal is especially important. Use materials made for the insulation system rather than assuming any household tape will provide a durable seal.
Can You Insulate a Pipe That Is Already Wet or Frozen?
Do not wrap a leaking or frozen pipe as a quick fix. First determine why it is wet, restore the pipe to safe service, inspect for cracks or leaks, and dry its surface. If water is condensation, select and install a properly sealed system after addressing persistent dampness. If you suspect a break, isolate the supply if safe and call a plumber.
Final Thoughts
The most reliable approach to how to insulate exposed pipes is a careful sequence: identify the water line, measure its actual outside diameter, choose the right insulation for its heat and moisture exposure, and close every section so the pipe covering is continuous. Straight foam sleeves are approachable for many DIY homeowners, but elbows, valves, vapor seams, and clearance from hot equipment deserve as much attention as the easy straight runs.
Inspect the finished work periodically, especially after humid weather or a hard freeze. Remember that insulation slows heat transfer; it cannot replace an appropriate heating, drainage, or freeze-protection plan for a pipe left in a persistently freezing environment. When the job involves suspected asbestos, gas flues, damaged plumbing, concealed lines, or electric heat trace, the safer solution is qualified help rather than an improvised wrap.