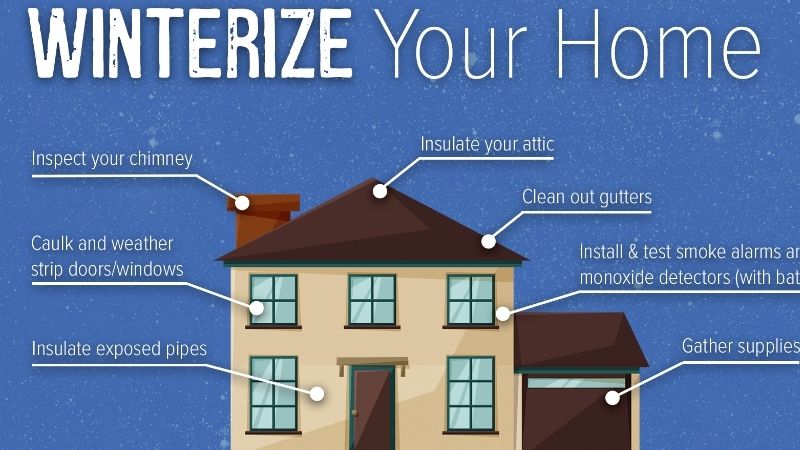
Preparing a house for freezing weather means reducing cold drafts, protecting vulnerable plumbing, confirming that the heating system works, and planning for a winter power outage. Learning how to winterize a house is manageable as a series of checks, although major attic, roof, gas, and electrical repairs belong with qualified contractors. Allow a weekend for a basic inspection and small repairs if supplies are on hand; the actual time depends on the building and what you uncover.
Quick Answer: Walk the property first, fix water-entry problems, seal door and window drafts, protect at-risk pipes, inspect attic insulation, service heating equipment, and test emergency safeguards. Do the work before repeated freezing nights arrive, and prioritize water leaks or heating faults over cosmetic weatherproofing.
As an Amazon Associate we earn from qualifying purchases.
By DIY Ideas 4 Home Editorial Team
Before You Start: Tools, Materials and Safety
The right material depends on whether you are blocking moving air, slowing heat loss, or keeping water out. The U.S. Department of Energy’s guidance on air sealing distinguishes caulk for stationary cracks from weatherstripping for moving door and window components. Measure the opening before buying supplies rather than guessing from an online photograph.
| Tool or Material | Size or Spec | Why You Need It | Substitute |
|---|---|---|---|
| Flashlight and notepad | Bright light, room-by-room notes | Identify drafts, stains, cracks and exposed pipes | Phone light and a printed checklist |
| Weatherstripping | Profile sized to the measured gap | Seal operable doors and windows | Compatible replacement door or sash gasket |
| Exterior-rated caulk | Compatible with joint and substrate | Seal stationary exterior trim gaps | Manufacturer-approved exterior sealant |
| Pipe insulation sleeves | Correct pipe diameter and wall thickness | Reduce heat loss around vulnerable water lines | Pipe-specific insulation rated for the location |
| Window shrink film | Enough film for measured interior frame | Add a temporary interior draft barrier | Removable interior storm-window panel |
| Smoke and CO alarms | Units suitable for their listed installation locations | Detect fire and carbon monoxide hazards | Replace expired or malfunctioning alarms |
Identify Which Parts of the House Are Vulnerable
Begin with the floor plan rather than a shopping list. A home with an unfinished basement may have exposed plumbing and open rim-joist gaps; a home with an attached garage may have water lines in a cold wall. Look at the attic hatch, window frames, exterior doors, sill plates, hose bibs, and the route of supply pipes. Photograph each issue and note whether it affects water, heat, air leakage, or structural safety.
Give special attention to rooms above garages, corners that feel colder than the rest of the house, and cabinets against exterior walls. ENERGY STAR’s guide to locating air leaks says significant openings are often hidden in attics and basements rather than at the visibly drafty windows. That changes the order of work: a new strip at the front door cannot compensate for a large unsealed attic opening.
Know the Jobs That Need a Professional
Do not disturb suspected vermiculite attic insulation. ENERGY STAR cautions that vermiculite may contain asbestos and advises testing before disturbance. Also avoid altering gas flues, chimney clearances, hardwired electrical equipment, structural roof components, and combustion-air openings. A qualified contractor should inspect an unsafe chimney or furnace, a recurring roof leak, or a concealed water leak that cannot be isolated.
Sealing a house too aggressively can interfere with needed ventilation or the safe operation of fuel-burning appliances. The Department of Energy’s Whole-House Weatherization guidance includes combustion-appliance safety testing and ventilation assessment alongside air sealing. If you have a fireplace, older furnace, or other combustion appliance and are planning significant tightening work, ask a weatherization professional to evaluate the complete system.
Set Priorities for Your Climate and House Type
Snowy regions need more attention to ice, roof drainage, and the possibility of extended outages. In a milder climate with occasional hard freezes, exterior hose connections and poorly insulated pipes may be the first failures. Renters can usually inspect alarms, use removable draft products where allowed, and notify their landlord about plumbing and heating defects; permanent building modifications need permission.
Make the plan in two passes: urgent safety and water risks first, then comfort and energy improvements. Keep the main water shutoff accessible and teach other household members how to identify it. If you discover wet insulation, rot, or mold during your inspection, repair the moisture source before enclosing the area with new material.
How to Winterize a House Step by Step
These eight steps cover the entire property at checklist depth. They are intended to prevent avoidable winter damage, not to replace a detailed pipe-insulation, roofing, or HVAC service manual. The National Weather Service’s winter-at-home preparation guidance includes chimney inspections, weatherstripping, exposed-pipe insulation, attic checks, clean gutters, and functioning smoke and carbon monoxide alarms.
Step 1: Inspect the Exterior and Stop Water Entry
On a dry day, walk around the foundation and look for loose siding, cracked trim joints, failed sealant, damaged downspouts, and standing water near the house. Watch for stains below roof edges or attic vents, which may indicate a leak that needs attention before freezing temperatures make access harder. Take pictures, mark the locations, and distinguish a superficial paint crack from an opening that actually admits water.
Clean accessible gutters and confirm that downspouts carry runoff away from the foundation; use a qualified service rather than climbing onto a steep or icy roof. Check that exterior vents are unobstructed without sealing ventilation paths that the building needs. Verify the repair by watching drainage during the next rain instead of assuming that a dry-looking joint is watertight.
Step 2: Seal Drafts at Doors and Fixed Gaps
Run your hand near the edges of closed exterior doors on a cold or windy day and look for daylight at worn seals. Clean the frame, measure the gap, and install a compatible weatherstrip without making the door difficult to latch. Use a door sweep or threshold gasket for a bottom gap. The Department of Energy’s guidance recommends weatherstripping for movable parts and caulk for stationary joints.
Apply exterior-rated caulk to suitable stationary gaps around trim only after removing loose material and allowing the area to dry as the sealant instructions require. Avoid caulking drainage weep holes in windows or sealing furnace combustion-air intakes. Close the door and check its full perimeter again; the success test is an uninterrupted seal that still permits normal opening, locking, and emergency egress.
Step 3: Improve the Draftiest Windows
Inspect the sash weatherstripping and locking hardware before purchasing a full window replacement. A window that does not latch tightly can leak even with intact glazing. Repair failed seals where possible, and consider removable interior window film on an older window that will remain closed through winter. Do not cover windows needed for emergency escape, ventilation, or an accessible emergency opening without understanding the consequences.
Duck Brand’s instructions for standard shrink-film kits specify adding about 2 inches to measured window dimensions before cutting the film. Their sequence is to clean the frame, apply the supplied double-sided tape, attach film, and shrink it with a hair dryer. Check whether tape can damage the particular paint or finish. The final film should be taut and secure, while the window remains safe to use as required.
Step 4: Protect Water Lines and Outdoor Faucets
Find the water supply pipes most exposed to cold: those in unheated garages, crawl spaces, attics, and exterior-wall cabinets. The American Red Cross advises insulating vulnerable lines, keeping garage doors shut where supply piping is present, and opening sink cabinets during severe cold so warmer room air can reach pipes. Keep household chemicals out of children’s reach if cabinet doors are left open.
Measure each pipe’s outside diameter and install a matching insulation sleeve, closing seams according to its instructions. Follow the outdoor faucet or frost-free sillcock maker’s winter-draining instructions, which may require disconnecting hoses and closing an indoor shutoff. Insulation alone cannot guarantee that stagnant water will not freeze during extreme cold or a prolonged heating failure. For installation details, use a dedicated guide to insulating exposed pipes rather than improvising around valves.
Step 5: Inspect Attic and Basement Air Leaks
Inspect the accessible attic floor from a safe walkway, noting open chases, a poorly sealed hatch, dirty insulation around bypasses, and obvious missing insulation. ENERGY STAR’s attic air-sealing guide recommends addressing large holes before small ones, because major bypasses can carry substantial air movement. Its attic-insulation guidance also says to seal air leaks before adding insulation. Never bury required vents or electrical fixtures that lack an approved insulation-contact solution.
At the basement perimeter, look for gaps where framing meets the foundation and at accessible plumbing penetrations. Moisture intrusion must be corrected first; concealing wet material can compound the problem. Do not place ordinary foam, caulk, or insulation against hot flues or masonry chimneys. ENERGY STAR gives separate high-temperature flashing and clearance instructions for these areas, which are better handled professionally when the installation is uncertain.
Step 6: Service the Heating System Before It Fails
Set the thermostat to call for heat and confirm that the system starts, distributes warm air, and shuts off normally. Check the heating-system filter against the actual equipment manual and replace or clean it if due. The Department of Energy’s Building Science Education guidance warns that clogged filters can restrict airflow and increase furnace run time and equipment wear. Do not select a high-resistance filter merely because its package claims superior filtration.
Schedule a professional inspection for a gas furnace, boiler, wood stove, or fireplace that has not been checked recently. The National Fire Protection Association recommends annual professional cleaning and inspection of heating equipment and chimneys. If you smell gas, leave the building and contact the gas utility or emergency services from outside. Do not attempt burner, flue, ignition, or gas-valve repairs as part of a routine DIY winterization checklist.
Step 7: Check Alarms and Plan for Power Loss
Test every smoke and carbon monoxide alarm according to its instructions and replace defective or expired units. NFPA’s heating safety guidance advises testing smoke alarms at least once a month and keeping combustible items at least 3 feet from heating equipment. Maintain exits, heating clearances, and a working flashlight where residents can reach them. A drafty home is inconvenient, but a home with a blocked exit or unvented heater is dangerous.
If you use a portable generator, the Centers for Disease Control and Prevention’s winter storm guidance says to operate it outdoors at least 20 feet from windows, doors, and vents, with appropriate carbon monoxide alarms inside. Never run a generator in a garage, even with doors open. Never use a gas oven, charcoal grill, or outdoor patio heater to heat living space. Arrange a safe place to stay if indoor temperatures cannot be maintained.
Step 8: Set a Freeze-Weather Routine
Write down the steps to use when a freeze is forecast: disconnect hoses, close garage doors, confirm heat, review vulnerable pipe locations, and charge communication devices. The American Red Cross advises keeping the heat on while away in cold weather, with a setting no lower than 55°F. That is a general starting point, not proof every remote or poorly insulated pipe will stay safe; check your plumbing exposure and any insurer requirements.
During severe cold, the Red Cross also advises allowing a small cold-water drip from a faucet served by an exposed pipe when necessary, and keeping cabinets open so indoor heat reaches the plumbing. During an outage, follow local emergency guidance, track indoor temperatures, and shut off the water if you must leave a vulnerable home without heat and local procedures call for it. After the weather clears, inspect exposed areas for leaks before assuming every line survived.
Products That Help
For medium gaps around moving doors or windows, Frost King V25WA is a white D-section EPDM rubber weatherseal listed by the maker at 5/16 inch wide, 1/4 inch thick, and 17 feet long. Buy it only when the gap profile and closing pressure match the actual frame. It is not a substitute for a structural door repair or a threshold that has rotted away.
For a 3/4-inch copper pipe or 1/2-inch iron pipe, Frost King P11 is a pre-slit polyethylene sleeve sold in a package of four 3-foot sections, according to the maker’s pipe-insulation product table. Check pipe material, outside diameter, local conditions, and the manufacturer’s allowed use before buying. Insulation sleeves protect exposed runs but cannot substitute for sufficient building heat and a sound plumbing system.
Duck Brand’s clear rolled shrink-film kit for five windows is listed by the maker at 62 by 210 inches and may help with seasonal drafts at older windows. Compare the total film area with your openings and inspect the finish before applying tape. Choose a repairable sash gasket or proper storm-window system instead where long-term hardware or framing defects are the underlying problem.
Common Mistakes to Avoid
Do not cover attic soffit vents, block furnace combustion air, seal window drain holes, or apply ordinary foam against hot flues. Do not treat a little pipe insulation as protection against every possible freeze, especially if the house may lose heat for days. And do not mistake air sealing for fixing water leaks: a wet wall or roof needs the moisture source corrected before insulation or interior film is installed.
Keep the project proportional. Replacing an inexpensive door seal before cold weather is a sensible DIY job; opening an unknown electrical junction, modifying a gas appliance, or stepping onto an icy roof is not. Make a post-project walk-through to verify that exterior doors latch, windows required for egress still function, plumbing is accessible, and the heating system has clean airflow and clear vents.
Frequently Asked Questions
These answers cover decisions that arise after the initial work, especially timing, rental restrictions, older homes, and homes left empty during winter. They supplement the eight-step checklist without replacing the instructions for the building’s particular systems.
When Should I Start Winterizing My Home?
Start before the first sustained freezing forecast, preferably while caulks and adhesives can still be installed within their labeled temperature ranges. Begin with the exterior inspection and heating-service appointment because contractors may be harder to schedule once the first cold spell arrives. Keep a short follow-up list for repairs discovered during the walk-through rather than waiting for snow to reveal them.
Can I Winterize a Rental Without Permanent Changes?
Yes, many checks and reversible draft measures may be possible with the property owner’s approval. Report heating faults, unsafe alarms, roof leaks, and vulnerable concealed pipes to the landlord rather than modifying shared plumbing or electrical systems. Before using adhesive window film or weatherstripping, check lease terms and test whether it can be removed without damaging painted surfaces.
Is Window Film Worth Using on Double-Pane Windows?
Sometimes, but first determine where the draft originates. An intact double-pane unit may not need film, while a worn sash seal or misaligned latch can still admit air at the perimeter. Interior film can be a temporary seasonal measure, not a repair for condensation between sealed glass panes, rotten framing, or a defective latch. Compare comfort before and after installation without claiming a universal energy-saving percentage.
Should I Turn Off the Main Water Supply While Away?
That depends on your plumbing layout, local cold exposure, insurance requirements, and whether the heating system will remain reliable. Shutting off the supply can limit some damage from a burst line, but water left in unheated pipes can still freeze; full winterizing or draining requires a plumbing-specific procedure. Consult a plumber when leaving a seasonal property unheated, and follow the Red Cross guidance to maintain heat in an occupied or temporarily vacant home during cold weather.
Final Thoughts
The most useful final check is to revisit the house after the first windy or freezing night: examine the same problem windows, cabinet plumbing, garage walls, and attic access you recorded before winter. That real-world inspection can reveal a remaining draft or cold pipe that a dry-day checklist missed. If you are deciding where to spend money next, correct active water entry and heating defects before buying additional weatherproofing products; use a professional assessment for large, hidden air leaks or any questionable combustion appliance.