Protecting household plumbing before a cold snap involves more than slipping foam onto one exposed line. Learning how to winterize pipes starts with locating vulnerable water routes, preparing outdoor connections, confirming that heated spaces stay warm, and deciding whether a vacant property needs a controlled drain-down. The right approach depends on whether people will occupy the home, whether the heat will remain on, and how the water system is built.
Quick Answer: Identify exposed supply pipes, locate the main shutoff, remove garden hoses, shut and drain outdoor faucet branches where possible, insulate accessible cold-weather risks, stop drafts around plumbing, and keep sufficient indoor heat. For a house that will be left unheated, arrange a plumbing-specific shutoff and full winterization rather than assuming pipe sleeves alone can prevent freeze damage.
As an Amazon Associate we earn from qualifying purchases.
By DIY Ideas 4 Home Editorial Team
Before You Start: Plumbing Risks, Tools and Safety
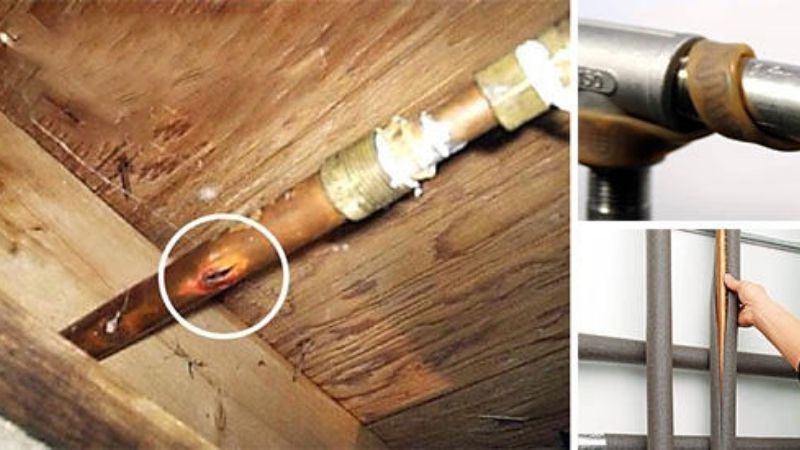
Water expands as it freezes and can damage a pipe or fitting even when the visible split appears away from the actual ice plug. The American Red Cross identifies outdoor hose bibs, sprinkler supply lines, crawl spaces, attics, garages, under-sink cabinets, and exterior walls with limited insulation as common problem areas. Walk those locations before shopping and photograph any existing corrosion, wet insulation, or repaired joints.
| Tool or Material | Size or Spec | Why You Need It | Substitute |
|---|---|---|---|
| Flashlight and inspection notes | Bright beam; room-by-room checklist | Trace pipes and record exposed sections | Phone light and a paper sketch |
| Measuring tape or caliper | Measure pipe outside diameter | Choose a correctly fitting sleeve | Manufacturer’s pipe-size chart |
| Pipe insulation sleeves | Compatible diameter and wall thickness | Reduce exposure on accessible lines | Approved pipe insulation wrap |
| Insulation seam tape | Compatible with sleeve material | Secure cuts, fittings and joints | Manufacturer-approved closure |
| Exterior faucet cover | Fits the hose bib and wall clearance | Add seasonal protection at the fixture | Appropriate hard-shell faucet cover |
| Shutoff identification tags | Water-resistant labels | Find the correct valve in an emergency | Permanent marker on a valve map |
Map the Supply Lines Before Buying Materials
Start at the main water entry point and trace the cold and hot lines as far as they remain visible. Note branches that supply exterior faucets, garage sinks, washing machines, irrigation systems, and fixtures on outside walls. A line inside a heated bathroom may need only draft control; the same line passing through an unconditioned crawl space may need additional protection. Do not open walls or disturb unknown insulation merely to make the map look complete.
Record the pipe material and measured outside diameter, not just the name stamped on a plumbing fitting. Nominal pipe size does not always equal outside diameter. When a line changes size at a joint, measure each section separately and choose sleeves that fit without forcing them around valves or bending them out of shape.
Separate Occupied and Unheated-Home Plans
There are two very different winterization decisions. An occupied or heated house generally keeps its plumbing pressurized and protected with heat, insulation, draft management, and selective draining of exterior branches. A seasonal cabin intentionally left without heat may require shutting off its water, draining appliances and low points, and protecting fixture traps. A closed main valve alone does not remove standing water from every pipe.
For an occupied house, the Red Cross recommends leaving indoor heat set to at least 55°F when away during freezing conditions. This is a baseline precaution, not a guarantee for a pipe routed through a cold wall or outside the heated envelope. Discuss unusually exposed plumbing, extended outages, and insurance requirements with a licensed plumber before leaving the property unattended.
Know When to Stop and Call a Plumber
Do not force a seized shutoff valve, cut a live supply pipe, work on concealed plumbing, or alter a fire-sprinkler connection. Some homes share a water supply with a fire protection system; shutting the wrong valve can disable that system. If the main valve is unidentified, corroded, leaking, or inaccessible, have it assessed before freezing weather. Apartment and condominium occupants should contact property management for shared systems.
Water heaters, boilers, backflow preventers, well pumps, and irrigation assemblies can have separate drain procedures. Follow the actual equipment manual rather than generic internet instructions. Never drain an electrically heated water tank without first safely disabling its power; never operate a water heater that has not been properly refilled and checked. Professional help is especially appropriate for a house that will be completely unheated.
How to Winterize Pipes Step by Step
The following eight steps cover the preparation sequence for common residential plumbing. Most occupied homes will use the protection steps and leave their interior supply on; the final drain-down decision applies to vacant or seasonal properties and must match the building’s water system. Finish this work before the first prolonged freeze rather than waiting until a faucet runs slowly.
Step 1: Locate and Test the Main Water Shutoff
Find the household shutoff near the service entry, often in a basement, utility area, garage, or near a foundation wall. Identify any separate valves for outside faucets and irrigation. Label the locations and make sure another adult in the home can find them quickly. Seattle and Bellevue utilities emphasize locating this valve before an emergency because closing it promptly can limit damage if a pipe bursts.
If the valve is obviously damaged or will not move with normal hand pressure, stop and call a plumber instead of applying extra force. Verify whether the shutoff affects a fire sprinkler, shared branch, heating equipment, or required appliance supply before closing it. If a planned trip requires water isolation, confirm that the home’s plumbing and safety equipment can safely remain in that state.
Step 2: Disconnect and Drain Outdoor Hoses
Remove garden hoses, splitters, timers, and pressure attachments from exterior hose bibs; drain and store those accessories. A connected hose can hold water where a frost-free sillcock needs an open outlet to drain. Do this even when the outdoor fixture is advertised as freeze resistant. Check manufacturer instructions for vacuum breakers or specialty faucets instead of removing permanent safety fittings.
Where a dedicated interior shutoff controls an ordinary exterior faucet, close that valve, open the outside faucet to drain the branch, and follow the installation’s directions about leaving the exterior tap open. The Red Cross describes this approach for hose bibs with indoor valves. If there is no separate shutoff, an appropriately fitted insulated cover may help, but it cannot compensate for an exposed pipe or a very cold wall cavity.
Step 3: Inspect the Garage, Attic and Crawl Space
Walk only safely accessible portions of unheated areas. Look for cold air entering at pipe penetrations, uncovered supply lines, insulation that has fallen away, and signs of leaks. Give particular attention to a water line crossing a garage ceiling or an attic supply branch serving a bathroom. Do not step between attic framing or enter a confined crawl space with unknown electrical, pest, or air-quality hazards.
Close garage doors during freezing weather when plumbing runs through the garage. At accessible wall or floor openings, use the building-appropriate sealant to stop moving cold air without covering required ventilation or electrical equipment. A pipe that is properly insulated but constantly washed by outside air may still freeze during an extended outage or hard freeze.
Step 4: Fit Insulation to Accessible Water Pipes
Measure the pipe outside diameter and select a sleeve rated for its use, temperature, and location. Cut the sleeve neatly around straight runs, elbows and tees, leaving no exposed gaps at joints. The U.S. Department of Energy’s pipe-insulation guidance recommends snug sizing, continuous coverage, and secure seams. Follow the insulation maker’s adhesive or tape instructions rather than improvising with an unsuitable household tape.
Protect both hot and cold lines in vulnerable locations. Foam sleeves slow heat transfer but do not generate warmth; they cannot keep a pipe indefinitely above freezing if the surrounding space stays cold. Avoid blocking service access to shutoffs, covering leak indicators, or putting standard foam where the equipment manual requires high-temperature clearance. Detailed sleeve-cutting techniques belong in a separate pipe-insulation project.
Step 5: Protect Outdoor Faucets and Irrigation
Check that any exterior faucet has drained as its design allows, then install a cover that fits tightly against the wall without crushing the valve or blocking necessary drainage. Frost-free models also require correct installation and an unobstructed outlet to function as intended. Use the faucet manufacturer’s specific procedure when a vacuum breaker, backflow device, or built-in drain is present.
For lawn irrigation, shut down and drain the system according to its controller, backflow preventer, and installer instructions. The North Tahoe Public Utility District recommends professional assistance for compressed-air blowouts. Excess pressure or the wrong connection can harm valves and plastic piping, so do not assume an ordinary shop compressor is appropriate. Keep pool equipment, exterior showers, and outdoor kitchen supplies on the same inspection list.
Step 6: Keep Warm Air Around Interior Plumbing
When a severe freeze is forecast, keep the home at a stable heating temperature and avoid deep overnight thermostat setbacks in rooms with vulnerable pipes. Open sink cabinet doors against exterior walls if it helps heated room air reach the plumbing, and place cleaners or other chemicals where children and pets cannot access them. Close the garage door and check that nearby heating vents are not blocked.
The Red Cross recommends allowing a small cold-water drip at a faucet supplied by a vulnerable exposed line during especially cold weather. This is a temporary measure for certain pressurized systems, not a substitute for repairs or a suitable approach when a property’s water service must be turned off or local restrictions prohibit it. Use the fixture that actually serves the at-risk run rather than letting an unrelated sink drip.
Step 7: Plan a Full Drain-Down for Vacant Homes
If a seasonal home will be intentionally left unheated, consult a plumber about shutting off the correct supply, opening fixtures, draining low points, preparing the water heater, and protecting pumps, filters, washing machines, and toilet components. Water can remain trapped in low sections even after a faucet appears dry. The City of Bellevue and several water districts list shutoff and draining among vacant-building precautions, but the procedures vary by system.
Do not pour automotive antifreeze into potable water lines or fixtures. If trap protection is needed in a winterized vacant property, use only a plumbing-appropriate product and method specified for that application; a professional can determine how to treat drain traps and toilet bowls without contaminating drinking-water piping. Remember that a household fire sprinkler may be affected by a main shutoff. Document the system state so nobody accidentally restores power to an empty water heater.
Step 8: Check for Leaks and Prepare for a Freeze
Walk the protected lines after installation. Check that insulation stays in place at bends, faucet covers are secure, and no valve or drain has started dripping. Take photos of the main shutoff and write down the steps for responding to a leak. If the house remains occupied, verify that ordinary hot and cold fixtures work and that the plumbing system has not been left inadvertently isolated.
During the first hard freeze, inspect accessible pipes and watch for reduced flow, unexpected moisture, or water-pressure changes. If a line freezes, do not use a torch or open flame. If you see a split or water escaping, shut off the proper supply and contact a plumber. The American Red Cross says inaccessible or unthawable frozen lines require professional help. On returning to a winterized vacant home, restore water carefully and check for leaks before assuming the system is ready for normal use.
Products That Help
Frost King P11 is a 5/8-inch-wall, pre-slit polyethylene foam insulation product listed by the manufacturer for 3/4-inch copper or 1/2-inch iron pipe. The package contains four 3-foot pieces. It is a useful example for accessible runs matching those dimensions, but the size must be checked against the actual pipe. Insulation thickness and proper installation matter more than the brand name alone.
Frost King FC1 is the maker’s oval foam cover for an outside faucet. It can provide extra protection after hoses have been disconnected and any drainable faucet branch has been prepared. Do not use a cover as evidence that water trapped in a connecting pipe cannot freeze; local exposure and faucet design still matter.
Frost King FC2 uses a rigid plastic outer shell with foam insulation and is marketed for outdoor faucets. It may be more suitable where a hard cover is preferred, provided there is enough clearance around the fixture. FC1 and FC2 are alternatives rather than items homeowners necessarily need to buy together. Compare fit, durability, mounting, and the faucet’s specific winterization instructions.
Common Mistakes to Avoid
The most costly mistake is treating insulation as a complete winterization plan. A sleeve cannot remove water from an outside branch, prevent a winter power outage, or protect a pipe buried in an unheated wall. A second common mistake is leaving a hose connected to a frost-free faucet; the trapped water can defeat the fixture’s drain-back design. Check outdoor equipment before the first freeze and after any unexpected thaw-and-refreeze cycle.
Also avoid shutting off an unknown valve without checking sprinkler or equipment implications, overpressurizing irrigation lines, and pouring automotive antifreeze into plumbing. Do not assume every part of a vacant house drains by gravity, and never energize an empty water heater. If the system involves a well, hydronic heating, shared supply, or concealed pipe network, obtain a specific professional procedure rather than relying on a generic checklist.
Frequently Asked Questions
Winterizing plumbing is partly a materials project and partly a plan for what happens when the weather turns unusually cold. These answers clarify the distinctions that most often affect a homeowner’s next decision.
What Temperature Should I Keep a House at?
The American Red Cross recommends at least 55°F when leaving a heated home during freezing weather. A higher setting may be necessary for a poorly insulated room or a pipe outside the heated envelope. Check the condition and routing of the pipes instead of treating 55°F as an absolute freeze-proof threshold, particularly during power outages or strong winds.
Should I Turn Off Water for a Weekend Away?
Possibly, but a short trip and a seasonal shutdown are not the same project. Check local guidance, insurance requirements, whether water supplies fire protection, and whether the heater or other equipment requires water. Closing a valve may reduce damage if a line breaks, but it will not drain water trapped inside the pipes. Ask a plumber before isolating a system you cannot identify completely.
Can Pipe Insulation Alone Prevent Freezing?
No. Insulation reduces the rate at which heat escapes, but it does not supply heat. Long periods below freezing, strong drafts, or loss of building heat can still freeze a covered line. Combine correctly installed insulation with suitable temperatures, protected outside connections, controlled drafts, and a plan for extreme-weather outages.
Do Frost-Free Outdoor Faucets Need Winterizing?
Yes. Disconnect the garden hose, sprinkler timer, and attachments so the fixture can drain as intended. Check the manufacturer’s instructions and ensure the faucet was installed with the required drainage slope where applicable. A frost-free label does not protect a supply line in an unheated wall from every possible condition or correct a fixture that is leaking or installed improperly.
Final Thoughts
Winterizing plumbing succeeds when each exposed branch has a clear protection plan and someone knows how to stop a leak quickly. Before the first freeze, verify shutoff locations, remove hoses, drain appropriate outside lines, insulate accessible runs, and keep heated rooms warm. When a property will sit unheated, use an equipment-specific drain-down plan and account for every connected appliance, trap and safety system. Recheck the vulnerable sections during the first cold spell, and use a licensed plumber for concealed lines, complex equipment, or any sign of a frozen or leaking pipe.