Learning how to insulate a garage begins with a decision: are you trying to make an attached house more comfortable, reduce extreme temperatures around stored items, or prepare a space for permitted year-round use? The answer determines whether you should insulate the shared wall, ceiling, exterior walls, door, or all of them. Covering every visible surface is not automatically the most effective first step.
Quick Answer: Inspect the garage for moisture, existing insulation, and air leaks. In an attached garage, prioritize the boundary between the garage and living spaces. Seal appropriate wall and ceiling penetrations, then install the right insulation in accessible cavities without gaps or compression. Add garage-door insulation only if the door maker permits the added weight. Preserve required fire separation and ventilation, and follow local energy and building codes.
A garage is not automatically conditioned space after insulation. Insulation slows heat flow; it does not produce heat, cool air, or make vehicle exhaust safe to breathe. If your goal is an office, bedroom, or other occupied room, check zoning, permits, electrical, HVAC, fire separation, and egress requirements before purchasing materials.
As an Amazon Associate we earn from qualifying purchases.
By DIY Ideas 4 Home Editorial Team
Decide What Part of the Garage Needs Insulation
The U.S. Department of Energy explains that insulation works with air sealing as part of a complete thermal boundary. For an unheated attached garage, that boundary is often the wall or ceiling separating the garage from the heated home, rather than the garage’s outer door. A detached garage used for occasional storage requires a different plan from a heated workshop.
Attached Garage With Living Space Beside It
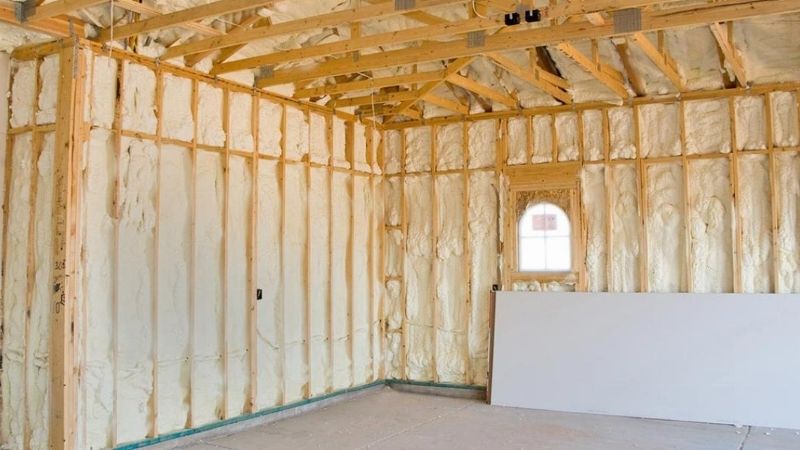
If one wall separates your garage from a kitchen, hall, or family room, that common wall deserves special attention. Look for incomplete drywall, gaps around plumbing and wiring, and missing insulation inside safely accessible wall cavities. The EPA recommends limiting air transfer from garages because vehicle exhaust, fuel vapors, and other pollutants can migrate into living space.
Do not remove or penetrate required fire-rated components casually. A shared garage wall may have specific gypsum-board, door, and penetration-sealing requirements. Where a garage and house share an air handler or duct arrangement, use an HVAC professional to evaluate potential contamination paths rather than connecting a garage to the home’s return air.
Rooms Above an Attached Garage
A bedroom over a garage may feel cold because of weak insulation, wind washing through joist bays, or disconnected air barriers in the floor system. Insulating only the outer garage door may not fix that complaint. Identify the garage ceiling as the thermal boundary and check whether the cavity is correctly air-sealed and filled.
These assemblies can require fire-rated ceiling finishes and special treatment around ductwork, recessed fixtures, and penetrations. Opening an existing finished ceiling and reconstructing it correctly is a more involved project than adding a batt to an open stud cavity. Consider an energy auditor or qualified insulation contractor when the boundary is concealed.
Detached or Unheated Storage Garage
For a detached structure used mostly for tools and vehicles, insulation may moderate temperature swings, but indoor conditions will still tend toward outdoor conditions without heating or cooling. If the garage contains a water line or equipment with freeze limits, insulation alone is not dependable freeze protection. Address pipes and their heat source separately.
Decide if occasional comfort justifies insulating the roof or ceiling and exterior walls. A workshop used with approved heating may benefit more than a space where the main door stays open frequently. Consider ventilation and equipment manufacturers’ clearance requirements when planning any finished wall or ceiling.
Choose Insulation and Understand R-Value
R-value describes a material’s resistance to heat flow. The proper installed R-value is governed by climate, assembly type, framing, and local code, not one universal number for every garage. Installation quality matters: compressed batts, unsealed gaps, and exposed framing can undercut a high label R-value.
| Insulation | Typical Application | Strength | Main Caution |
|---|---|---|---|
| Fiberglass batts | Open wall or ceiling cavities | Widely available and easy to size | Needs proper fit, air barrier, PPE, and suitable facing |
| Mineral wool batts | Stud or joist cavities | Fits friction-style in many framed cavities | Must meet required coverage and assembly details |
| Rigid foam board | Specific wall, door, or foundation applications | Continuous insulation potential | Often requires approved thermal/fire protection |
| Blown cellulose or fiberglass | Existing enclosed cavities or selected attics | Fills irregular spaces when properly installed | Density, ventilation clearances, and access require care |
| Spray polyurethane foam | Selected difficult-to-seal assemblies | Can combine air sealing and insulation | Professional assessment, exposure controls, and ignition/thermal barriers |
| Garage-door-specific kit | Door panel recesses when compatible | May improve door-surface comfort | Added weight can change door balance and opener load |
Why You Should Not Copy an Attic R-Value Into Every Wall
An attic floor, a two-by-four wall, and a garage door have different available depths, framing patterns, and code requirements. A batt designed for one framing cavity can buckle or compress in another. Ask your local building department or consult an approved energy-code resource for the required assembly and climate zone before buying insulation.
For exterior walls, framing members conduct heat around cavity insulation; this is called thermal bridging. Continuous insulation may help in some assemblies, but layering foam board against a fire-separation wall without approved protection can create a code problem. Treat the full wall assembly, not a single product label, as the unit of design.
What About Reflective Foil and Radiant Barriers?
Reflective products do not behave exactly like thick fiber insulation. The Department of Energy explains that radiant-barrier performance depends on a reflective surface facing an air space. A foil sheet pressed flat between two solids does not automatically deliver the claimed system R-value. Confirm the tested installation configuration before comparing a thin reflective roll to a batt.
On a garage door, radiant products may be useful in suitable sunny conditions, but they do not seal the perimeter, repair damaged panels, or guarantee a particular room-temperature improvement. Include door type, added weight, material fire rating, and expected use in the decision.
Prepare the Garage Before Insulating
Inspect for Water Intrusion, Mold, and Pest Damage
Begin by inspecting the roof, flashing, exterior walls, sill plate, and slab edges for active leaks or stains. Wet insulation often performs poorly, and closing a damp cavity can invite mold or hidden wood damage. Repair the water source and allow the assembly to dry before covering it.
Look for rodent nesting, damaged wiring, or decaying wood, especially near the bottom plates and attic access. Avoid disturbing suspected asbestos materials, vermiculite insulation, or unknown sprayed fireproofing. These situations require specialized assessment and may make the project unsuitable for DIY work.
Map Utilities, Heat Sources, and Required Clearances
Identify electrical boxes, gas appliances, water heaters, chimneys, vents, recessed fixtures, and garage-door hardware. Never bury junction boxes behind insulation or block service clearances. Do not place ordinary combustible foam or fiber material against flues or other high-temperature surfaces unless the approved assembly and product instructions allow it.
Keep electrical work and combustion-air design with qualified trades. If the garage has a fuel-burning heater, do not assume that sealing drafts is harmless: tighter buildings can change air supply and exhaust behavior. A licensed professional should check combustion safety and ventilation where relevant.
Make a Simple Material and Safety Checklist
Measure stud spacing, cavity depth, wall height, ceiling area, and every unusual section. Gather a tape measure, straightedge, utility knife suited to the material, gloves, safety glasses, dust mask or respirator required by the product, long sleeves, and an appropriate air-sealing product. A stable working platform is preferable to balancing on stored objects.
Buy material for the actual exposed cavities, allowing for waste around obstacles, but do not use excess insulation to fill voids by crushing batts. Keep the garage door, pedestrian exits, and pathways clear during the project; avoid leaving sharp fasteners or cut foam where vehicles may contact them.
How to Insulate a Garage in 8 Practical Steps
Step 1: Identify the Thermal Boundary
Draw a rough plan showing which walls and ceilings border living areas, outdoor air, attic space, and other garages. Mark whether your garage is attached, detached, heated, or unheated. Your first investment should usually protect the areas that actually separate heated rooms from colder space, not an arbitrary wall.
For a home with living space above the garage, the garage ceiling may deserve higher priority than the outer sidewalls. For a fully conditioned detached workshop, the roof, walls, and door may all be part of one continuous boundary. This planning step prevents spending money on surfaces that do little for your stated goal.
Step 2: Air-Seal Accessible Gaps
Repair cracks and seal obvious gaps around fixed penetrations before adding insulation. Suitable caulk, approved low-expansion foam, gaskets, or rigid blocking with sealed edges can reduce unwanted airflow at common wall and ceiling joints. Use products suited to the substrate and any required fire-rated assembly; regular household spray foam is not automatically a firestop.
Do not seal designed attic ventilation pathways, combustion-air openings, or drainage routes. When an attached garage connects to the house, the entry door should retain weatherstripping, proper closing behavior, and any required fire protection. Never alter its self-closing mechanism merely to improve convenience.
Step 3: Correct Water and Condensation Risks
Before covering cavities, confirm that exterior moisture has a safe drainage path. A garage foundation wall may need a different insulation and moisture-control strategy from a dry wood-framed wall. Do not sandwich wet materials between vapor-impermeable layers based on a generic internet detail.
Vapor-retarder placement depends on climate, assembly, and code. In mixed or humid climates, a misplaced polyethylene sheet can trap moisture rather than prevent it. Seek local building-science guidance if you cannot establish where the wall should dry.
Step 4: Install Insulation in Open Garage Walls
For a dry, code-compatible open wood-stud wall, choose batts sized for the cavity depth and spacing. Cut to fit around pipes and cables so insulation remains in contact with all sides instead of bowing outward. Split a batt around a cable when appropriate rather than forcing all the insulation behind it. Keep electrical device boxes and other service access usable.
Do not compress a thick batt into a shallow cavity or leave long narrow gaps at studs. Fit material snugly without crushing it. Finish the wall with the approved facing and fire-protective layer required for that location; exposed foam plastic is often not acceptable in a garage without specified protection.
Step 5: Insulate the Ceiling or Floor Above
If an accessible unfinished ceiling separates the garage from a heated room, inspect the floor cavities and air-seal penetrations first. Install insulation with continuous support so it does not sag away from the subfloor or leave air channels. An air barrier at the right location matters as much as the nominal insulation thickness.
Protect any required fire-rated garage ceiling. If existing drywall must be removed, review approved replacement details before demolition. Work around ducts, plumbing, lights, and electrical components with suitable clearances. A professional is often the safest option for extensive ceiling work, especially below bedrooms.
Step 6: Address the Garage Door and Its Perimeter
If the garage door itself is uninsulated, consider a door-specific insulation kit compatible with its construction. Clean panel recesses, measure each recess, and secure insulation with the clips or fastening system specified by the kit. Keep hinges, rollers, locks, cables, tracks, reinforcement struts, and opener attachments clear.
Insulation adds weight, sometimes enough to affect spring balance. Check with the door manufacturer or installer before retrofitting. If the door becomes heavier or no longer balances correctly, stop using the opener and obtain professional service; do not adjust springs yourself. Replace missing perimeter weatherstripping separately because panel insulation cannot stop drafts through open gaps.
Step 7: Finish the Assembly Without Blocking Safety Features
Install approved drywall, panel finish, or other code-compliant interior covering where required. Preserve fire separation between garage and dwelling; local regulations may specify particular materials and fastening methods. Do not create an unprotected opening into living space, cover a smoke or CO alarm, or seal off a required exit.
For a workshop, consider impact-resistant finishes and electrical outlet placement before closing the wall. Keep the garage’s appropriate ventilation strategy intact. Insulation reduces heat flow but does not make it safe to idle a vehicle, run a portable generator, or use unvented combustion equipment inside.
Step 8: Inspect the Result and Plan the Next Improvement
Check for missing strips, compressed batts, unsecured door panels, exposed foam where prohibited, and gaps around framing. Confirm that service panels remain accessible and the overhead door moves freely. Observe the temperature and humidity over several days before assuming further insulation is needed.
If your main goal is a warmer room above the garage, compare room comfort and drafts rather than looking only at garage air temperature. If the remaining problem is caused by air leakage, poor ductwork, or slab moisture, another roll of insulation will not necessarily help. An energy audit can identify the next useful upgrade.
Common Garage Insulation Mistakes
Insulating the Door Before Fixing the Shared Wall
In an attached unconditioned garage, heat may escape from the home through an underinsulated common wall or ceiling. Improving the door can be worthwhile, but it does not fix air leaks from the garage into the house. Start at the thermal and air boundary relevant to your objective.
Leaving Batts Compressed or Full of Gaps
Fiberglass and mineral wool depend on the thickness and complete coverage specified in their labeling. Stuffing excess material into a cavity reduces effective thickness, while voids create cold spots. Cut accurately and support material so it remains in place after wall finishing.
Using Unprotected Foam or the Wrong Vapor Layer
Foam board and spray foam may require an approved ignition or thermal barrier, particularly in a garage. Vapor control is climate-specific. Never use general-purpose plastic sheeting or exposed foam as a substitute for a complete code-compliant wall design.
Assuming Insulation Makes a Garage Safe to Live In
A habitable conversion may require permits, egress, heating and cooling, floor and moisture work, and fire-protection changes. Vehicle storage and engines introduce contamination hazards. Insulation is one component of a larger code and health problem; it does not turn a garage into a legal bedroom.
FAQs About Insulating a Garage
Is It Worth Insulating an Unheated Garage?
Sometimes. Insulation can reduce temperature swings and improve comfort in nearby rooms, especially when an attached garage shares walls or a ceiling with conditioned living space. An unheated garage will not remain at room temperature simply because insulation was installed.
Should I Insulate the Garage Ceiling or Walls First?
Prioritize the assembly separating the garage from heated living space. A ceiling beneath a bedroom may matter more than exterior garage walls. For a heated detached workshop, a continuous insulated roof or ceiling and wall system may make sense.
Can I Install Garage Wall Insulation Without Drywall?
Some materials can be installed in open framing during construction, but many garage assemblies require an approved interior finish, fire barrier, or mechanical protection. Check code and product instructions before leaving insulation exposed.
What R-Value Should I Use in My Garage?
There is no single correct R-value for every garage. Requirements depend on climate zone, wall or roof assembly, whether the area is heated, and local building code. Select products that fit the actual framing and meet the assembly requirements.
Can Insulating a Garage Prevent Pipes From Freezing?
Not reliably by itself. Insulation slows heat movement; it does not supply heat. Water lines in unheated or exposed garage areas may still freeze during extended cold conditions. Protect vulnerable plumbing using appropriate pipe-specific and temperature-control measures.
Final Thoughts
The best plan for how to insulate a garage starts with the thermal boundary, moisture condition, and intended use. Air-seal first, insulate the right walls and ceiling with properly fitted material, and evaluate a garage-door kit only after checking door compatibility. A practical whole-assembly plan is better than buying the highest printed R-value.
Preserve garage-to-house fire and air separation, keep ventilation and service access intact, and do not treat insulation as heating or as permission to occupy a garage. For concealed boundaries, extensive ceiling renovation, unknown moisture behavior, or added door weight, a qualified contractor is the safer route.