How to Sharpen Drill Bits Safely and Restore Cutting Edges
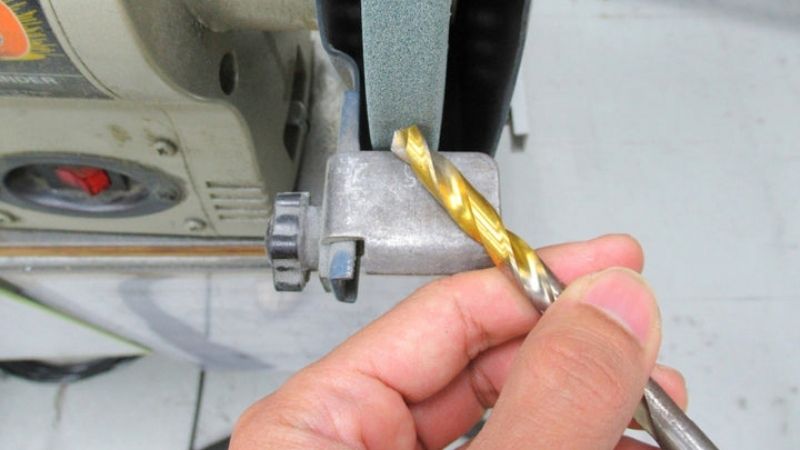
To learn how to sharpen drill bits, first identify the bit type. An ordinary high-speed-steel twist bit may be sharpened by restoring its cutting lips to a consistent shape, but masonry bits, brad-point wood bits, step bits, spade bits, and specialty cutters use different geometry. A guided drill-bit sharpener is usually more repeatable for a beginner than trying to shape a small cutting edge freehand on a bench grinder.
Quick Answer: Clean and inspect a dull HSS twist bit. If it is straight and undamaged, check whether its point is the common 118-degree or 135-degree style and use a sharpener rated for that bit’s diameter and material. Follow the machine’s alignment, sharpening, and optional split-point process exactly. Compare the two cutting lips, check for proper clearance, and test on scrap material with a secure workpiece. Replace a cracked, badly overheated, or unsuitable bit rather than grinding it aggressively.
Sharpening works only when the original drill geometry can be restored without leaving uneven lips or weakening the cutting edges. A bit that wanders or needs too much pressure may be dull, but incorrect speed, loose clamping, and clogged flutes can mimic dullness. Diagnose the problem before grinding.
As an Amazon Associate we earn from qualifying purchases.
By DIY Ideas 4 Home Editorial Team
Determine Whether Your Drill Bit Can Be Sharpened
Not every worn bit is worth sharpening, so judge the bit before you reach for a grinder. This section explains which drill bits can be reground at home, which are better replaced, and what the wear pattern tells you about the edge.
Standard twist bits are the main DIY candidate
Common HSS twist bits used in wood, plastic, and metal have two cutting lips meeting at a central chisel edge. These are the bits many home sharpening machines are designed to restore. A sharpener’s manual will list supported diameters, bit materials, and point geometries. Some equipment can also resharpen certain cobalt-alloy bits, but suitability depends on the specific machine. Read its limits instead of treating every spiral-fluted bit as identical.
Know when a replacement is the better choice
Do not sharpen a bit whose shank is bent, whose body has a visible crack, or whose cutting edges are severely chipped. Pronounced blue or black heat discoloration may indicate overheating; whether the bit remains serviceable depends on its material and degree of damage. A very inexpensive tiny bit can cost less to replace than the effort and risk of hand grinding it. Discard broken bits rather than attempting to create new cutting geometry by eye.
Masonry, wood, and coated specialty bits need different handling
Carbide-tipped masonry bits crush mineral material and have very different tips from ordinary HSS twist bits. Brad-point bits, Forstner bits, step bits, hole saws, and countersinks also have distinct cutting features. Improper grinding can destroy their function or remove protective coatings. Seek the manufacturer’s method or professional sharpening service, or replace them. This article’s step-by-step sharpening process is for compatible standard twist bits, not every type of drill bit sold in a hardware store.
| Bit type | Typical home approach | Important limitation |
|---|---|---|
| Ordinary HSS twist bit | Guided sharpener rated for its diameter | Maintain both lips and correct point angle |
| Compatible cobalt twist bit | Tool-specific sharpening procedure | Not every sharpener supports every alloy or geometry |
| Carbide masonry bit | Manufacturer-approved specialist method or replacement | Not sharpened like an HSS twist bit |
| Brad-point wood bit | Specialized sharpening or replacement | Preserve center spur and outer spurs |
| Step bit or coated specialty bit | Refer to manufacturer’s service guidance | Generic bench grinding may ruin step profile or coating |
| Bent or cracked bit | Replace | Sharpening does not restore structural integrity |
Understand the Cutting Geometry
What 118 degrees and 135 degrees mean
The point angle is the included angle at the drill tip, not the angle of the bit against the workpiece. Many general-purpose bits use a 118-degree point, while some bits intended for harder materials use a flatter 135-degree point. Drill Doctor’s product guidance distinguishes these two settings and includes procedures for sharpening and splitting points. Existing design and tool compatibility determine the right setting; do not assume that changing every bit to 135 degrees improves it.
Both cutting lips should match
Viewed from the end, the two main cutting lips should be shaped evenly so they share the workload. If one side is longer or set at a different angle, the tip may cut off-center, produce an oversized hole, vibrate, or wear rapidly. The heel behind each cutting edge needs relief so the edge reaches the material before the trailing surface rubs it. A sharpening machine is valuable because it helps control these relationships.
Why a split point is not just a sharper tip
A split-point design modifies the central chisel region to improve the bit’s ability to start with less wandering in certain materials. It is not appropriate to invent a split with a hand file or random grind. Use only a sharpener designed to produce that geometry, after the primary sharpening pass, and follow the model-specific setup. Drill Doctor identifies split-point sharpening as a separate step on certain machines.
Prepare a Safe Sharpening Station
Inspect the sharpener or grinder before use
Place the machine on a stable surface and check guards, electrical cords, abrasive condition, and the model’s required setup. Disconnect power while installing or adjusting accessories where instructions require. Use compatible abrasive wheels and follow the maximum rated operating speed. Never use the side of a grinding wheel unless the manufacturer explicitly permits that operation. Keep flammable materials, loose items, and bystanders away.
Respect bench-grinder guards and tool rests
A bench grinder can catch a small bit, especially when the operator lacks a stable rest. OSHA’s workplace guidance explains the purpose of properly adjusted grinder work rests and the risk of work becoming trapped between rest and wheel. For covered workplace grinders, the standard ordinarily calls for a rest gap not exceeding 1/8 inch. DIY users should follow their equipment’s guard and rest instructions rather than assume that a homemade rest or freehand pinch grip is safe.
Wear appropriate protection and secure long hair
Use appropriate impact-rated eye or face protection for grinding debris, hearing protection when needed, closed-toe footwear, and snug-fitting work clothing. Keep hair tied back. Gloves are a tool-specific issue near rotating equipment because loose gloves can catch; follow the manufacturer’s recommendations rather than using bulky fabric gloves indiscriminately. Do not grip a tiny bit so close to a spinning wheel that your fingers could contact the abrasive surface.
Avoid overheating the cutting tip
Excessive pressure or prolonged contact can damage cutting edges and alter their performance. Use the guided sharpener’s prescribed feed and motion; for approved bench-grinder methods, make controlled passes and follow the manufacturer’s cooling guidance for the bit material and abrasive. Do not dunk a dangerously overheated or specialty cutting tool into a liquid by habit. Cooling instructions differ by metal and sharpening system.
How to Sharpen Drill Bits in Eight Steps
Step 1: Clean the bit and confirm its design
Wipe away drilling oil, pitch, rust, and packed chips using a method appropriate for the bit and its coating. Examine the tip under bright light or a magnifier. Identify whether it is an ordinary twist bit that the sharpener supports. If the bit is cracked, badly bent, or outside the machine’s size range, set it aside for replacement rather than trying to force it into the chuck.
Step 2: Identify the intended point angle
Refer to the bit maker’s original specification where available. A 118-degree or 135-degree geometry is common, but other designs exist. Use the sharpening tool’s angle guide or setting system to choose a compatible value. Do not estimate angle by eye when your jig provides a reference. For a bit with an unfamiliar point or a pilot-point feature, verify that your sharpener is designed for it.
Step 3: Set up the sharpening machine
Check abrasive wear, wheel guards, ventilation, and chuck condition. Confirm the specified tool rest or proprietary sharpening port is ready. Install the appropriate bit holder and select the point angle. Disconnect power while setting up where the manual instructs, and make sure the cutting area is clear before switching on. Never bypass a safety interlock to speed up an adjustment.
Step 4: Align the bit in its holder
For a guided sharpener, insert the bit into its chuck and use the alignment port or jaws exactly as described. These controls orient the cutting lips and establish proper protrusion. Tighten the holder without skewing the drill. Poor alignment can create unequal lips even if the abrasive itself is in excellent condition. On a traditional bench grinder, freehand alignment is an advanced skill; a novice should use a purpose-built jig or guided machine.
Step 5: Sharpen according to the machine’s motion
Place the aligned chuck into the sharpening port and make the number of turns or passes specified by the maker. Allow the abrasive to remove metal gradually. Do not bear down to make a badly worn bit sharp in one pass. Pause and inspect the tip rather than grinding away unnecessary material. If the machine makes unusual sounds or the chuck binds, switch it off and troubleshoot before continuing.
Step 6: Inspect symmetry and cutting-edge relief
Remove the bit after the machine has stopped and compare both lips under good light. They should be comparable in length and angle with no obvious burnt or chipped regions. Check the manufacturer’s reference diagram for the heel relief and chisel edge. If the point is lopsided, repeat the alignment process before taking more metal away; extra grinding without correction only shortens the bit.
Step 7: Split the point only if appropriate
If your bit originally had a split point, or the specific machine and application call for one, follow its separate split-point instructions. Do not confuse a 135-degree point setting with a split-point operation: they refer to different features. Many home projects do not require split-point conversion, and some sharpening machines cannot perform it. Inspect the result against the model’s examples before testing.
Step 8: Test on clamped scrap and store correctly
Clamp a piece of suitable scrap material, wear the required drilling PPE, and use speeds and cutting fluid appropriate to the material and bit. Check whether the bit starts without wandering excessively, produces normal chips, and cuts with less pressure than before. If it still rubs, overheats, or cuts unevenly, stop and recheck geometry or replace it. Clean and dry the bit before storing so sharpened edges do not chip against neighboring tools.
Sharpening With a Bench Grinder: Limits for Beginners
Why freehand grinding is difficult
Maintaining equal lips, the included point angle, and relief at the same time is harder than simply touching a bit to the wheel. Small deviations show up as wandering and oversized holes. A stable sharpening jig and trained technique improve the odds, but a beginner should practice on inexpensive HSS twist bits rather than ruining specialty cutters. A guided sharpener is the safer, repeatable starting point for many homeowners.
Do not improvise the wheel setup
Grinding wheel hazards include fractures, ejected fragments, and entrapment of the workpiece. Guards, correct wheel ratings, and proper rests matter. Do not hand-hold extremely short bits near the wheel or remove guards to gain access. If the point is so damaged that much of the bit must be reformed, professional sharpening or replacement may be more practical than a risky home attempt.
Troubleshoot Results After Sharpening
The bit still wanders at the start
Check whether the point is symmetrical and appropriate for the material, and whether the workpiece was clamped. The drill press, chuck, or operator angle might also be responsible. For metalwork, starting with a center punch or approved spotting method can help in some situations. Do not immediately increase force: a poorly aligned tip often worsens with pressure.
The hole comes out larger than expected
Unequal cutting lips can cause wobble and an oversized hole; loose chuck jaws and unsupported workpieces can produce similar effects. Examine the sharpened geometry and test in properly secured scrap. If the tool is damaged or the bit is badly warped, retire it.
The bit heats quickly and makes dust instead of chips
A rubbing heel or blunt lip can create heat rather than cut material efficiently. Incorrect speed, hard material, or inadequate lubrication can produce the same symptom. Let the tool cool, inspect the drill point, and compare the setup with the bit maker’s recommendations. Stop when heat discoloration or smoke appears; do not continue until failure.
One cutting edge looks longer than the other
Re-seat the bit in the sharpener and recheck the alignment procedure. Make only the permitted corrective passes. A badly off-center point may be uneconomical to salvage. Avoid trying to balance two lips with random freehand touches unless you have the equipment and experience to control relief angle and symmetry.
Frequently Asked Questions
Can I sharpen any drill bit with a bench grinder?
No. Many specialized bits have cutting geometry that a generic grinder can ruin. A bench grinder is also hazardous when operated without appropriate guards, rests, and skills. Use the method specified for the bit type.
What is the difference between a 118-degree and 135-degree drill point?
These are included tip angles used on different twist-bit designs. A 118-degree point is common for general applications; 135-degree points are often selected for harder materials. The best choice depends on the bit and workpiece, not one universal ranking.
How many times can a drill bit be sharpened?
There is no fixed number. Remaining length, flute design, damage, material, and tool limits all matter. Replace bits that are too short for safe holding or no longer retain proper geometry.
Should I sharpen a carbide masonry drill bit the same way?
No. Its carbide cutting head and hammer-drilling function differ from a conventional HSS twist bit. Follow the masonry bit maker’s instructions or seek specialist service or replacement.
Why does a newly sharpened bit still cut poorly?
Possible reasons include unequal lips, insufficient relief, incorrect point design, inappropriate speed, inadequate clamping, or hard material. Check the entire setup before grinding the point again.
Final Thoughts
Sharpening drill bits is worthwhile when the bit is a compatible twist design, the body remains sound, and the sharpening system can reproduce the original geometry. Start by identifying the bit and diagnosing its poor performance, then use the correct point-angle setting, stable alignment, and controlled sharpening passes. Inspect the two cutting lips and test on clamped scrap rather than assuming that a shiny tip is a sharp tip. Treat bench grinders with appropriate respect, including guards and tool rests, and never force an incompatible specialty bit into a generic sharpening routine. A safe replacement is always better than an unsafe rescue attempt.