How to Remove Stripped Screws Without Ruining Your Work
When a screw head has rounded out, the safest way to learn how to remove stripped screws is to start with the least damaging method. Stop turning the slipping screwdriver, clean the recess, try a bit that fits correctly, and apply steady downward pressure. If the screw still will not move, choose a rubber-grip method, pliers on an accessible head, or a correctly sized extractor depending on the surrounding material.
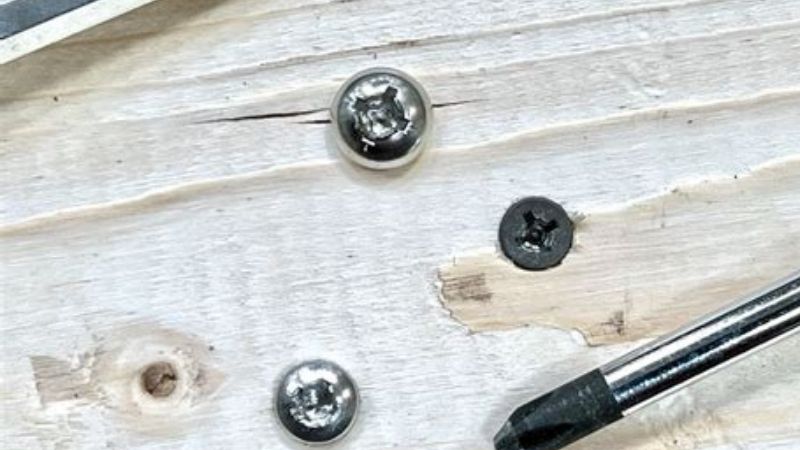
Quick Answer: Disconnect power where applicable and stabilize the workpiece. Try a fresh, correctly fitting hand screwdriver first; if the recess has partial grip, place a wide rubber band between the bit and the head and turn slowly. If the screw head protrudes, grip its outside edge with suitable extraction pliers. For badly damaged or recessed screws, consider a manufacturer-approved screw extractor; drilling or cutting a slot is a last-resort option because it can damage the part below.
A stripped screw head is different from a screw whose threads are stripped. The first has a drive recess the tool cannot turn; the second may rotate without backing out. A seized fastener is another problem entirely. Diagnosing which failure you have prevents wasted effort and broken tools. iFixit’s removal guide describes escalating from different screwdrivers and a rubber band to pliers and more invasive approaches; this guide adapts that logic for common household work.
As an Amazon Associate we earn from qualifying purchases.
By DIY Ideas 4 Home Editorial Team
Identify the Screw Problem Before You Start
Removing a stripped screw is easier once you know why it stripped and how much of the head is left to grip. Classifying the problem first helps you choose a removal method that will not chew up the fastener or the surface further.
Stripped head versus stripped threads
A stripped head usually shows a rounded or enlarged cross, slot, hex, or star-shaped recess. The driver slips, making a clicking or grinding motion while the fastener stays in place. Stripped threads behave differently: the tool engages and the screw spins, but the threads no longer lift it from the hole. Thread damage may require gentle upward tension during removal and later repair of the receiving material. Do not attack a thread problem with a larger driver bit.
Seized screws, corrosion, and threadlocker
A screw that refuses to turn despite a good-fitting driver may be rusted in place, overtightened, or held by threadlocker. Penetrating oil can help on some exposed mechanical joints, but it is inappropriate near live electronics, finishes that it may stain, and materials the oil can damage. Some threadlocking compounds require specific manufacturer-approved removal methods. Do not apply open flame or uncontrolled heat around plastics, finishes, wiring, batteries, or unknown coatings.
Check whether the screw is safe to remove
Shut off and disconnect appliances or powered tools before opening covers, and follow the manufacturer’s service instructions. Lithium-battery devices and concealed electrical parts deserve extra caution; do not puncture or heat a battery while chasing a screw. On structural fittings, brake components, gas appliances, or load-bearing assemblies, a stuck fastener may require a qualified technician rather than force. Secure the part so it cannot twist or fall when the screw releases.
| Visible situation | First reasonable technique | Avoid initially |
|---|---|---|
| Slightly worn Phillips recess | Correct-size fresh hand driver | High-speed power driving |
| Driver slips but recess remains deep | Rubber band or suitable grip material | Repeated slipping that rounds the recess |
| Head protrudes above surface | Screw extraction pliers | Crushing nearby wood or finish |
| Recess fully rounded and sunken | Purpose-made extractor if space allows | Drilling blindly into the part below |
| Screw turns but does not back out | Diagnose stripped threads and apply controlled lift if safe | Oversized driver bits |
| Tiny screw near a battery or circuit board | Device-specific repair guidance | Grinding, heating, or uncontrolled drilling |
Get the Surface and Tools Ready
Choose the exact bit type and size
Phillips, Pozidriv, Torx, hex, and slotted drives can resemble one another at a glance. The wrong geometry rounds the recess quickly. Examine the head under good light, clean packed paint or debris gently, and test a fresh bit that seats fully without rocking. Avoid using an impact driver as the first option on a damaged screw; too much speed or torque often makes a marginal recess unusable.
Stabilize and protect the surrounding material
Clamp removable workpieces using padded jaws where possible. Tape delicate paint near a screw head and keep hard plier jaws from scuffing the surface. Wear safety glasses if any cutting, drilling, or metal chips are possible. A handheld driver gives better feedback than a drill when testing whether the recess still grips. Set aside a replacement fastener so you are not tempted to reinstall the stripped one.
Select tools in order of invasiveness
Start with a hand screwdriver and better-fitting bit, then a non-damaging grip aid. Extraction pliers work only when there is enough exposed head to grip. A dedicated extractor or left-hand drill bit needs room and precise alignment, and some models require a pilot hole. Rotary cutting tools can form a new slot in certain larger screw heads, but sparks, chips, heat, and surrounding damage make this a last resort.
How to Remove Stripped Screws in Eight Steps
Step 1: Stop before the head gets worse
Release pressure as soon as the bit cams out. Continued spinning polishes away the remaining corners of the recess. Inspect whether the screw is countersunk, raised, rusted, painted over, or located next to fragile parts. If the fastener secures electrical equipment or a safety-critical component, first determine whether removal is within your skills and the manufacturer’s permitted service process.
Step 2: Clean out the drive recess
Use a brush or a suitable non-marring pick to remove dust or a thin layer of paint without stabbing into the workpiece. Wipe loose debris away. A shallow layer of material in the screw head may keep a correct bit from engaging fully. Avoid filling the recess with oil before attempting a friction-based rubber-band method, since it reduces grip.
Step 3: Try a fresh correctly sized hand driver
Seat the bit straight down in the recess, apply firm axial pressure, and turn slowly counterclockwise for a standard right-hand screw. Some specialty fasteners have left-hand threads, so verify the thread direction when uncertain. If the bit starts to skip, stop immediately. An alternate driver shape should be tried only if it fits securely and will not expand or crack the head.
Step 4: Add a rubber grip layer if there is room
Place a broad rubber band or suitable thin friction material over the head, press the driver into the recess through it, and turn gently. This can help when the recess has enough remaining structure to guide the bit; it is not a guaranteed cure for a fully rounded head. Do not use this method inside small devices if the rubber could lodge in moving parts or sensitive connections.
Step 5: Grip a raised head with extraction pliers
If the screw protrudes, clamp purpose-designed screw extraction pliers around the outside edge. Protect the nearby surface, grip squarely, and turn incrementally without bending the fastener. Ordinary locking pliers can sometimes work on accessible larger screws, but their jaws may slip or mar the finish. If the head breaks, stop and reassess before attempting to drill out the shank.
Step 6: Consider controlled penetrating oil only where appropriate
For corroded screws in accessible metal-to-metal joints, an appropriate penetrating product may help after the finish and material have been checked. Apply sparingly and allow the time specified on its label. Keep it away from circuits, batteries, painted furniture, food-contact surfaces, and incompatible plastics. Remove excess before attempting grip or drilling. Do not confuse this step with a mandatory treatment for every stuck screw.
Step 7: Use a dedicated extractor when noninvasive methods fail
Select the extractor type and size for the screw, not the largest bit that fits your drill. Read its instructions about rotation, pilot drilling, and depth. Center it carefully and operate at low speed with steady alignment. A broken hardened extractor can be far more difficult to remove than the original screw, so do not use excessive torque. For tiny screws or thin material with limited clearance, seek a repair specialist instead.
Step 8: Replace the fastener and check the hole
Once the screw is out, inspect the threads, head seat, and surrounding substrate. If the wooden hole is stripped, use an appropriate wood-repair method before installing the replacement; if metal threads are damaged, use an approved thread-repair procedure. Match the screw’s length, diameter, head shape, strength, and thread type to the assembly. Seat with controlled torque and a properly fitting driver to prevent another failure.
Last-Resort Methods and When to Avoid Them
Cutting a new slot in the screw head
On a sufficiently large, exposed metal screw, a thin rotary cutting wheel can sometimes create a usable straight slot for a flat driver. This method sprays sparks and chips and can scar the surrounding surface. Wear eye protection, clamp the work, and follow the cutting tool’s safety instructions. Do not do it near batteries, combustible materials, plastic enclosures, glass, or finished surfaces you cannot protect.
Drilling the head or using a left-hand bit
A left-hand bit may catch and turn a screw counterclockwise while making a pilot hole, but the technique requires precise centering, compatible bit geometry, and clearance behind the screw. Drilling completely through a head can also damage the part it holds. These approaches are not appropriate for novices working near electronics, thin castings, plumbing fittings, or structural components. Choose a specialist rather than sacrificing an expensive assembly.
Why glue and aggressive heat are risky shortcuts
Some repair guides mention gluing a bit to a damaged head. Glue can permanently contaminate threads or bond the screw to the workpiece, especially in a recess. Excess heat may damage painted wood, polymers, wire insulation, or batteries. Use such techniques only when they are compatible with the product and understood fully; for most household projects, better driver engagement, pliers, or the right extractor should come first.
Prevent Future Stripped Screws
Hold the driver straight and seat it fully
Many stripped heads begin with a tilted, mismatched driver. Keep the tip square to the fastener, select the exact recess pattern, and apply the pressure recommended for the screw. Replace worn bits and clean a painted-over recess before applying torque. iFixit emphasizes full bit contact and keeping the driver perpendicular to reduce cam-out.
Drill pilot holes when the material needs them
For wood fastening, a suitably sized pilot hole can reduce splitting and driving resistance, especially near edges and in dense hardwood. Pilot size depends on the wood, screw geometry, and thread design. For metal hardware, check whether the joint expects a machine screw and existing threads; never force a wood screw into a threaded metal opening.
Stop when torque rises suddenly
A binding or cross-threading fastener should be backed out carefully and inspected. If using a powered driver on appropriate work, start with low speed and an appropriate clutch setting, then finish delicate assemblies by hand. Do not drive until the bit grinds, the wood splits, or the screw head becomes hot. Replacing a cheap fastener early is easier than extracting a ruined one later.
Frequently Asked Questions
Will the rubber-band trick work on every screw?
No. It can help a slightly rounded recess with usable depth, but it rarely solves a completely smooth head or a screw seized by corrosion. Stop if the driver keeps slipping.
What if the stripped screw is flush with the wood?
Start with a correctly sized bit and a friction aid. If the recess is destroyed, a carefully sized extractor may work without gouging the surface, but deep or delicate locations may justify professional removal.
Can I use a drill to remove a stripped screw?
Sometimes, with a dedicated extractor or left-hand bit and the right clearance. Freehand drilling can enlarge the hole or damage hidden parts, so it is not the first method to try.
How do I remove a screw that turns but will not come out?
That is more likely a stripped-thread problem than a stripped-head problem. The correct solution depends on the receiving material; avoid forcing the screw because you can enlarge the damaged hole.
Should I reuse the screw after removing it?
Generally no. Replace a damaged screw with a properly matched new fastener and repair the mounting hole or threads where necessary. The old head is likely to fail again.
Final Thoughts
Removing stripped screws is a controlled escalation, not a contest of force. The first response should be to stop cam-out and identify the actual fault. A fresh matching bit, steady hand pressure, and a rubber grip layer may save a mildly damaged head. Pliers can remove a raised head; specialized extractors may be appropriate when simpler methods fail. Cutting and drilling can work but create meaningful risks for delicate surfaces and concealed components. Choose the least destructive technique that suits the material, abandon unsafe improvisations, and replace the failed fastener only after checking why it stripped in the first place.