A kitchen knife that crushes tomato skins or slips across an onion can often be restored at home without grinding away large amounts of steel. The reliable way to approach how to sharpen kitchen knives is to identify the blade’s existing edge angle, stabilize a suitable abrasive, sharpen both bevels evenly, and remove the fine burr left at the edge. Plan for a deliberate first session rather than racing through strokes: consistency matters more than speed.
Quick Answer: For a plain-edge steel knife, use a manufacturer-approved whetstone or guided sharpener at the knife’s original angle. Work from a suitable sharpening grit to a finer finishing surface, use light controlled strokes, then clean and dry the blade before testing it on paper or produce. A honing rod maintains an existing edge but does not substitute for restoring a rounded or damaged bevel.
As an Amazon Associate we earn from qualifying purchases.
By DIY Ideas 4 Home Editorial Team
Before You Start: Tools, Materials and Safety
Different brands use meaningfully different cutting angles, so an arbitrary setting can alter the bevel rather than revive it. WÜSTHOF’s sharpening FAQ specifies approximately 14 degrees per side for its standard blades and 10 degrees per side for its Asian-style models. Identify your knife before touching a stone, especially if its edge was factory-ground for a specific sharpener.
| Tool or Material | Size or Spec | Why You Need It | Substitute |
|---|---|---|---|
| Waterstone | About 1,000 grit for routine sharpening; finer face optional | Removes metal in controlled passes and refines the bevel | Adjustable guided sharpener compatible with the knife |
| Stone holder | Non-slip base on a level worktop | Stops the abrasive from moving toward your hands | Damp towel under a stable stone tray |
| Clean water | Amount specified by the stone maker | Conditions a waterstone and rinses away swarf | Follow the instructions for a splash-and-go stone |
| Soft towel | Clean, dry, lint-free cloth | Dries the blade and keeps the work area tidy | Clean paper towels handled away from the edge |
| Test material | Plain printer paper or a tomato | Checks whether the finished edge cuts without snagging | Another soft-skinned vegetable on a board |
Check the Knife’s Edge and Material
Start with a conventional, double-bevel steel chef’s knife, santoku, or paring knife. Look at both faces under good light: a fine continuous cutting edge is appropriate for the method below, while teeth, chips, cracks, or a single-bevel profile may need specialized attention. Serrated bread knives should not be dragged across a flat stone as if they had continuous plain edges; ZWILLING’s care guidance directs serrated knives to professional sharpening rather than ordinary honing.
Do not assume that all Japanese-style knives share one angle. ZWILLING’s sharpening instructions describe approximately 15 degrees for its standard knives, while its MIYABI and certain other ranges have different specifications. Read the care card or manufacturer’s model page first. A blade that was previously reground might also have a bevel that differs from its original factory setting.
Choose Sharpening, Not Just Honing
Sharpening cuts a fresh bevel with abrasive material. Honing generally straightens or tidies an edge that still has usable geometry, although ceramic and diamond rods can also remove some metal. ZWILLING’s knife-sharpening article separates routine honing from occasional edge regrinding for this reason. If a few careful passes on an appropriate honing steel fail to restore a clean slice, continued aggressive steeling is unlikely to solve the problem.
Use the coarsest abrasive only when the knife truly needs it. A lightly dulled edge often needs a medium stone and a short finishing sequence, not a coarse repair session. Deep chips or a broken tip demand more metal removal and can change blade shape; an experienced sharpener is a safer choice for valuable knives or damage extending into the profile.
Secure the Stone and Protect Your Hands
Place the stone across a stable countertop at a comfortable height with adequate light. Keep fingers above the cutting edge, move slowly, and maintain a clear area behind the stroke. ZWILLING’s step-by-step stone tutorial specifically instructs the user to position the free hand on the blade, not directly on the sharpened edge. Keep children and pets away from the workstation, and never try to catch a falling knife or abrasive.
Before beginning, unplug any nearby appliance and dry the outside of the bench so the holder cannot skate. A soaked towel can anchor a holder, but it should not allow the stone to rock. If you cannot hold the knife at a stable angle without pressing your fingertips close to the edge, use a guided clamp system or request professional sharpening instead.
How to Sharpen Kitchen Knives Step by Step
For a standard plain-edge kitchen knife, a waterstone gives direct control over how much steel is removed. ZWILLING’s published stone guide describes setting the bevel between 10 and 20 degrees according to the blade and using repeated strokes on both sides before removing the burr. The practical goal is a continuous, clean apex along the entire cutting length, not a predetermined stroke count.
Step 1: Clean and Inspect the Blade
Wash the knife by hand to remove grease, stuck-on food, and any abrasive dirt that could obscure the edge. Dry it before examining the bevel in bright light. A rounded edge may show a thin reflective line where the cutting apex should be; chips can look like dark notches against a light background. Identify whether the knife has a full-length plain edge or a heel obstructed by a thick bolster.
Decide whether you are maintaining a serviceable edge or repairing real damage. If the blade is merely dragging through produce, begin with a moderate abrasive. If the steel has cracks or a loose handle, stop: sharpening does not correct a structurally unsafe knife. The knife should feel rigid in the hand before any pressure is applied.
Step 2: Prepare the Whetstone Correctly
Check the exact waterstone’s instructions because soaking rules vary. WÜSTHOF’s How to Sharpen Your WÜSTHOF Knives guide calls for submerging its traditional waterstone for approximately 10 minutes; ZWILLING’s general stone instructions mention about five minutes for the stone used in that demonstration. Neither instruction should be applied automatically to a ceramic splash-and-go abrasive, which may only need surface water.
Seat the prepared stone on its non-slip base, with the medium or sharpening face upward. Maintain a wet surface as the manufacturer directs. The gray slurry that develops on some stones is an expected mix of water and fine particles, not a sign that a knife needs extra pressure. If the stone is severely dished, flatten it according to its maker’s guidance before attempting a straight bevel.
Step 3: Match the Original Sharpening Angle
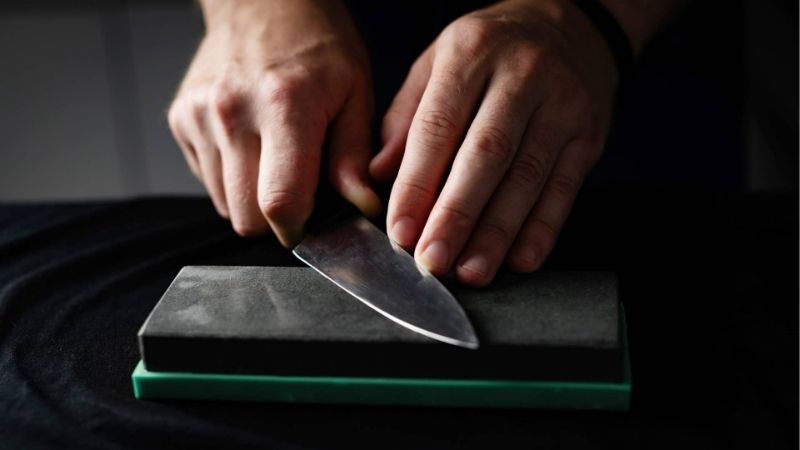
Set the blade on the stone and lift the spine until its existing bevel makes contact. Keep that relationship constant as you move from heel toward tip. WÜSTHOF lists 14 degrees per side for its standard knives; this is a useful example of why copying a generic 20-degree recommendation onto every knife can be counterproductive. Manufacturer instructions always take precedence over an online rule of thumb.
For a first attempt, work slowly enough to monitor the spine height and wrist position. Rotating the wrist at the tip can make that section more rounded than the middle. If maintaining the bevel is difficult, mark the existing bevel with a washable marker; after a light stroke, the location where the marking disappears can help you see whether you are contacting the intended surface.
Step 4: Sharpen the First Side Evenly
With the edge moving safely across the stone, draw the knife in controlled overlapping passes so the abrasive reaches heel, middle, and tip. ZWILLING’s sharpening guide suggests dividing a larger blade into sections and notes that a small burr may begin to develop after several passes. That is an observation, not an instruction to force a burr within a fixed number of strokes. Apply moderate, predictable pressure and let the abrasive do the cutting.
Check progress at intervals rather than grinding blindly. A slight burr or visible change in how the bevel reflects light can indicate that the new bevel is reaching the edge. Avoid pulling your fingertip along the cutting edge to find it. Keep the stone wet, and stop if the knife or holder shifts unexpectedly. The first side is finished only when the edge formation is reasonably consistent along its length.
Step 5: Turn the Blade and Match the Other Side
Flip the knife and repeat the same motion while preserving the opposing bevel’s intended angle. Do not move your supporting fingers onto the edge. ZWILLING’s stone tutorial describes working both sides in alternating sets and maintaining the selected angle throughout; it mentions roughly five to ten strokes per side as a teaching example. Your knife may need fewer or more passes depending on wear and abrasive speed.
Look for a balanced edge rather than attempting to match a number on a timer. If the knife develops a broad burr on one side but still shows a dull section near the heel, refine the neglected area with shorter, careful passes. Avoid excessive pressure on the tip, where the contacting area is small and the profile changes quickly. A consistent bevel is more useful than one highly polished patch.
Step 6: Refine the Edge and Remove the Burr
Switch to the finer stone face or finishing abrasive recommended for your system. WÜSTHOF’s current 1000/4000 combination stone illustrates the difference between a general sharpening surface and a finer refinement stage. Use progressively lighter passes, alternating sides more frequently so the thin strip of metal at the apex does not merely bend back and forth. A finishing sequence should reduce remaining roughness rather than create a fresh large burr.
Work the whole edge with minimal pressure and inspect it in light. Residual wire-like burrs can make a blade feel deceptively sharp for a few cuts and then fail. If the tip remains blunt, return to the appropriate sharpening surface briefly instead of polishing the rest of the knife longer. Do not scrape the cutting edge against a metal sink, glass plate, or countertop to remove a burr.
Step 7: Rinse, Dry and Test the Result
Wash the knife thoroughly after sharpening to remove loose steel and stone residue, then dry the blade and handle by hand. WÜSTHOF’s stone instructions direct users to rinse and immediately dry the knife after the finishing passes. Keep the edge pointed away from your wiping hand. A clean blade is particularly important before it returns to food preparation, where abrasive particles have no place.
For an initial check, hold a sheet of ordinary paper away from your body and try a slow cut from the heel toward the tip. ZWILLING recommends paper as a practical sharpening check: snagging at one location may reveal an unfinished section. Test on a tomato on a secure board if you prefer a kitchen task; the skin should part without heavy downward force. Neither test requires shaving hair or touching the edge with a thumb.
Products That Help
For hands-on stone sharpening, the WÜSTHOF Whetstone J 1000/4000 with Non-Slip Holder, model 3069720101, combines a 1,000-grit sharpening face with a 4,000-grit finishing face. WÜSTHOF’s product page specifies water soaking and includes a holder, making it appropriate when you want to practice controlled strokes on compatible steel blades. Check current availability and confirm your knife’s recommended abrasive before buying.
If angle consistency is your main difficulty, the Work Sharp Precision Adjust Knife Sharpener, model WSBCHPAJ, uses a V-block clamp, 320- and 600-grit diamond abrasives, a fine ceramic surface, and 15- to 30-degree adjustment, according to Work Sharp’s product documentation. For between-session edge maintenance, the WÜSTHOF 10-inch Honing Steel, model 3049700526, is a separate tool intended to maintain a good edge, not rescue a severely dull knife. Check each listing for the correct version and compatibility.
Common Mistakes to Avoid
Switching to a random angle can remove more steel than necessary and may make the knife feel worse before a new bevel is formed. Pressing harder is not a substitute for picking the right abrasive. Likewise, a rod sold as a honing steel is not the same as a complete sharpening system, even though some ceramic or diamond rods remove material. ZWILLING explicitly distinguishes honing an existing edge from regrinding a worn one in its maintenance guide.
Do not use a standard slot sharpener on an expensive thin Japanese blade unless its manufacturer approves the specific edge geometry. Fixed-angle devices may reshape an edge when their setting differs from the knife’s original bevel. Avoid dishwasher cleaning after sharpening, since harsh washing and contact with other utensils can damage an edge. A knife guard or suitable rack prevents the new edge from knocking against metal in a drawer.
Frequently Asked Questions
Knife maintenance questions often involve specialized blades or sharpening habits rather than the basic stone sequence. The answers below help you decide when to change the method instead of repeatedly grinding the same steel.
Can You Sharpen a Serrated Bread Knife at Home?
Yes, but not with the flat-stone method used for a plain-edge chef’s knife. Each serration has its own scallop, so a correctly sized tapered rod and careful work are needed if the maker permits home sharpening. ZWILLING’s sharpening guide advises professional service for serrated knives. That is the lower-risk option if the knife has a fine or unusual tooth pattern.
Is an Electric Knife Sharpener Safe for Japanese Knives?
Only when the sharpener explicitly supports the knife’s steel, blade profile, and existing edge angle. A fixed-angle electric slot can grind a new bevel that differs from a factory Japanese edge. WÜSTHOF’s FAQ illustrates the variation by distinguishing its 14-degree standard edges from 10-degree Asian-style models. Consult both manufacturers before feeding a thin blade into powered abrasives.
How Often Should I Sharpen a Chef’s Knife?
Sharpen it when normal honing no longer restores controlled cutting, not automatically after a set number of days. ZWILLING’s maintenance article recommends regular honing and occasional sharpening because these remove or realign the edge in different ways. Frequency depends on cutting-board material, steel hardness, how often the knife is used, and whether the blade contacts bones, frozen food, or hard surfaces.
Can Ceramic Kitchen Knives Be Sharpened on a Whetstone?
Do not assume that an ordinary waterstone or steel is suitable. Ceramic is much harder and more brittle than common stainless kitchen-knife steel, and an incorrect setup can chip the edge. Use a maker-approved diamond abrasive or a service that specifically handles ceramic knives. For a chipped ceramic blade, ask the manufacturer whether repair is supported before attempting any grinding at home.
Final Thoughts
After learning how to sharpen kitchen knives, record which abrasive and angle actually restored your particular blade instead of starting from scratch next time. This is especially useful in a kitchen with several brands that use different bevel geometries. Keep the first sharpening session conservative; if a thick bolster prevents access to the heel, or the knife has substantial chips, have a professional assess its profile before removing more metal. Choose the stone or guided sharpener that matches that blade, confirm the product model before purchasing, and store the finished knife so the renewed edge stays protected.