Key takeaways
- Plug-in with RF remote: easiest path. Adapter goes into an existing outlet, remote handles dimming and timing. The WOBANE kit works this way.
- Hardwired to a wall switch: cleanest look, no visible driver. Requires comfort with a junction box and, in many areas, permits. Hire an electrician if you’re unsure.
- Cord routing: run linking cables along the back inside corner where the cabinet meets the wall, secured with adhesive clips every 8 inches.
- Sensor placement: motion sensors need a clear line to the approach path — don’t tuck them behind a canister.
What's inside
Bad counter lighting shows up in small ways first. You squint at a cutting board, misread a measuring cup, then start dragging prep work over to the window because the light there is honest. The problem usually isn’t your ceiling fixtures — it’s that your own body blocks them. Standing at the counter puts your shoulders between the bulb and the work surface, and no amount of wattage overhead fixes that geometry. Under-cabinet lighting solves it by putting the source below the obstruction, roughly 18 inches above the countertop, aimed straight down where your hands actually are.
This guide walks through what I’ve learned installing these in my own kitchen and a few friends’ places: the real split between rechargeable pucks and wired strips, how to read the specs that matter (and skip the ones that don’t), where to physically mount the fixture so you don’t stare into a glare line, and which products hold up. Expect about an afternoon of work for a wired kit, or fifteen minutes for battery bars.
As an Amazon Associate we earn from qualifying purchases.


🛒 Best Price Today on Amazon
Prime members get fast, free shipping on everything above, plus member-only deals. New members get a 30-day free trial — cancel anytime.
Rechargeable Bars vs. Wired Strips: Pick Your Lane First
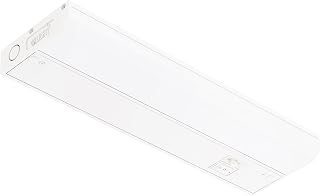
Everything downstream depends on this choice. Rechargeable motion-sensor bars stick up with magnetic mounts, need zero tools, and come off for charging via USB-C. They’re ideal for rentals, closets, pantries, and any spot where running a cord is a nonstarter. Something like the MCGOR 10-inch 2-pack or the Gritin 10.2-inch set covers a short counter run or a linen shelf without a single screw. The tradeoff is recharging — expect to pull them down every few weeks under regular kitchen use. Wired kits like the WOBANE 6-piece 20-inch kit or the 12-inch 6-bar 2000-lumen kit plug into an outlet (or get hardwired into a switch) and simply stay on task forever. For a working kitchen you cook in daily, wired wins.
Lumens, Color Temperature, and CRI
Aim for 200–350 lumens per linear foot of counter. Under that you get mood lighting; over it you get an operating theater. The 1500-lumen WOBANE spread across roughly 10 feet lands right in the useful zone, while the 2000-lumen 12-inch kit runs brighter for anyone with dark granite or deep-toned cabinets that swallow light. Color temperature matters just as much: 2700K reads warm and blends with incandescent fixtures, 3000K–3500K is the sweet spot for most kitchens, and 4000K+ starts feeling clinical. Adjustable-temperature bars like the Gritin or the RUIKORING 8.5-inch 6-pack let you test without committing. If a listing hides its CRI, assume it’s around 80 — fine for a closet, mediocre for judging whether chicken is done. Look for CRI 90+ when you can find it.
Mount Position Is Half the Result
The single most common mistake is mounting flush with the cabinet’s front edge, which puts the LEDs in your direct sightline. Instead, set the fixture back one to two inches from the front lip and slightly forward of the cabinet’s back wall. That angle throws light onto the counter and the backsplash while the cabinet frame shields the diodes from your eyes. Before you commit adhesive, hold the bar in position, power it on, and stand where you normally work. Move it an inch at a time. On face-frame cabinets you may need a small shim or a light channel to clear the frame’s lip.
Wiring, Switching, and Cord Management
- Plug-in with RF remote: easiest path. Adapter goes into an existing outlet, remote handles dimming and timing. The WOBANE kit works this way.
- Hardwired to a wall switch: cleanest look, no visible driver. Requires comfort with a junction box and, in many areas, permits. Hire an electrician if you’re unsure.
- Cord routing: run linking cables along the back inside corner where the cabinet meets the wall, secured with adhesive clips every 8 inches.
- Sensor placement: motion sensors need a clear line to the approach path — don’t tuck them behind a canister.
Motion Sensors: Where They Shine and Where They Annoy
Motion activation is genuinely great in pantries, closets, and stairwells, where you want light for thirty seconds and nothing else. The 3-pack wireless bars with power display handle those spots well, and the battery readout removes the guesswork about when to recharge. In an active kitchen, though, constant retriggering gets tiresome fast. Look for bars with a manual always-on mode alongside the auto setting — the Gritin’s four modes cover this — so the same fixture can work either way.
Tips
- Clean mounting surfaces with isopropyl alcohol, not dish soap. Residual grease is why adhesive strips fail after two months.
- Buy one more bar than your measurement suggests. Gaps between fixtures create scalloped shadows that are impossible to ignore once you notice them.
- If your backsplash is glossy tile or polished stone, drop the brightness a level — reflected glare doubles the perceived output.
- Charge rechargeable bars in pairs on a rotating schedule so you’re never fully dark in one zone.
Frequently Asked Questions
How long do rechargeable under-cabinet lights last per charge?
Motion-sensor mode typically yields two to six weeks of normal use, since the light only runs in short bursts. Running them constantly on full brightness drops that to three or four hours. Mid-level brightness roughly doubles runtime compared to maximum.
Can I cut LED strip kits to fit odd cabinet runs?
Rigid bar kits like these aren’t cuttable — you select bar lengths that fit and link them with connector cables. Only flexible tape-style strips with marked cut points can be trimmed, and cutting them usually voids the warranty.
Do I need a dimmer?
It’s worth having. The same fixture serves as bright task light for chopping and low ambient light for evenings. Most kits here include 5-level dimming via remote or an onboard button, so you don’t need a separate wall dimmer.
Will these work in a bathroom or damp area?
Only if the fixture carries an IP44 or higher rating. Most under-cabinet kitchen lights are rated for dry locations. Check the spec before installing anywhere near a shower or sink splash zone.
Conclusion
Match the mounting method to your situation, get the lumens and color temperature in a sane range, and spend an extra five minutes finding the right setback before the adhesive goes down. Rechargeable bars like the MCGOR or Gritin sets handle closets and rentals with almost no effort, while a wired kit such as the WOBANE 20-inch set gives a daily-use kitchen light that never needs thinking about again — and either way, the difference on your counter is immediate.