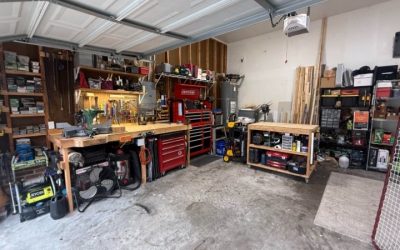
A garage gets easier to work in when every tool has an obvious home and the path from the door to the workbench stays clear. Learning how to organize garage tools is less about buying matching bins than assigning storage according to weight, project type, and how often each item leaves its shelf. A typical one-car garage can start with one wall, one drawer, and an afternoon of sorting.
Quick Answer: Empty and inventory one zone, group tools by task, place daily-use items within easy reach, store heavy equipment low, and put small fasteners in labeled bins. Choose a properly mounted pegboard for hand tools, drawers for precise or valuable items, and rated shelving for bulky cases. Build in space for future tools and test the layout on a real project.
As an Amazon Associate we earn from qualifying purchases.
By DIY Ideas 4 Home Editorial Team
Before You Start: Tools, Materials and Safety
The Home Depot’s pegboard organization guide emphasizes grouping tools by size or frequency of use and hanging heavier items lower. That is a useful design rule, but the wall itself still determines how much load can be supported. Plan storage around the structure, vehicle clearance, garage-door track, and walking routes before ordering shelving.
| Tool or material | Size or spec | Why you need it | Substitute |
|---|---|---|---|
| Tape measure and painter’s tape | Measure wall and vehicle clearance | Mark zones before mounting hardware | Cardboard storage-size templates |
| Stud finder and level | Match wall construction | Locate sound mounting points | Verified plans and manual stud checks |
| Tool chest or drawer cabinet | Load-rated for stored contents | Protect valuable and sharp hand tools | Sturdy divided toolbox |
| Pegboard and approved hooks | Rated system with proper spacers | Visible storage for commonly used hand tools | Slatwall or a suitable tool rail |
| Shelving and small-parts bins | Manufacturer-rated shelves and anchors | Store cases and identify fasteners | Stackable labeled boxes kept low |
Measure useful space, not just an empty wall
Park the vehicle where it normally sits, open its doors, and mark the space that must remain clear. Check the path of the overhead garage door and opener, access to the electrical panel, any water heater or furnace, and the route to an exit. A shelf that looks fine while a car is outside may obstruct a door handle or make a fire extinguisher unreachable when the garage is in use.
Measure workbench depth and the space needed to lift a long tool or open a cabinet drawer. If the garage doubles as laundry or a bicycle area, reserve those pathways before storing tools. Organizing around actual movement prevents a tidy wall from creating a new daily inconvenience.
Check load ratings and wall construction
Garage walls may be finished drywall, exposed wood studs, masonry, or a combination. A hook rated for a particular load is only as secure as its mounting arrangement. Use the specified fasteners and embedment for the system and the wall material; drywall alone should not be treated as a universal anchor for heavy equipment. The Home Depot’s garage storage buying guide also advises anchoring freestanding cabinets when recommended to prevent tipping.
Keep an eye on shelving capacity: ratings may apply per shelf only when weight is evenly distributed and the unit is assembled and anchored as directed. A stack of impact sockets or a bench vise concentrates weight in a small area. Position heavy items low rather than trying to maximize vertical storage at any cost.
Separate sharp, hazardous, and valuable items
Store saw blades, sharp chisels, and loose drill bits in guarded sleeves or closed compartments, not at face height on exposed hooks. Keep fuels, solvents, paint, and lithium-ion batteries according to their own label or manufacturer storage guidance rather than treating them as ordinary fasteners. Maintain clear space around combustion appliances and electrical equipment as required by their instructions and local codes.
Children may enter garages unexpectedly. Lock cabinets containing chemicals, blades, or other dangerous items and avoid unstable stacks that can be pulled down. A tidy-looking pegboard is not inherently a safe place for every tool in the collection.
How to Organize Garage Tools Step by Step
The seven steps below create a system you can maintain without purchasing storage for every object. Start with a small pilot area if the garage is packed; finishing one functional zone is more valuable than spreading every tool across the floor.
Step 1: Empty one area and create an inventory
Clear a single cabinet, tool cart, or bench section. Place its contents where they cannot block exits or create a tripping hazard. Divide items into functional groups such as measuring, fastening, cutting, drilling, electrical testing, automotive repair, lawn care, and consumables. Note duplicates and anything broken, missing a guard, or unsafe to use.
Do not discard specialty accessories simply because you cannot identify them. Put mystery parts in a labeled review box and investigate their fit later. On the other hand, empty packaging, damaged disposable blades, and hardened glue tubes do not need permanent storage positions. The objective is an accurate inventory, not a rush to make the bench look bare.
Step 2: Sort by frequency and project type
Give everyday tools such as tape measures, safety glasses, common screwdrivers, and a utility knife the easiest positions to reach. Put occasional plumbing and painting tools together in separate bins, and reserve high shelves or less prominent drawers for seasonal accessories if their weight allows. Task grouping cuts search time because you can retrieve one kit for a job rather than hunting across the entire garage.
Frequency should outrank matching shapes. A constantly used driver belongs near the workbench even if it looks neater hanging beside four seldom-used drills. Set aside a return zone for tools that need cleaning or repair; placing dirty equipment directly into clean drawers hides maintenance problems.
Step 3: Design the wall and bench zones on paper
Use painter’s tape to outline pegboard panels, shelves, cabinets, and a charging station. Keep the most-used zone between a comfortable waist and shoulder height, with heavy tools and cases lower. Leave an uninterrupted work surface for assembly, and test whether you can reach the power outlets without draping cords across walking paths.
The best location for a pegboard is usually above or beside the bench, where small hand tools can be returned in seconds. A cabinet may be better where sawdust, humidity, or overspray would coat exposed tools. Before fastening anything, check where wall-mounted plumbing or wiring may run, using appropriate inspection methods and caution.
Step 4: Install rated cabinets, pegboard, and shelves
Follow each manufacturer’s mounting instructions, using a level and fasteners appropriate for confirmed framing or masonry. Pegboard systems generally need a gap behind the board so hooks engage properly; The Home Depot describes using furring strips for standard hardboard installations. Do not improvise a heavy-duty wall rack using only generic drywall screws.
Anchor tall cabinets when directed and make sure drawers can open without a vehicle blocking them. Load shelves gradually, then check for movement or sagging. Store heavy cases on lower shelves and use enclosed cabinets for items you do not want exposed to dust. If the wall has unusual framing or you cannot confirm attachment points, ask an installer before placing a large load overhead.
Step 5: Make small parts searchable
Fasteners, wall anchors, washers, spare batteries, bits, and sockets disappear when several sizes share one bucket. Separate them into shallow divided containers, label the actual size and type, and place similar categories together. A label such as “#8 wood screws, 1-1/4 in.” is more useful than “hardware” when a repair must be completed quickly.
Use drawers or containers with secure lids for parts that can spill. Keep metric and SAE fasteners clearly separated and store matching driver bits close to the fasteners they service. If you buy a mixed kit with its own organizers, consider retaining that case rather than transferring the pieces into a system that loses the size markings.
Step 6: Set a tool return and charging routine
Outline common hand tools on the pegboard, or use readable labels inside drawers. Reserve a narrow tray for tools waiting to be cleaned and maintain a second spot for damaged items that should not be returned to circulation. This separation prevents a drill with a questionable battery or a chipped blade from silently reentering the kit.
Place battery chargers in a dry, ventilated location that follows manufacturer clearance and temperature guidance, and keep cables controlled without covering heat-dissipating openings. Charging is not the same as indefinite storage: follow each battery maker’s instructions. Do not position a charging area directly beside paint thinners, loose paper, or other easily ignited clutter.
Step 7: Test the system on one real project
Choose a small repair such as tightening cabinet hinges or replacing a shelf bracket. Collect everything the job requires and track where you have to walk, bend, or open several unrelated drawers. Afterward, return each item and decide whether the storage locations made sense. If a common tool is awkward to return, it will soon be left on the bench.
Make only a few changes after this test; endless rearrangement is as inefficient as disorganization. Once a week, reset the bench and tool return tray. At seasonal intervals, inspect anchors, cabinet stability, humidity, and the condition of stored blades and batteries so the neat layout stays safe.
Products That Help
A garage tool chest is well suited to sockets, measuring instruments, and compact sharp tools; a wall tool organizer or pegboard improves visibility for lightweight hand tools used repeatedly. Garage shelving works best for labeled cases, bins, and bulky items, provided its actual load capacity and assembly requirements match the plan.
Buy storage only after the inventory and tape layout. A small labeled parts organizer often solves more frustration than another large rack, while a locking cabinet may matter more than open display storage in a household with children. Specific product capacities should be checked against the manufacturer’s current installation instructions rather than inferred from photos.
Common Mistakes to Avoid
Avoid arranging everything by color or tool brand if it scatters the tools needed for one repair. Do not stack heavy equipment overhead merely because floor space is limited, place chargers in sealed boxes, or fill every available hook; some empty capacity allows the system to adapt. Overcrowded storage makes sharp tools collide and encourages clutter to build up again.
Also avoid mounting a cabinet over a light switch, electrical panel working area, gas appliance service space, or the path of the garage door. Any storage system that obstructs safety access has failed even if it looks impressive in a photograph.
Frequently Asked Questions
Garage layouts differ, but a few recurring decisions determine whether an organizing plan remains practical.
Is pegboard strong enough for power tools?
Sometimes, but only when the panel, hooks, and installation are rated for the actual load. For heavier drills, saws, or stacked tools, a load-rated cabinet or dedicated rail may be safer. Mounting screws in structural framing and following the manufacturer’s system rating matter more than the pegboard material alone.
What should I store in the top drawers of a tool chest?
Light, frequently used items such as measuring tapes, bits in labeled cases, pencils, and small hand tools suit upper drawers. Keep the heaviest sockets, power tools, and dense accessories lower to reduce tip risk. Observe the chest’s individual drawer and total load ratings and any anti-tip instructions.
How can I organize tools without drilling into walls?
Use a stable freestanding tool cart, a suitable portable chest, or shelving designed for freestanding use; anchor units when the manufacturer requires it. Avoid using narrow tall furniture as a substitute for a rated workshop cabinet. Even renters should verify that the garage floor is level and that storage cannot block an exit.
How often should garage tools be reorganized?
Return tools after each project and do a brief weekly reset. A deeper seasonal review is useful before major lawn care, winter weather, or vehicle maintenance periods. Change the layout when your actual work changes; a system that must be completely rebuilt every month is too complicated.
Final Thoughts
A useful answer to how to organize garage tools is to store the next tool where your hand naturally reaches for it, not where an empty wall happens to be available. Leave one clearly labeled holding tray for borrowed tools and parts returning from projects. That small accountability step can keep an otherwise excellent organization system working long after the initial makeover.