A toilet that keeps refilling or hissing after a flush usually has a leaking flush seal, an incorrectly adjusted float, or a fill valve that is not shutting off. Knowing how to fix running toilet problems starts with watching where the tank water goes. A short inspection can prevent you from buying the wrong part, and many repairs require only basic hand tools. If water is leaking outside the tank, shut off the supply first rather than continuing these internal-tank checks.
Quick Answer: Remove the tank lid, flush once and watch the water level. Water spilling into the overflow tube points toward a fill-valve or float issue; a tank that quietly loses water points toward its flapper or flush seal. Try adjusting the chain or float, then replace only the defective component. Finish with a dye test to confirm that the leak has stopped.
As an Amazon Associate we earn from qualifying purchases.
By DIY Ideas 4 Home Editorial Team
Before You Start: Identify the Leak and Gather Tools
These directions apply primarily to ordinary residential gravity-fed toilets with a removable tank lid. A dual-flush or canister-style tank can have different seals and adjustments, so identify your mechanism before ordering parts. The goal is to locate water escaping inside the tank without disturbing the bowl, tank bolts, or supply plumbing unless a specific repair requires it.
| Tool or Material | Size or Spec | Why You Need It | Substitute |
|---|---|---|---|
| Flashlight | Handheld light | See overflow tube and water line | Phone flashlight |
| Food coloring or leak dye | A few drops | Check for tank-to-bowl seepage | Toilet leak-detection tablet |
| Soft cloth or sponge | Nonabrasive | Clean the flush-valve seat | Soft paper towel |
| Bucket and towel | Small household bucket | Catch water if disconnecting fill valve | Shallow pan and rags |
| Replacement part | Matched flapper or fill-valve model | Repair the confirmed failure | Manufacturer-specific repair seal |
| Pencil | Regular pencil | Mark the settled tank water level | Removable dry-erase marker |
Confirm What Kind of Toilet You Have
Lift the tank lid straight up and set it on a soft towel. Look for a hinged rubber flapper attached to the bottom flush-valve opening, a tower or canister that lifts vertically, or a dual-flush assembly with two buttons. Their seals are not interchangeable. Korky’s product page for its 2001 flapper specifies a 2-inch flush-valve opening; that makes it a reasonable candidate only after you confirm the outlet size and flapper style.
A toilet labeled 1.28 or 1.6 gallons per flush does not automatically tell you the drain opening diameter. Find the tank model or inspect the removed seal before ordering. On special one-piece or pressure-assisted designs, consult the actual manufacturer’s service instructions. Opening or repairing a sealed pressure vessel is not part of this homeowner procedure.
Locate the Shutoff and Set a Safe Work Area
Identify the stop valve on the wall or floor behind the toilet before starting. Turn it gently clockwise to shut off the supply when a step calls for it; do not force a corroded or frozen valve. Put a towel under the tank, keep the ceramic lid clear of the work area and avoid overtightening plastic fittings. If the stop valve itself leaks, stop and arrange a plumbing repair before dismantling anything.
Do not confuse tank water with water around the base of the toilet. A damp floor near the supply connector may be a supply leak, while water appearing near the base only during flushing can indicate a failed bowl seal or loose fixture. Neither problem is corrected by adjusting the flapper. These symptoms deserve prompt evaluation because the resulting moisture may damage flooring and subflooring.
How to Fix a Running Toilet Step by Step
Work from observation to adjustment, then replace parts only if a check identifies a failure. Run the same tests after each change so you know what fixed the problem. If the toilet is merely completing its normal refill immediately after a flush, allow it to finish before diagnosing a continuous run.
Step 1: Watch the Tank After a Flush
With the tank lid off, flush once and let the tank fill. Note whether the fill valve shuts off, whether the water rises into the vertical overflow tube, and whether it starts again after a quiet interval. If the bowl continues to receive water while the tank level remains high, the problem is on the refill or overflow side. If the fill valve stops and then restarts unexpectedly, suspect water leaking through the seal at the bottom of the tank.
Locate the maker’s waterline mark on the tank wall or fill valve, if provided. Do not mistake the top of the overflow tube for the normal target level. The American Standard Champion troubleshooting instructions distinguish a drop to the flapper seal from water flowing over the overflow tube; the two observations lead to different repairs. Take a photo before moving any clips or adjustment screws.
Step 2: Test for a Hidden Tank-to-Bowl Leak
When the tank has refilled and is quiet, add a few drops of food coloring to its water without flushing. EPA WaterSense’s Home Maintenance guidance says to wait 10 minutes and check whether color appears in the bowl. Colored water in the bowl means the tank is leaking through a seal or passage where it should not. Flush immediately afterward to avoid dye stains; colorless water does not rule out an intermittent problem that occurs only after some flushes.
For a second way to narrow the fault, Korky’s running-toilet guide recommends marking the full tank level with a pencil, closing the supply valve and waiting at least 25 minutes. A falling line confirms tank water is leaving while the inlet is off. If the level settles near the flapper or canister seal, inspect that seal. If it falls significantly below the flush opening, the overflow tube or flush-valve assembly may be damaged instead.
Step 3: Check the Handle and Flapper Chain
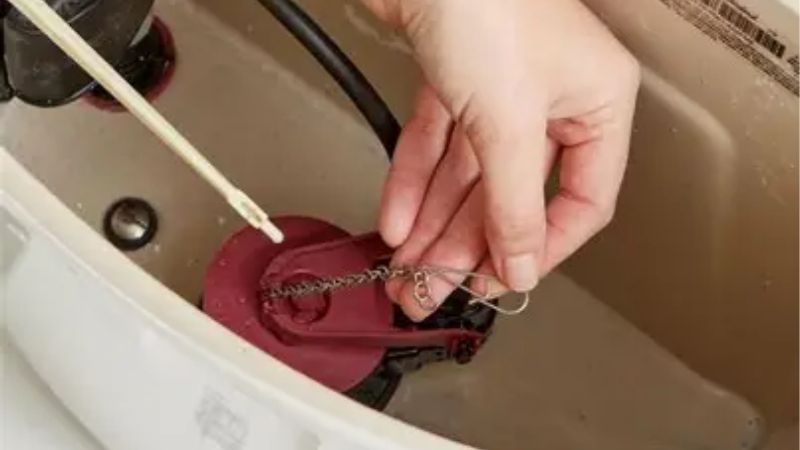
Press and release the flush handle while watching the lift arm and chain. The rubber flapper should rise for the flush, then settle evenly back onto its seat. A taut chain can keep one edge open; an excessively long chain can tangle under the seal. The Korky running-toilet guide recommends roughly 1 to 2 chain links of slack for its typical flapper setup, but follow the clearance specified for your replacement part.
Move the hook one link at a time rather than shortening the chain dramatically. Check that the lever does not rub the lid, bind against the fill valve, or hang in its raised position. Flush again after each adjustment. A chain fix should leave the flapper closing freely with a decisive end to the flush; a running sound that persists after the flapper is seated means there is another cause to investigate.
Step 4: Lower an Overfilled Tank Water Level
If you see water spilling over the top of the overflow tube, the tank is filling too high or the fill valve is failing to close. Adjust the float using the mechanism specified for that valve: a screw on some cup-style units, a clip on others, or a manufacturer’s height adjustment. Make a small change, flush, and wait for the fill cycle to stop. Aim for the tank’s original waterline mark and keep the resting water below the overflow tube.
Korky’s installation directions for its adjustable fill valves use a reference mark about 1/2 inch below the overflow-tube top for certain configurations. That is a product-specific setup check, not permission to ignore the toilet maker’s labeled waterline. If lowering the float does not stop the continuous flow, sediment in the inlet or a worn valve seal may be preventing shutoff. Do not keep turning an adjustment screw in hopes of compensating for a valve that cannot close.
Step 5: Clean the Flush Seal and Valve Seat
Shut off the water and flush to reduce the tank level before handling the seal. Examine the flapper’s underside and the smooth rim it rests on. Slime, grit or mineral residue can hold a small gap open; gently wipe both contact surfaces with a soft cloth. Avoid abrasives or metal scrapers that can scratch the valve seat, and do not pour aggressive cleaners into the tank. Damage to the seat can make a new flapper leak just as badly.
Feel for a flapper that is swollen, warped, cracked or unusually stiff. A deteriorated seal may appear clean and still fail to close. Inspect the plastic overflow tube for cracks, especially near its base. American Standard’s Champion troubleshooting guide separates a failed flush-valve assembly from a replaceable seal by observing how far the standing tank level drops. If the plastic tube or valve body is cracked, cleaning will not restore a watertight joint.
Step 6: Replace a Worn Flapper or Flush Seal
Buy a replacement that matches the existing mechanism, flush opening and, when applicable, the toilet’s manufacturer part number. With the supply shut off and most water flushed out, unhook the chain and remove the old flapper from its hinge posts only if your assembly uses that style. Fit the new seal without stretching it, reconnect the chain with suitable slack and confirm it moves freely. A canister-style or dual-flush toilet requires its own manufacturer’s seal procedure rather than standard flapper hinges.
The Korky 2001 product page confirms that its flapper is intended for a 2-inch plastic flush-valve opening, so it should not be substituted into a 3-inch opening just because the brand matches. For detailed flapper sizing and installation variations, see our separate guide to replacing a toilet flapper. Once the new seal seats, reopen the supply and let the tank settle. If the leak test still fails, inspect the seating surface and determine whether the flush-valve assembly itself needs repair.
Step 7: Service the Fill Valve and Verify the Fix
If the float is correctly set but the valve still hisses or overfills, consult the precise fill-valve manual before opening its cap. Certain Korky valves can be cleaned or serviced; other designs require replacement of the complete unit. For a replacement, close the stop valve, flush out most tank water, sponge out the rest and place a bucket beneath the supply fitting. Disconnect the line, remove the mounting nut and install the matching fill valve according to its instructions.
Korky’s fill-valve replacement guide calls for hand-tightening its connection and clipping the refill tube to the overflow tube rather than pushing it deeply inside, where it can promote siphoning. Check that the bowl refills to its normal level and that the tank shuts off before the overflow. After reassembly, dry the outside of the tank and supply fitting, then watch several refill cycles for seepage. Run EPA WaterSense’s 10-minute dye test again to confirm that no color enters the bowl without flushing.
Products That Help
The Korky Plus 2001 2-Inch Universal Toilet Flapper is a direct replacement candidate for a confirmed 2-inch plastic flush opening. Korky’s part 2001 product page lists chlorine-resistant rubber and a stainless-steel chain, with a 5-year warranty. Choose this only after identifying the existing flush valve; a large-opening or canister toilet needs a different seal. Check the current product listing and exact fit before buying.
The Korky QuietFILL Platinum 528MP Toilet Fill Valve addresses a different failure: a fill valve that fails to shut off or refill correctly despite proper float adjustment. Korky’s 528MP product page describes an adjustable bowl-refill control and serviceable strainer, plus a 5-year warranty. It is marketed for many toilets made since 1994 using 1.6 gallons per flush or less, but the specific tank and installation clearances still need confirmation. Do not buy a fill valve for a dye-positive flapper leak without first inspecting the flush seal.
Common Mistakes That Make the Leak Return
One mistake is tightening the lift chain until the flapper barely opens; that can keep it from sitting flat. Another is installing a fill valve high enough to send water into the overflow tube, then mistaking the resulting hiss for a flapper leak. Submerging a refill hose where the manual calls for an air gap can also create an unwanted siphon. Each failure produces running water, but the correction differs.
Do not overtighten tank bolts or the plastic fill-valve mounting nut. Ceramic can crack, and a damaged tank can cost much more than the repair part. Avoid replacing several unrelated components merely because the toilet is old: first make one observation that identifies the leak path. Conversely, if the flush-valve seat is visibly broken, a new rubber flapper alone is unlikely to succeed. A complete valve repair may require separating the tank from the bowl.
Frequently Asked Questions
A running toilet can waste water even when there is no puddle on the floor. These questions cover situations that may persist after the main checks, including intermittent cycling and toilets without an ordinary rubber flapper.
Why Does My Toilet Run Every Few Minutes?
That intermittent sound often means the fill valve is replacing water that slowly leaked from the tank into the bowl. A worn seal is a leading possibility, but a leaking flush-valve seat or overflow-tube defect can produce a similar cycle. The Korky running-toilet guide recommends shutting off the inlet, marking the tank level and watching it fall to locate the internal leak before buying a part.
Can a Running Toilet Increase My Water Bill?
Yes. Water can flow silently from the tank into the bowl and down the drain, even without a visible leak on the bathroom floor. EPA WaterSense’s Fix a Leak Week guidance identifies worn toilet flappers as a common household leak source and recommends prompt repairs. The actual cost depends on your local rates, how fast water escapes and how long the condition has persisted, not simply whether you hear a hiss.
Why Does the Toilet Still Run With a New Flapper?
A new flapper can fail if it is the wrong size, its chain is too tight, or the flush-valve seat is rough or cracked. Watch whether water escapes through the opening below the flapper or flows over the overflow tube. Korky’s running-toilet troubleshooting guide specifically calls out chain slack and mineral buildup at the sealing edge after a flapper replacement. A confirmed faulty fill valve needs a separate repair.
Does a Dual-Flush Toilet Have a Flapper?
Not necessarily. Many dual-flush models use a tower, cartridge or gasket arrangement instead of a hinged rubber flap. The correct seal may be identified by the number molded into the valve or the toilet’s tank model. Do not force a standard 2-inch flapper onto a dual-flush assembly. Consult its exploded-parts diagram and obtain the specified seal before disassembly; some designs also need button travel adjusted after servicing.
Final Thoughts
For a durable repair, write down which test exposed the problem and keep the tank model or replacement part number with your household maintenance records. If dye no longer reaches the bowl, the water stops below the overflow tube and the supply fitting stays dry through several flushes, the repair has a meaningful confirmation rather than just a quieter sound. If water continues to escape outside the toilet, a shutoff valve is seized, or an internal crack is visible, stop troubleshooting and contact a plumber. Otherwise, repeat EPA WaterSense’s annual leak check and choose a flapper or fill valve only after matching the actual failure and fit.