A worn rubber seal can let tank water slip into the bowl long after a flush. Learning how to replace toilet flapper parts starts with confirming that your tank actually has a hinged flapper, then matching the replacement to its flush-valve opening. Most conventional flappers hook onto two pegs and connect to the handle with a short chain. You generally do not need to remove the toilet or disconnect its water line for this repair.
Quick Answer: Turn off the supply valve, empty the tank, unhook the old flapper, clean its seat, and snap on a compatible replacement. Set the chain with a little slack, refill the tank, then flush and run a dye test. Stop if the shutoff valve leaks, the plastic valve is cracked, or the tank has a different flush mechanism.
As an Amazon Associate we earn from qualifying purchases.
By DIY Ideas 4 Home Editorial Team
Before You Start: Tools, Materials and Safety
Choose the part before taking the old seal off. Korky’s flapper-sizing guidance identifies two common flush-valve opening sizes, 2 inches and 3 inches, but a tank may also contain a flush tower or canister that uses a different replacement seal. With the right part on hand, the work is confined to the tank rather than the supply plumbing.
| Tool or Material | Size or Spec | Why You Need It | Substitute |
|---|---|---|---|
| Replacement flapper | Compatible 2-inch or 3-inch unit | Seals the flush-valve opening | Exact manufacturer replacement |
| Measuring tape | Inches marked clearly | Identifies the valve opening size | Tank model number and parts chart |
| Towel and small sponge | Clean, absorbent | Catch residual tank water | Small cup and cloth |
| Soft cloth | Nonabrasive | Wipes sediment off the valve seat | Soft sponge |
| Food coloring | A few drops | Checks whether tank water leaks into bowl | Toilet leak-detection dye tablets |
Identify the flush mechanism first
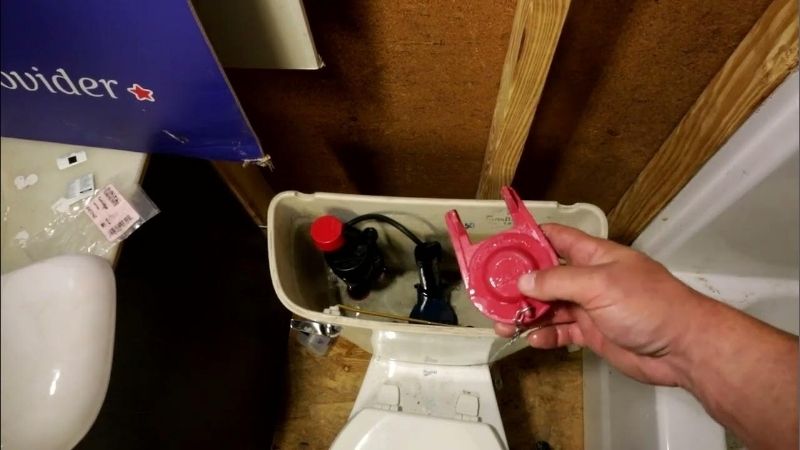
Remove the porcelain tank lid with both hands and put it on a protected, flat surface. Look for a flexible flap covering the large drain opening near the bottom of the tank, with two mounting ears and a chain running toward the handle. That is the conventional design these instructions cover. Photograph the arrangement before touching anything, including the chain attachment point and the adjustment dial if one is present.
A cylinder-shaped canister, sliding tower, or button-operated assembly can look quite different. Kohler’s toilet service-parts guide explains that some single-flush canister toilets use a replaceable seal rather than a flapper. Find the number stamped inside the tank or under its lid and order the correct seal for that mechanism instead of forcing a generic flapper into place.
Measure the opening, not the old rubber edge
Korky’s sizing guide distinguishes standard 2-inch and large 3-inch flush-valve openings. Measure the opening underneath the seal after the tank is drained, or cross-check the stamped tank number with the manufacturer’s compatibility guide. Measuring the floppy outside edge of a deteriorated flapper can mislead you because the rubber overhangs the opening and may be distorted.
The same Korky guide uses a baseball or orange as a rough visual reference for a 2-inch style and a softball or grapefruit for a 3-inch style. Those comparisons are only a starting point. A toilet’s age is not proof of its size: newer models may use either opening, and specialized systems sometimes require a specific hinge shape or clearance.
Protect the tank and recognize the stopping points
Shut off water gently at the small valve by the wall. If the handle is seized, the connection drips, or the valve body rotates with the pipe, do not force it. A functioning shutoff matters more than finishing the replacement immediately. Set the lid where it cannot slide off a countertop, and avoid leaning on the tank or overtightening any fittings.
Do not scrape the plastic valve seat with a knife, file, or abrasive pad. A rough sealing surface can defeat a brand-new flapper. Similarly, this task does not call for removing tank bolts or loosening the large nut beneath the tank. Those steps belong to flush-valve replacement, which is a different repair and carries an added risk of leaks at the tank-to-bowl joint.
How to Replace a Toilet Flapper Step by Step
Korky’s published replacement procedure covers shutting off the water, draining the tank, detaching the hinge ears, fitting the new seal and adjusting the chain. The steps below add a before-and-after leak check and distinguish a poorly fitted flapper from a faulty fill valve. Keep your original part nearby until the new one seals and flushes normally.
Step 1: Confirm the old flapper is the problem
If the toilet occasionally refills by itself, inspect the water level first. Water flowing visibly into the vertical overflow tube points toward an overfilled tank or fill-valve issue, not necessarily a leaking flapper. If the level is below the overflow but keeps falling while the toilet sits unused, a worn flapper or another seal in the flush system becomes more likely.
The EPA’s Fix a Leak Week guidance recommends putting a few drops of food coloring in the tank and checking the bowl after 10 minutes without flushing. Color appearing in the bowl means tank water is escaping where it should not. Flush immediately after the check to avoid staining. A positive test establishes a leak, but it does not by itself prove which part needs replacing.
Step 2: Shut off water and drain the tank
Turn the supply valve clockwise until the refill stops. Flush once and hold down the handle to let as much water as possible escape. Korky’s installation procedure suggests noting the original water-level drop before disassembly when matching the performance of an adjustable replacement. A small puddle remaining in the tank is normal; absorb it with a sponge if you need a clear view of the mounting pegs.
Make sure no water begins refilling while your hands are in the tank. The flapper sits low in the tank and does not require work below the water supply connection. Leave the supply hose attached. If you cannot reliably isolate the water, finish by restoring the original configuration and arrange a shutoff repair before continuing.
Step 3: Unhook the chain and old flapper
Lift the chain clip off the handle’s lever arm and note which hole it used. Then gently slip each rubber mounting ear away from the two pegs on the overflow or flush-valve body. On some older arrangements a ring slides over the overflow tube instead; compare the old mounting arrangement with the replacement instructions rather than cutting parts indiscriminately.
Look at the seal face once removed. Cracks, hardening, a warped rim, or rubber that leaves residue on your fingers are reasons not to reuse it. Take a photo if the old flapper has an adjustment float or dial; that information can help you recover the former flush duration, though the new model’s settings may work differently.
Step 4: Wipe the flush-valve seat clean
Use a damp, soft cloth around the circular surface the rubber seals against. Remove loose grit, sludge, or mineral deposits without gouging the plastic. Korky’s replacement instructions specifically call for cleaning this opening before installing the new part, because debris can create a narrow channel for water to pass even under a sound flapper.
Run a fingertip lightly around the edge to check for roughness or a broken section. A hairline crack, missing piece, or permanently uneven seat is not something a thicker flapper reliably fixes. If the seat itself is damaged, stop and look into a compatible seat-repair kit or flush-valve service, using the toilet maker’s instructions for the exact tank design.
Step 5: Mount the new flapper squarely
Attach the new flapper’s two ears to the valve pegs so the rubber covers the drain opening without twisting. Raise and lower it gently by hand. It should pivot freely and settle flat against the seat; it should not rub the refill tube, tank wall, or chain hardware. Check whether any adapter is needed before assuming the holes in a so-called universal model must line up unaided.
For example, Korky’s Fit-All 3020 product page lists separate assemblies for 2-inch and 3-inch openings plus a leg adapter for certain toilets. A part labeled universal still has defined mounting and tank compatibility. If the new seal rides on one edge or never sits flat, remove it and confirm both the opening size and hinge geometry before turning the water back on.
Step 6: Connect and adjust the lift chain
Attach the clip to the lever-arm hole that pulls upward most directly over the flapper. Korky’s installation guide recommends roughly one to two links of slack when the flap is seated. Too much slack can stop the flapper lifting far enough; a chain held tight can pull one side of the seal off its seat continuously. Keep the spare chain tail out of the opening.
Press the handle while the tank is empty and watch the path of the chain. The flapper should rise without snagging and return to the seat after the handle is released. If the new part has a float or numbered dial, initially follow its specific instruction sheet. Adjustment mechanisms differ, so settings cannot be copied blindly between Korky, Fluidmaster, and original-equipment parts.
Step 7: Refill, flush and verify the seal
Slowly reopen the supply valve and let the tank reach its usual shutoff level. Confirm that water stops below the overflow tube and does not spill around the supply connection. Flush several times, watching that the flap lifts and closes correctly. The goal is a full bowl flush followed by a quiet refill and a stable tank water level, not simply silence for a few seconds.
Repeat the EPA’s 10-minute dye test after the tank has refilled and settled. A clear bowl after the wait supports that the new seal is holding. If dye appears, recheck chain tension, seating and compatibility before buying more parts. If the tank level climbs to the overflow, inspect the fill valve instead. Also look for moisture on the floor; a tank-to-bowl or supply leak is separate from a flapper leak.
Products That Help
For a standard 2-inch flush valve, the Korky Plus Universal Toilet Flapper 2001 comes with a stainless steel chain; Korky’s product page lists a five-year warranty and a chlorine-resistant rubber material. For a large 3-inch opening, the Korky Premium Universal Toilet Flapper 3060 has an adjustable design and a stainless steel chain, according to its product page. Choose by measured opening and the specific toilet compatibility list, not just the maker’s name on the bowl.
If you cannot confidently identify the opening size before shopping, the Korky Fit-All Universal Toilet Flapper 3020 product page specifies components for both 2-inch and 3-inch configurations, together with a leg adapter for selected models. It is a useful option when fit is uncertain, but it is not a substitute for a canister seal or other specialized mechanism. Compare the included parts against the inside of your tank before purchasing.
Common Mistakes to Avoid
The first costly mistake is treating every running toilet as a failed flapper. Water pouring down the overflow tube needs a fill-level or fill-valve check, while a leak at the base of the tank needs different parts. Another mistake is choosing the replacement by overall rubber diameter instead of by the seat opening and hinge arrangement. Both can make a reasonable-looking repair fail immediately.
A third mistake is altering the flapper’s adjustable float or dial until the bowl barely clears, without comparing the flush to the toilet’s original behavior. Korky’s 3060 instructions explain that adjusting the band changes how long the flap remains open. Make small changes only as the model directs. Avoid drop-in tank cleaners containing bleach or chlorine; Fluidmaster’s 513A-016 product guidance warns they can damage tank components and affect warranty coverage.
Frequently Asked Questions
Replacing the seal is straightforward on a conventional tank, but choosing the right part and knowing whether the repair worked lead to a few related questions. These answers distinguish routine service from a different plumbing problem.
Can I replace a toilet flapper without removing the tank?
Yes, on a conventional hinged-flapper toilet. The mounting ears and chain are accessible by lifting the tank lid, shutting off water, and draining the tank. The toilet’s tank bolts and lower flush-valve nut stay in place. If you discover a broken valve seat or unusual flush tower, the required repair may go beyond a simple flapper swap.
Do all toilets take a universal toilet flapper?
No. Korky’s compatibility guides cover many conventional 2-inch and 3-inch valves, but they also identify specific mechanisms that need particular fittings. Kohler’s service-parts documentation shows single-flush canister systems that take a seal instead of a hinged flapper. Use the stamped tank model to confirm compatibility when the old part looks unlike the replacement.
Why is my toilet still running after I changed the flapper?
A chain that is too tight, a dirty or damaged seat, or the wrong part can leave an internal leak. If the water level reaches the overflow tube, the fill valve may be failing to shut off. Kohler’s toilet running guidance identifies both flapper or canister seals and overflowing tank water as possible causes. Observe where the water moves before replacing another component.
How do I know whether my replacement really worked?
Run the toilet through several normal flushes, then use the EPA’s dye test: put a few drops of coloring in the full tank and wait 10 minutes without flushing. No color entering the bowl is the desired result for this check; flush afterward to avoid staining. Also confirm that the tank stops refilling and that the outside fittings remain dry.
Final Thoughts
The safest way to finish how to replace toilet flapper parts is to verify the flush twice: first by watching the mechanism lift and close, then by confirming there is no hidden dye transfer after the tank settles. Buy a measured 2-inch or 3-inch replacement with the correct mounting arrangement, and keep the old part or a photo until the new seal has passed the leak test. If the seal repeatedly fails despite a good fit, do not keep shortening the chain; inspect the valve seat or ask a plumber to assess the tank assembly.