The secure way to learn how to install floating shelves is to locate solid mounting points before drilling, then attach the concealed bracket level and lock the shelf onto it. A typical premade kit takes about one to two hours according to Lowe’s 2025 installation guide, although tile, masonry and uncertain wall framing can extend the job. Mounting into studs is preferable for heavier displays. A drywall-only installation needs a shelf system and anchors specifically approved for that situation.
Quick Answer: Check the shelf’s mounting instructions and load rating, scan for studs and hidden services, mark the bracket holes with a level, install the correct screws or anchors, and secure the shelf to its support. Keep the shelf empty until the bracket feels rigid. Stop if the wall crumbles, the fixing spins, or you cannot rule out concealed wiring and plumbing.
As an Amazon Associate we earn from qualifying purchases.
By DIY Ideas 4 Home Editorial Team
Before You Start: Tools, Materials and Safety
A floating shelf hides the hardware that carries its weight, so the wall connection matters more than the shelf’s finish. Lowe’s 2025 guide specifically calls for checking the planned load, finding studs and marking the bracket before fastening. Gather the shelf instructions and identify whether yours slides onto a metal backplate, fits over individual rods, or uses a different locking mechanism. Do not assume mounting screws are included.
| Tool or Material | Size or Spec | Why You Need It | Substitute |
|---|---|---|---|
| Stud finder | Suitable for your wall finish | Locates likely stud edges before fixing the bracket | Careful inspection of framing clues and a professional check |
| Level and tape measure | Bubble level or cross-line laser | Transfers consistent bracket marks | Long straight level with pencil |
| Drill/driver and bits | Bit matched to screws, anchors and wall type | Creates controlled pilot holes and seats screws | Hand screwdriver after approved pilot holes |
| Fasteners and anchors | Specified by shelf maker for stud, masonry or hollow wall | Transfers the shelf load into the correct substrate | None without a suitable fastening plan |
| Painter’s tape, pencil and eye protection | Nonmarking layout aids and safety glasses | Marks the wall and reduces drilling exposure | Removable paper templates and protective eyewear |
Choose the Shelf and Mounting Surface Together
Start with what the shelf will hold, not just where it looks attractive. IKEA’s U.S. product page for the LACK wall shelf 902.821.80 lists a 43 1/4-inch length, 10 1/4-inch depth and a maximum load of 22 lb. That figure belongs to this particular shelf and depends on appropriate wall fixing; it is not permission to hang 22 lb from any pair of drywall anchors. Include the shelf’s own weight when assessing the complete mounting system.
Identify the surface under the paint: typical gypsum drywall over wood studs, metal framing, plaster over lath, masonry or tile over a backing wall. Each calls for different fasteners and pilot holes. If a kit is designed for studs only, moving it to an unsupported hollow section is not a minor substitution. For a heavy collection of books or pottery, consider a different location or added backing rather than trusting a larger generic anchor.
Check for Wires, Pipes and Unstable Walls
Before making holes, look at nearby outlets, switches, faucets, shower valves, drains and vents. Lowe’s November 2025 floating-shelf guidance flags concealed wiring, pipes and ductwork as a reason to investigate the planned location. Zircon’s StudSensor HD55 user instructions also warn that electronic detection can miss live cables. A silent scanner never establishes that a drilling path is clear.
Use noninvasive checks and, when appropriate, isolate electrical circuits and relevant water or gas supplies before penetrating the wall, as cautioned by Zircon’s HD55 instructions. If you suspect a service lies in the fastener path, change location or get a qualified trade professional to locate it. Avoid drilling into a loose, damp, cracked or softened area until the wall condition is corrected; a neat bracket cannot compensate for weak substrate.
Know What the Load Rating Actually Covers
A load rating does not transfer unchanged between studs, brick and hollow drywall. IKEA’s mounting guidance for the LACK range distinguishes wall substrates, while its U.S. listing for model 902.821.80 cautions about falling shelves and calls for appropriate screws and plugs. Check the exact manual for the version you own, since shelves that look alike can have different mounts, number of holes and weight limits.
Projection matters as well. Objects placed toward the front of a deeper floating shelf create leverage on the concealed bracket and top fasteners; a flat picture ledge is a different use case from deep book storage. Keep heavy objects toward the rear when the maker allows them, distribute smaller items instead of stacking them at one end, and do not treat a fastener’s package rating as the finished shelf’s guaranteed capacity.
How to Install Floating Shelves Step by Step
These steps apply to a common concealed-backplate shelf, rather than every bracket design. The Home Depot’s August 2026 instructions and Lowe’s 2025 guide both use the sequence of locating mounting points, leveling the support and securing the finished shelf. Keep the manufacturer’s drawing beside you, especially for the location of any locking set screws. If your hardware requires a different sequence, the supplied instructions take priority.
Step 1: Mark the Shelf’s Position
Hold the shelf or cardboard outline where you intend to install it, checking nearby doors, cabinet doors and anything a person might hit while walking past. Measure from a fixed reference such as a counter, rather than relying on a sloping floor or ceiling line. If you plan a row of shelves, sketch all their heights first so you can see whether the spacing works with the actual objects you own.
Place a short strip of painter’s tape at each end of the planned bracket and mark its target height. Check the marks with a bubble level, not by judging their alignment with trim. For wide shelves, a longer level or projected laser line simplifies transferring the height across the wall. At this stage nothing should be drilled, so move the layout until the bracket has reasonable access to studs and avoids suspected utilities.
Step 2: Find Stud Centers and Map the Holes
Scan slowly across the intended mounting line and mark both edges of each probable stud. Confirm each result by scanning from the opposite direction and checking the spacing for a plausible framing pattern. Zircon’s product page for the StudSensor HD55 specifies up to 3/4 inch of scan depth in its normal StudScan mode and up to 1 1/2 inches in DeepScan. Those are manufacturer-stated sensing ranges under suitable wall conditions, not a promise of success through plaster, metal lath or thick tile.
Compare the confirmed stud locations with the actual bracket slots. If the holes do not align, do not drill extra holes in a thin bracket unless its maker explicitly permits modification. Move the shelf, choose a differently spaced mounting plate, or have appropriate backing installed. For metal studs or an unfamiliar partition, obtain a fastening specification meant for that assembly rather than assuming ordinary wood screws will grip it securely.
Step 3: Level the Bracket and Mark Each Hole
Remove the visible shelf and hold only the hidden support against the planned marks. Set your level directly on the straight part of the backplate and adjust it until the bubble is centered or the laser reference aligns with the bracket. Through the supplied slots, mark the exact centers of the holes you will use. Photograph the layout or transfer it to painter’s tape before taking the bracket down.
For a long support, mark the center first and then recheck both ends; a small slope near one end may be hard to see from the center of a deep shelf. Bosch’s GLL 30 product page describes a cross-line beam visible up to 30 feet with stated accuracy of 5/16 inch at 30 feet. A laser is convenient for repeated shelves, but an ordinary spirit level is adequate for a single installation when you verify every marked hole.
Step 4: Drill Only the Required Pilot Holes
Before drilling, compare the fastener diameter, hole depth and substrate with the shelf maker’s fitting table. Wood studs generally require a pilot sized to the specified screw; masonry calls for an appropriate masonry bit and masonry-approved fixing; a hollow-wall anchor may need a particular clearance hole. There is no universal drill size for floating shelves. Mark the intended depth on the bit or use a properly set stop so you do not drill farther than necessary.
Wear eye protection, keep a steady grip and stop immediately if the bit encounters unexpected metal, resistance, a void or moisture. Never drive through an area where you suspect a service line. When installing in tile, first confirm the substrate behind the tile and use a bit and drilling technique suitable for the finish; cracked tile or a hollow substrate can make the anchor unreliable. Clear loose drilling dust before inserting a fastener so the bracket can seat flush.
Step 5: Secure the Hidden Support
Insert the approved anchors where needed, then place the backplate over the prepared holes. Start the screws loosely so the bracket can still shift a little. Bring it precisely back onto the level line, then tighten the fasteners according to the shelf and anchor instructions. Alternate between mounting points instead of fully tightening one end first, and do not use a powered driver’s highest torque setting to force a loose screw into a failing hole.
Once the hardware is seated, press gently at the ends of the bracket to check for rotation or rocking. The bracket should contact the wall as designed, without a visible gap caused by plaster ridges, damaged anchors or a screw head trapped behind it. If the support moves, remove it and correct the fastening problem; a thin shim or a thicker decorative shelf cover does not restore a stripped mounting hole.
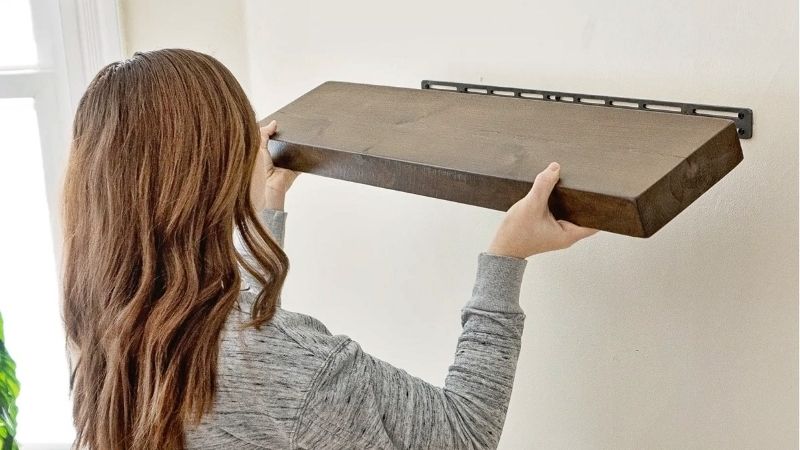
Step 6: Slide On the Shelf and Lock It
With the mounting plate firm, align the shelf’s internal channels with the rods or concealed arms and slide it on evenly. Do not hammer the shelf into position. Some kits use underside set screws that must engage matching holes in the metal rods; others have an integrated rail or locking feature. Lowe’s 2025 installation instructions describe attaching the shelf to its backplate with set screws, but the hardware you purchased determines exactly how it locks.
Check that the back edge is close to the wall, that neither side is binding and that the shelf does not lift off freely when the design calls for positive retention. A slightly crooked shelf can indicate a bracket that was not level, an arm that did not engage its pocket, or a wall surface that is uneven. Remove the shelf and fix the cause instead of forcing heavy objects onto a bad fit.
Step 7: Inspect the Mount and Load It Gradually
Confirm the empty shelf is level front to back and side to side. With one hand ready to support it, apply only light, controlled pressure to check for unexpected movement; do not hang from it or use your body weight as a load test. Look for screws backing out, anchors shifting, fresh drywall cracks or a shelf tilting forward. Any of those signs calls for unloading and correcting the hardware before further use.
Add light items first, then place approved heavier objects nearer the wall while staying below the lowest applicable limit for shelf, bracket, screws and wall. IKEA’s U.S. listing for its LACK 902.821.80 gives a maximum shelf load of 22 lb, but that figure does not override its separate warning that correct wall fixings are essential. Reinspect the installation after the first period of use, particularly if the room sees frequent door slams or the contents are moved often.
Products That Help
The Zircon StudSensor HD55 makes sense when the wall is compatible with electronic stud detection and several possible mounting positions need checking. Zircon states that its deeper mode senses stud edges up to 1 1/2 inches under suitable conditions; buy it for locating likely framing, not for certifying a clear drilling path. For repeated shelf rows, the Bosch GLL 30 Self-Leveling Cross-Line Laser offers a manufacturer-stated 30-foot working range and helps transfer one reference line across a wide section of wall.
If you still need the shelf itself, the IKEA LACK Wall Shelf 902.821.80 is a concrete premade example with hidden support hardware and a published 43 1/4-inch length. IKEA sells wall screws separately, so buying the shelf alone does not complete the installation. Confirm the space, the wall type and the maker’s 22-lb stated maximum before comparing the current price; for heavier storage, choose a shelf and support system whose instructions explicitly match the planned load and fixing points.
Common Mistakes to Avoid
The most expensive mistake is treating the wall surface as though it were the structural support. An anchor that grips a patch of drywall may still be inappropriate for a projecting, heavily loaded shelf. Another frequent issue is drilling before matching the bracket pattern to usable studs. Correcting those problems afterward leaves unnecessary wall holes and may tempt someone to reuse weakened fixing points. Decide on the mounting path before opening the drill case.
A shelf that tips forward is not necessarily fixed by adding screws to the top of the wooden cover. The hidden metal support, its contact with the wall, the wall’s integrity and the type of load all matter. Resist over-tightening set screws into thin shelf material, and check the installation manual before adding glue or construction adhesive; such changes can make later inspection or removal difficult and may not improve the actual wall connection.
Frequently Asked Questions
Installation choices also depend on whether the shelf sits in a moisture-prone room, needs future removal or could fall onto people and furniture. These questions address those situations rather than repeating the mounting sequence.
Can You Hang a Floating Shelf Without Drilling?
Not safely with the usual concealed metal bracket system, because those brackets need mechanical fixings that transfer weight into the wall. Removable adhesive strips may support certain lightweight decorative products only when their own instructions specifically allow the item, surface and load. They are not interchangeable with the screwed supports supplied with a typical floating shelf. Renters who cannot drill may be better served by a freestanding shelf or a furniture-based display.
Are Floating Shelves Safe Above a Bed?
It is better to avoid placing heavy or breakable items above a sleeping position, even when a shelf has a published load limit. People can be injured by contents falling independently of the bracket, and accidental bumps or changes to the stored items add uncertainty. If an overhead shelf is unavoidable, obtain professional advice about the wall attachment and location, keep objects lightweight and secure, and follow any applicable local requirements for anchoring and impact protection.
Can You Reuse the Same Holes After Moving a Shelf?
Sometimes, but only when the wall and fastener manufacturer allows reuse and the original mounting substrate remains sound. Plastic anchors removed from drywall can enlarge or damage their holes; driving a new screw into a spinning anchor does not restore its original grip. Inspect each location and repair unsuitable holes properly. When you need a different bracket spacing, select fresh, sound structural points rather than assuming the existing holes will fit or carry the new configuration.
What Changes When Installing a Shelf in a Bathroom?
Moisture resistance and concealed plumbing become more important than in a dry hallway. Choose a shelf finish and hardware suited to the room’s humidity, and keep fasteners away from suspected supply lines and waterproofed shower walls unless the installation method is approved for that assembly. A tiled surface can conceal a hollow or water-sensitive backing, so the surface material alone does not establish anchor capacity. If drilling would penetrate a waterproofing system, consult the installer or a qualified professional before proceeding.
Final Thoughts
One final check before you finish learning how to install floating shelves is whether the actual objects will change over time. A shelf fitted for a few framed pictures may later attract dense books, plants or storage bins, turning an adequate display mount into the wrong system for the job. Photograph the bracket and fastener locations and keep the product instructions for future reference. If the planned contents could exceed the approved installation, change the shelf or mounting design before loading it, not after it begins to sag.