A damp concrete basement wall needs more than a fresh coat of paint. Learning how to seal basement walls means identifying where the moisture originates, redirecting surface runoff, repairing sound masonry, and then applying a compatible wall coating only when conditions allow. A small cosmetic repair may fit a weekend, but ongoing seepage can require drainage work rather than another layer of sealant.
Quick Answer: Check the wall after rain, correct gutters and grading first, clean the masonry, repair suitable cracks, and apply the wall product exactly as directed. Do not coat actively leaking, structurally damaged, or chronically saturated walls and assume they are waterproof. Call a foundation or waterproofing contractor when water pressure persists.
As an Amazon Associate we earn from qualifying purchases.
By DIY Ideas 4 Home Editorial Team
Before You Start: Tools, Materials and Safety
A concrete-block wall and a poured-concrete wall can both show damp patches, yet their joints and internal voids behave differently. Before buying a bucket of masonry waterproofer, determine whether this is a dry wall that needs minor surface repair or a wall still receiving outside water. The distinction affects every tool and material you choose.
| Tool or Material | Size or Spec | Why You Need It | Substitute |
|---|---|---|---|
| Flashlight and painter’s tape | Handheld light and removable tape | Track changing damp spots and cracks | Phone light and paper sketch |
| Safety goggles and gloves | Eye protection and product-rated gloves | Protect against grit and caustic repair mortar | No safe substitute |
| Stiff brush and vacuum | Masonry brush; appropriate dust collection | Remove loose residue without hiding defects | Hand brush and dustpan for a small clean area |
| Masonry repair product | Match active leak, rigid crack or moving joint | Repair a specific defect before coating | Contractor repair for unsuitable cracks |
| Masonry brush and roller | Per coating label, often thick nap | Work coating into pores and open joints | Manufacturer-approved sprayer with back-brushing |
| Moisture-control supplies | Downspout extension and temporary water removal | Keep outside runoff away and remove standing water | Permanent drainage installed by a qualified contractor |
Identify the Water Before Choosing a Sealant
There are several ways a basement becomes wet. University of Minnesota Extension’s guide, Moisture in Basements: Causes and Solutions, distinguishes rain or groundwater from indoor moisture generation and humid air condensing on cold surfaces. Moisture on the face of an entire cold wall during humid weather may be condensation, while a stream emerging from a crack immediately after rain points more strongly toward liquid infiltration.
Mark the edge of each patch with removable tape, note the weather, and photograph the floor-wall junction. Also inspect above the damp area for plumbing or laundry leaks. If the moisture tracks an exterior corner, window well or downspout location, investigate that outside feature before touching the wall. Applying a vapor-resistant coating to an unexplained problem can merely redirect water into another joint.
Know Which Walls and Cracks Are Suitable
These steps target structurally sound, exposed concrete or masonry block. They are not interchangeable with guidance for wood framing, drywall, old soft brick, historic lime-mortar stonework or waterproofing the exterior of a buried foundation. Those assemblies may need a different moisture strategy to avoid trapping water in vulnerable material. If old plaster conceals the concrete, determine the actual substrate rather than spreading a masonry product over the finish.
Watch for horizontal cracks, stair-step cracking in block joints, outward bowing, shifting gaps, repeated leaks and crumbling masonry. These can indicate movement or pressure rather than a sealant-sized opening. Stop and obtain an assessment from a qualified foundation professional. Even a small crack can be a symptom worth inspecting if it continues to widen or changes seasonally.
Protect People and the Building
Wear safety glasses and compatible gloves when handling masonry repair cement; QUIKRETE’s Hydraulic Water-Stop Cement product data sheet warns that the material can burn skin and seriously injure eyes. Control dust rather than dry-grinding questionable old coatings. For pre-1978 homes, check lead-safe renovation requirements before disturbing older painted surfaces. Keep electrical devices out of standing water and have an electrician address any wet outlet or suspect circuit.
If water came from sewage or another contaminated source, do not treat the scene as ordinary DIY cleanup. EPA’s A Brief Guide to Mold, Moisture and Your Home says cleanup beyond about 10 square feet of mold, or cases with substantial water damage, may warrant professional help. Ventilate according to the repair material’s label, and never mix cleaners or acid products in a basement workspace.
How to Seal Basement Walls Step by Step
The order matters: prevent new water from reaching the foundation, dry and assess the masonry, then seal only the defects and surfaces that the product is designed to handle. Seven checkpoints let you decide whether to continue at each stage instead of covering evidence of a larger drainage problem.
Step 1: Map the Moisture and Find Its Entry Point
Examine the wall during dry weather and again after a meaningful rain if it is safe to do so. Trace staining upward from the floor, along mortar joints, and around window wells or service penetrations. White crystalline powder is often efflorescence, salts deposited when water migrates through porous masonry and then evaporates. It signals prior or ongoing moisture movement; wiping it away does not stop the underlying cause.
Check interior plumbing, leaking supply connections and condensation before attributing everything to groundwater. A tissue placed near a cold wall may become damp from room humidity without an exterior water path. Make a simple sketch showing when each patch appears. If the wall actively trickles during rain or the floor floods, do not move straight to painting: plan for drainage and professional review first.
Step 2: Redirect Roof Runoff and Surface Water
Clear blocked gutters, secure loose downspouts and inspect whether splash blocks actually carry water away from the house. EPA’s Mold House Tour guidance says gutter outlets should carry roof runoff at least 5 feet away from the foundation. Verify that the outlet sends water downhill without flooding a neighbor, sidewalk or window well. A short extension positioned toward the house will not help even if it is new.
Where site conditions permit, University of Minnesota Extension recommends ground sloping away from the foundation at a minimum of 1 inch per foot for at least 6 feet. Do not pile soil against siding, vents or masonry weep holes to achieve the slope; maintain required clearances and seek grading advice for tight property lines. Correcting an obvious runoff problem can sometimes eliminate recurring moisture before any interior waterproofer is purchased.
Step 3: Remove Water and Let the Masonry Stabilize
Remove standing water safely, without using household electrical equipment in an unsafe wet area. Move storage boxes, rugs and moisture-sensitive finishes away from the work zone. EPA’s Brief Guide to Mold, Moisture and Your Home notes that drying wet materials within 24 to 48 hours after a leak often prevents mold growth. That is a cleanup target, not a claim that a saturated foundation becomes dry within two days.
Run appropriate ventilation or dehumidification to manage indoor humidity after the exterior source is addressed, and wait until surface conditions meet the repair and coating labels. University of Minnesota Extension cautions that dehumidification manages symptoms but does not remove groundwater pressure. If water promptly returns whenever it rains, do not confuse a temporarily dry surface with a solved basement problem.
Step 4: Clean the Bare Concrete or Block
Brush off loose dust, mortar grains, dirt and flaking material, then collect debris using suitable dust controls. Expose the actual concrete or block so repairs can bond. DRYLOK’s product instructions for Extreme Concrete & Masonry Waterproofer explain that efflorescence interferes with adhesion and must be addressed before coating. Cleaning the powder is only part of the job; the wall still needs a corrected moisture source.
Avoid aggressive acid etching as a default household step. Some masonry coatings call for specific surface preparation, especially on very smooth concrete, but strong acid introduces ventilation, chemical and disposal concerns. Follow the exact manufacturer’s preparation method, or have a qualified contractor prepare the surface. The manufacturer’s indoor directions also distinguish bare masonry from ordinary latex- or oil-painted surfaces, which may prevent a penetrating waterproof coating from functioning.
Step 5: Repair Small Defects With the Right Method
Choose a patch according to the opening, not simply the strongest-sounding label. A small dry, stable defect may accept a compatible repair mortar or elastomeric crack sealant. A moving joint typically needs a flexible product, while an active water leak may call for a rapid-setting hydraulic cement in a properly prepared opening. Do not fill a bowed or shifting foundation crack as a cosmetic repair and skip structural evaluation.
For an appropriate active leak in masonry, QUIKRETE’s guidance describes Hydraulic Water-Stop Cement for cracks over about 1/4 inch wide and says to mix only what can be placed in 2 to 3 minutes. Its repair instructions specify undercutting the edges so the expanding patch anchors; follow the applicable data sheet rather than chiseling indiscriminately through fragile block. Work in tiny batches with proper hand and eye protection, and stop if the leak exceeds a small localized repair.
Step 6: Seal Compatible Joints and Penetrations
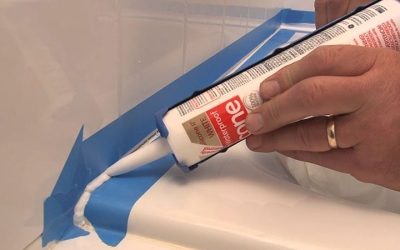
Inspect the wall-to-floor transition, penetrations and nonstructural gaps for the correct repair treatment. Sika’s Sikaflex + Concrete Fix product page identifies a non-sag polyurethane sealant for compatible vertical and horizontal concrete or masonry joints. It is a flexible joint material, not a foundation reinforcement or a replacement for subsurface drainage. Confirm the intended joint geometry and whether backer rod is needed before applying the bead.
Clean the opening thoroughly and apply the sealant only to sound surfaces within the manufacturer’s temperature and moisture conditions. Sika lists a final cure of about 5 to 7 days for Sikaflex + Concrete Fix under its stated conditions, so do not expose the joint to conditions the label prohibits before curing. Leave designed movement and drainage details intact. A neat caulk line is useful only when it seals an appropriate opening without masking ongoing water pressure.
Step 7: Apply a Masonry Coating and Recheck
If the masonry is sound, suitable and no longer subjected to uncontrolled infiltration, apply the selected waterproofer according to its own instructions. DRYLOK’s Extreme Concrete & Masonry Waterproofer product page requires at least 2 coats, estimates roughly 75 to 100 square feet per gallon depending on porosity, and calls for a 2 to 3 hour interval before recoating. These are product-specific instructions, not a universal drying or coverage rate for all sealers.
Work the first coat into open masonry pores and block joints with a compatible brush, using the specified roller and back-brushing where required. Inspect for pinholes after the second coat and let the assembly cure before adding finishes or storage. Revisit the wall after subsequent storms, recording any new damp line or peeling. If seepage returns, diagnose drainage rather than automatically adding a third or fourth layer of paint.
Products That Help
For sound exposed block or concrete after water sources are addressed, DRYLOK Extreme Concrete & Masonry Waterproofer is a wall-coating option whose official instructions specify preparation and two coats. QUIKRETE Hydraulic Water-Stop Cement serves a different job: a fast localized patch of a qualifying active leak in masonry. Neither product substitutes for grading, footing drains or structural repair. Check the intended surface and warnings before choosing a package size.
Sikaflex + Concrete Fix addresses compatible nonstructural joints where flexibility is needed. Its job is not the same as hydraulic cement, and its cure time is longer. Buy based on the defect actually present; a coat of masonry waterproofer for broad bare-wall coverage, a short-setting patch for a narrow active leak, or a flexible bead for an appropriate moving joint. Confirm the current product label and availability before purchasing.
Common Mistakes to Avoid
Painting directly over salt deposits, ordinary interior latex paint or an actively dripping wall may produce a clean-looking finish that fails when the next storm arrives. DRYLOK’s own wall-coating instructions state that its Original and Extreme masonry waterproofers are not formulated for floors, and a basement slab must not be treated as an interchangeable wall surface. A damp basement also may have several sources at once, such as runoff plus summer condensation.
Another mistake is sealing visible cracks without considering soil pressure or radon. EPA’s Radon-Resistant Construction Basics and Techniques includes polyurethane caulking as one component of soil-gas control, not proof that an entire home is protected. Test radon separately and pursue qualified mitigation when warranted. Where a foundation repeatedly leaks despite corrected gutters and grading, a professional drainage design is a more credible next step than repeated surface coating.
Frequently Asked Questions
Basement wall treatments are often confused with cosmetic paint, foundation drainage and humidity control. The answers below cover decisions that homeowners commonly face after inspecting a damp wall.
Can I Seal Basement Walls From the Inside Only?
Sometimes, for limited surface dampness on otherwise sound masonry, an interior product can be part of the work. But University of Minnesota Extension explains that interior membranes or coatings may offer only temporary relief when exterior liquid water continues to accumulate. If water is pressing through cracks or rising at the slab joint, address exterior drainage or consult a waterproofing contractor rather than promising a dry basement from inside paint alone.
Should I Seal an Old Painted Basement Wall?
Not automatically. DRYLOK’s Extreme waterproofer instructions say ordinary interior latex or oil-based paint can prevent its waterproofing material from penetrating masonry pores. Inspect the existing coating, identify the substrate and follow the new product’s compatibility rules. Older coatings may also require a lead-safe assessment before removal. If removing paint would damage historic brick or mortar, seek a preservation-appropriate repair strategy.
What if White Powder Returns After Cleaning?
Recurring white efflorescence usually means moisture is still carrying salts through the masonry. Brushing it off improves appearance, but it does not stop that movement. Inspect gutters, grading, window wells and any drainage system again. University of Minnesota Extension identifies efflorescence and spalling among signs of basement moisture problems, so treat repeated deposits as diagnostic evidence before repainting.
Does Sealing Cracks Make a Basement Radon-Safe?
No. Caulking foundation openings may be useful within a radon-resistance strategy, but it does not replace measuring indoor radon or installing a mitigation system when needed. EPA’s radon guidance recommends action when test results reach 4 picocuries per liter and consideration of action at lower elevated levels. If radon is a concern, use a qualified tester or mitigation professional rather than relying on the appearance of sealed joints.
Final Thoughts
For homeowners learning how to seal basement walls, the decision that matters most is whether the surface stays dry after rain once runoff has been redirected. If it does, a carefully chosen patch and compatible masonry coating may be reasonable; if it does not, stop spending on finish coats and get a drainage assessment. Check the product’s current substrate requirements before buying, and keep storm photos so a contractor can see the pattern if the leak comes back.