A sump pump can look fine while its float switch is stuck or its discharge pipe is blocked. Learning how to test a sump pump means checking more than whether the motor makes noise: you want to see water trigger the switch, leave the basin, and allow the pump to shut off. Do not approach energized equipment in standing water; stop and contact a qualified professional if the outlet, wiring, or pit area is wet or damaged.
Quick Answer: Inspect the discharge and pit with power disconnected, then restore power and add clean water until the automatic float activates. Watch the water fall, confirm discharge at the outlet, and wait for the motor to stop. If a backup is installed, test it separately using its own manual. An audible hum by itself does not establish that the pump is moving water.
As an Amazon Associate we earn from qualifying purchases.
By DIY Ideas 4 Home Editorial Team
Before You Start: Tools, Materials and Safety
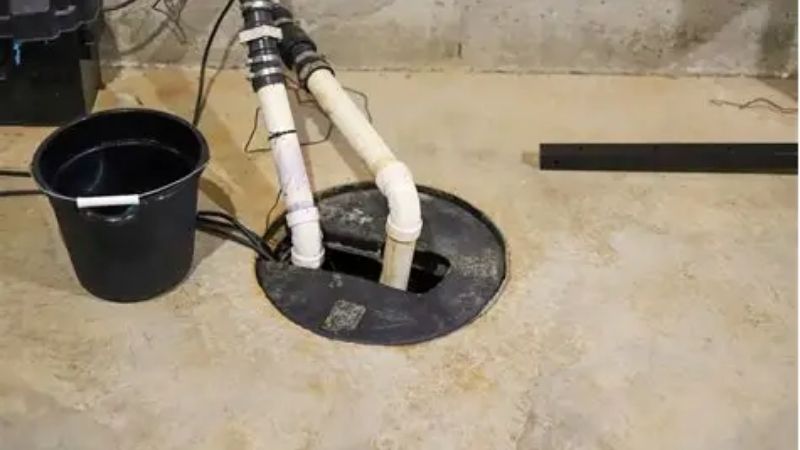
Begin by finding out which pump and control system you actually own. A standard residential sump may have a vertical float, a tethered float, an electronic sensor, or a separate control switch. A combination system may also have a higher backup activation point and an alarm. These differences determine exactly when to stop filling the pit and how to run a backup test without defeating its safeguards.
| Tool or Material | Size or Spec | Why You Need It | Substitute |
|---|---|---|---|
| Bucket of clean water | About 5 gal as a starting supply | Raises water to the automatic switch’s on level | Clean water added gradually in smaller containers |
| Flashlight | Battery-powered | Shows debris and float clearance without leaning into the pit | Headlamp |
| Work gloves | Dry, intact gloves | Handle a removable cover and dry debris with power disconnected | Suitable protective gloves for the task |
| Manufacturer’s manual | Exact pump and backup model | Identifies the switches, plugs, test sequence, and limits | Manufacturer support documentation |
| Phone or notes | Record start, pumping, and stop observations | Gives a service technician useful symptoms if a test fails | Written checklist |
Make Water and Electrical Safety the First Check
Zoeller Pump Company’s FM2676 installation instructions direct owners to disconnect pump power before handling the equipment, keep the grounded plug intact, and avoid extension cords. Inspect plugs and the receptacle from a dry floor. Never lift a pump by its power cord, reach into the pit while it is energized, bypass a ground-fault interrupter, or operate a pump with exposed wiring. A flooded basement is not the place to reset a breaker or touch a wet outlet. Have an electrician or utility personnel make the electrical area safe before proceeding.
The Electrical Safety Foundation International’s GFCI guidance includes basement receptacles among locations requiring protection and explains how a test button interrupts the circuit. You can check a safely accessible GFCI after completing the water test, following the device instructions. If TEST fails to remove power or RESET will not restore it, leave the pump off and arrange electrical service instead of repeatedly cycling the control.
Identify the Pump Type and Its Float Travel
Locate the pump label, check whether the pump plug goes directly to the outlet or through a piggyback switch plug, and note any independent backup-controller connection. A tethered float needs a free arc; a vertical float needs clearance along its guide. Zoeller’s FM2676 instructions recommend an approximately 18-inch or larger basin diameter for certain variable-level installations, but this is an installation recommendation, not a universal pass/fail rule for existing pits. Follow the clearance and switch-level requirements of your exact model.
If your sump is sealed, sewage-rated, hardwired, or inaccessible without tools, do not dismantle it just to reproduce a typical open-pit test. Ask the installer or a qualified plumber how its service access and controls should be tested.
Know When to Delay the Test
Do not pour extra water into a basin that is already close to overflowing or into a system with a known blocked discharge. Verify that the outlet pipe can safely carry test water away from the building, not into a blocked frozen line or against the foundation. If the equipment is already running continuously, making loud grinding sounds, or showing an electrical fault, testing by adding more water can make the problem worse.
Perform the inspection before the rainy season if possible, when the basin is not being overwhelmed by incoming water. Have a working light and an unobstructed route away from the equipment. Stop immediately if the pit rises toward overflow without the motor starting.
How to Test a Sump Pump Step by Step
This seven-step sequence evaluates the actual water-moving cycle, not just the float or motor in isolation. Zoeller at Home’s guide describes adding about 5 gallons of water to trigger the switch; the amount needed in your basin varies with its size and current water level. The important endpoint is switch activation and a controlled full discharge cycle, not a fixed number of buckets.
Step 1: Find the Pit, Outlet and Discharge
Locate the basin, primary pump plug, check valve, and point where the discharge leaves the house. Walk outside before adding water. Confirm that the pipe outlet is visible and free of leaves, soil, ice, or an obvious obstruction. Keep in mind that a buried outlet may be inaccessible; in that case, you may need to rely on water-level change and accessible pipe observations or ask a professional to verify the termination.
Look at the pipe joints for wet marks or drips. Finding the discharge first avoids mistaking a running motor for successful drainage. If the system empties directly into another enclosed disposal arrangement, follow the installed system documentation rather than assuming it should discharge visibly in the yard.
Step 2: Inspect the Basin With Power Off
From a dry location, disconnect the pump using the method specified by its manual. Remove a serviceable lid only if doing so is safe and allowed. Shine a flashlight into the pit and look for silt, pebbles, tangled cords, or a float pinned against the basin wall. Remove only accessible loose debris without disturbing pump wiring, disassembling equipment, or placing your hand near an energized switch.
Zoeller’s FM2676 troubleshooting material identifies float obstruction as a possible reason a pump will not turn on or off. A float that cannot move through its designed range is a failed pre-test check even if the motor could run when forced. Refit any guard or lid component that the manufacturer requires for normal operation before energizing the equipment.
Step 3: Restore Power and Add Water Slowly
Reconnect the primary pump to its approved grounded power connection while standing on a dry surface. Keep all hands, tools, and loose items out of the basin. Pour clean water gradually until the float reaches its normal on level. The Zoeller at Home maintenance article uses about 5 gallons as a practical amount to bring to the test; a large or already dry basin may need a different volume.
Stop pouring as soon as the pump starts. If the float rises past its expected activation point and the motor stays silent, do not keep adding water to see what happens. Disconnect safely if possible, avoid touching any wet electrical component, and have the switch, supply, and pump checked.
Step 4: Confirm Water Actually Leaves
Observe the waterline. A functioning pump should lower it while water moves through the discharge line. A brief sound at start-up is not enough: sustained humming with a stationary water level can indicate a blocked intake, air lock, check-valve issue, or failed impeller. Zoeller’s FM2676 service checklist identifies discharge restrictions and improper system conditions among reasons for poor flow.
Check the outside termination from a safe location if it is accessible, or have another adult observe it. Do not try to clear a running pipe with your fingers or open pressurized fittings. If water sprays from a joint indoors, stop the test; that connection requires repair before the equipment can protect the basement reliably.
Step 5: Wait for Automatic Shutoff
Once the waterline falls, the float should return to its off position and the motor should stop on its own. Do not leave the area while a pump continues running against an emptied pit. Dry running can damage some sump pumps, and a switch caught on pipework can keep a motor operating when there is no usable water left to move.
Watch the float rather than trying to manipulate it while powered. If the motor remains on after the water drops below its normal shutoff range, stop the test and disconnect power from a safe dry location. A homeowner should not adjust electrical contacts or open the motor housing to solve the problem.
Step 6: Check for Backflow and Repeat the Cycle
After shutdown, look for a sudden return of water from the discharge pipe. A small amount of residual movement may be installation-dependent, but rapid refill from the pipe or repeated start-stop behavior can indicate a malfunctioning or missing check valve. Zoeller’s published troubleshooting guidance identifies a stuck-open check valve and pit-size or switch-level problems among causes of short cycling.
If conditions remain safe, add another controlled amount of clean water and watch for a second normal start, drain, and stop. This can reveal an intermittent sticking float missed on the first cycle. Do not force repeated starts in rapid succession or use a stopwatch target from a different model: pumping time depends on head height, pipe routing, basin volume, and pump capacity. Record unusual noises, leaks, or sluggish drainage for service.
Step 7: Test the Backup Separately and Restore Power
Where a battery backup is installed, follow its specific isolation and water-test sequence. Liberty Pumps’ 4414000F manual directs owners of the covered backup systems to inspect and test monthly: disconnect power to the pumps before inspection, reconnect the backup unit, raise the level to the backup switch, confirm pumping, then restore and confirm the primary unit. Wayne’s WSS30V manual also calls for monthly battery checks and a water-triggered backup test with the primary isolated. Those sequences belong to their listed systems; do not apply one controller’s unplugging order to every backup brand.
Check the controller indicators, audible high-water alarm, and battery status as the model manual instructs. After the backup run, restore every primary pump plug, backup charger, controller, pit cover, and monitoring device to normal operating condition. A backup test is incomplete if the main pump is accidentally left disconnected. If you are unsure whether the backup ran on battery or utility power, consult the manufacturer’s troubleshooting section rather than claiming a successful outage simulation.
Products That Help
The Liberty Pumps ALM-P1 is a specific high-water warning accessory for indoor sump applications, not a substitute for the water-cycle test. Liberty’s 2026 ALM-Series brochure identifies its compact snap-on float and 10-foot sensor cord, plus an audible alarm with a 9-volt backup battery. Consider it when your basin geometry and installation allow a separate high-water sensor; verify pipe fit, required clearances, and the power connection before purchase.
The Basement Watchdog BWD-HWA is a different kind of protection: it monitors floor-level water where an overflow or leak would become visible. Its published product page describes a 6-foot sensor lead and sensitivity down to 1/32 inch of water. Choose it for puddle notification near the sump or nearby appliances, while recognizing that it cannot tell you whether the internal sump float, impeller, or discharge valve passed the full-cycle check. Compare current prices and product compatibility before ordering either accessory.
Common Test Failures and What They Mean
If the pump never starts, look first at the float path, safe access to the receptacle, and any controller warning lights. A humming pump that leaves the basin full needs a flow-path diagnosis rather than a bigger bucket. If the pump runs and stops repeatedly, note how quickly water returns and whether the discharge check valve is making an unusual noise. In all three cases, the right fix depends on the unit’s label and manual; do not assume that replacing the entire pump is the first or cheapest repair.
When a motor trips the breaker, the GFCI repeatedly opens, the power cable is damaged, the check valve needs disassembly, or the discharge line is frozen or buried, stop homeowner testing and call the appropriate licensed electrician or pump professional. Regular water testing can reveal faults; it cannot make a marginal electrical installation or undersized drainage system safe.
Frequently Asked Questions
The timing and method of testing depend on how heavily a sump system is used and whether it includes a separate backup controller. These answers distinguish a useful homeowner check from a full service inspection.
How Often Should I Test My Sump Pump?
Zoeller’s FM2676 instructions say to inspect and test the covered sump systems at least every three months. Some backup systems require more attention: Liberty Pumps’ 4414000F manual calls for monthly testing of its covered configuration. Use the stricter model-specific schedule and make an extra check before a forecast period of heavy rain if the pit has sat idle for months.
Can I Test the Float Without Adding Water?
Moving a float may show that one switch changes state, but it does not demonstrate that the impeller moves water through the discharge or that the unit shuts off at the normal water level. A water-fill test checks the combined cycle. Do not manually force a float with power connected or run a pump dry unless the specific manufacturer procedure explicitly permits a controlled diagnostic step.
Should the Pump Run When I Press the GFCI Test Button?
No. The Electrical Safety Foundation International explains that pressing TEST on a functioning GFCI should interrupt the protected outlet’s power; pressing RESET should restore it. This is an electrical safety check, not a pump-water test. If the outlet fails its test or cannot be reset, have an electrician investigate rather than moving the pump to an unprotected extension cord.
What If My Sump Pump Works but the Basement Still Floods?
A passing bucket test proves the pump can complete the cycle under the conditions of that test, not that it can handle every storm. Incoming flow may exceed its capacity, the discharge may return water toward the foundation, or the backup may lack enough stored energy during a prolonged outage. Have a contractor evaluate basin size, drainage routing, pump capacity at the actual lift height, and backup performance before assuming the existing setup can meet peak demand.
Final Thoughts
A successful sump-pump check has three visible results: rising water starts the pump automatically, the discharge lowers the basin level, and falling water stops the motor without intervention. Add a separate backup test if your system has one, and write down any changes from its usual sound or cycling pattern. The next step is to set a calendar reminder for the interval required by your model manual, replace failed components through qualified service, and consider the Liberty Pumps ALM-P1 or Basement Watchdog BWD-HWA only if you need additional warning coverage. A high-water alarm can alert you to trouble, but it never replaces a tested primary pump and correctly restored backup.