Dusty condenser surfaces can make some refrigerators work harder to release heat, but not every appliance has coils you should touch. The safest way to learn how to clean refrigerator coils is to identify your model’s approved access point before moving a grille or reaching behind the cabinet. If the owner’s manual says the condenser needs no routine cleaning, leave the sealed system alone and concentrate on external ventilation openings instead.
Quick Answer: Locate the model instructions, unplug the refrigerator, vacuum loose debris, gently brush only accessible coils, reinstall the permitted grille, and reconnect power. Never remove a sealed mechanical cover, bend tubing, or pull on a water line. A technician is the right choice when the condenser is not owner-accessible.
As an Amazon Associate we earn from qualifying purchases.
By DIY Ideas 4 Home Editorial Team
Before You Start: Tools, Access, and Safety
The key distinction is between a removable intake grille and a protective cabinet panel that shields the compressor and refrigerant tubing. Whirlpool’s How and When to Safely Clean the Condenser Coils guide says some units require no routine cleaning, while others should be handled only by a technician. Decide which design you own before buying tools or attempting to open anything.
| Tool or Material | Size or Spec | Why You Need It | Substitute |
|---|---|---|---|
| Vacuum and hose | Soft-brush or crevice attachment | Removes dust without pushing it deeper | Compact hand vacuum with gentle suction |
| Refrigerator coil brush | Long, flexible, soft bristles | Loosens lint on owner-accessible coil surfaces | Vacuum brush on surfaces it can reach |
| Flashlight | Handheld or headlamp | Shows tubing, wiring, and grille clips | Phone light used away from moving parts |
| Protective gloves | Comfortable, well-fitting pair | Protects against sharp edges and dusty debris | Work gloves suitable for appliance maintenance |
| Appliance thermometer | Refrigerator/freezer-rated | Checks the cabinet temperature after the job | Existing separate appliance thermometer |
Confirm That Your Model Needs Coil Cleaning
Start with the model number, which is commonly found on a label inside the refrigerator compartment, although the exact location varies. Search the manufacturer’s owner manual for condenser, base grille, cleaning, or ventilation. GE Appliances’ Refrigerator – Cleaning Condenser Coils support article says most GE refrigerators manufactured since 2001 have a NeverClean condenser arrangement that does not require owner cleaning. That statement applies to those GE designs, not automatically to every refrigerator produced after that year.
If the manual prohibits accessing the condenser or specifies professional maintenance, do not treat a video of another model as permission. Some refrigerators still benefit from removing dust from an external back cover, even though the coils themselves remain protected. Cleaning the wrong opening may produce little benefit while creating a risk of damaged wiring or refrigerant piping.
Locate the Owner-Accessible Surface
GE Appliances describes three possible condenser locations: beneath the refrigerator behind a lower grille, along the back, or at the top on certain built-in units. You may see a front intake opening without seeing the entire heat-exchanger assembly. A wall of metal or a covered machine compartment is not necessarily a removable access panel, so use the exact manual rather than assuming every screw can be removed.
LG USA’s June 2023 guide, How Do I Clean The Rear of My LG Refrigerator?, specifically instructs owners to vacuum the outside of the rear mechanical-compartment cover and warns against taking that cover off. Internal cleaning and disassembly belong to a service technician. If yours has a similar enclosed back, stop at the exterior screen or cover.
Protect Power, Water Lines, and Stored Food
Whirlpool’s condenser cleaning instructions begin by unplugging the refrigerator or disconnecting its power. Move it only if the model’s guide permits this and you have enough slack in the power cord and water connection; a heavy built-in unit should not be pulled out casually. If the floor is uneven or the cabinet can tip, arrange help before attempting to shift it. Avoid wet spraying, cleaners, and metal scrapers near electrical parts.
Plan a brief maintenance window and minimize open-door time. The FDA’s Refrigerator Thermometers guidance recommends keeping refrigerated foods at 40°F or below and frozen foods at 0°F; a freestanding thermometer confirms actual temperature better than a control dial alone. If unplugging will be prolonged, make a food-storage plan rather than assuming the contents will remain cold indefinitely.
How to Clean Refrigerator Coils Step by Step
These seven steps apply when the manufacturer explicitly allows the homeowner to reach and clean the condenser surface. If the manual describes a no-clean or technician-only system, follow its exterior-ventilation directions and skip disassembly. The goal is clear airflow, not exposing every hidden component or forcing a brush into inaccessible machinery.
Step 1: Identify the Coil Access Route
Read the coil-cleaning section in the use-and-care guide and locate the named access point while the appliance is still running normally. Note whether the manufacturer refers to a snap-on base grille, exposed rear tubing, or a top machine compartment. An under-cabinet vent may lead to accessible coils, but the louver itself can also hide a no-service design. A flashlight can reveal the first layer of dust without disturbing anything.
Confirm which part the manual allows you to remove and where your hands and brush can safely travel. GE Appliances’ cleaning guide provides different procedures for bottom, rear, and top condenser positions, which is why a single demonstration cannot fit every refrigerator. If your manual does not authorize access and you cannot confidently identify the condenser, clean only the external ventilation surface and request model-specific support.
Step 2: Clear Space and Disconnect Power
Pick up floor debris and clear lightweight obstacles near the work area. Shut the doors, then unplug the refrigerator by gripping the plug rather than tugging the cord. If the appliance is hardwired or its approved procedure requires a breaker shutoff, follow the manual and use qualified help if you cannot safely isolate power. Do not work around an energized compressor fan or exposed wiring.
For a rear-mounted accessible condenser, move the cabinet only along a route that will not stretch the water-supply line or crush flooring. Check the hose and cord as you go; an attached water dispenser may have a short line with almost no extra reach. If the refrigerator is tightly built in, anchored, unusually heavy, or connected with rigid tubing, stop instead of forcing it forward.
Step 3: Remove Only the Approved Grille
Whirlpool’s How and When to Safely Clean the Condenser Coils explains an accessible lower-grille sequence on applicable models: open the refrigerator doors, release the grille as directed, and keep the clips clear for reinstallation. On another brand the grille may pull straight forward, require a different clip release, or stay permanently in place. Your model’s instructions take priority over a generic removal method.
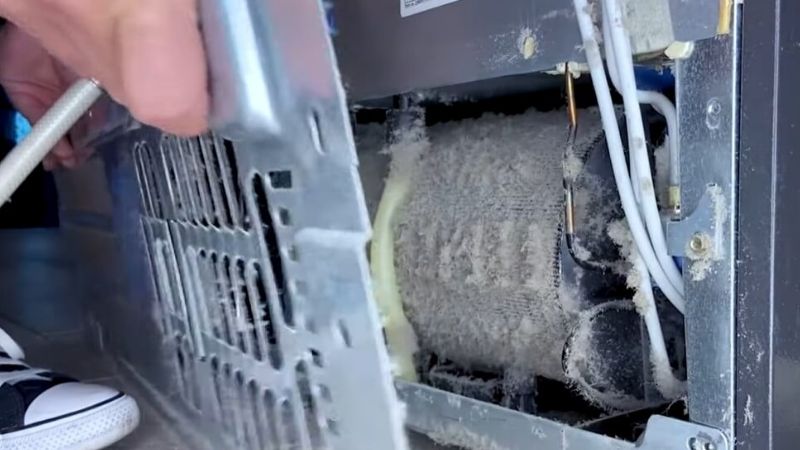
Place a removed grille on a clean towel where nobody will step on it. Look for dust along the louver edges and the exposed, serviceable front face of the condenser. Do not unscrew a solid compressor-compartment cover, remove safety guards, or try to reach past a fan shroud. If the only visible surface is a sealed panel, clean its outside and proceed directly to the reassembly step.
Step 4: Vacuum Dust From Grille and Floor
Use the vacuum hose and a soft-brush attachment to draw dust off the detached grille and from the exposed intake area. Keep the nozzle close enough to collect lint but do not ram it into aluminum fins, copper tubing, wire connectors, or plastic fan blades. Work from the outer edge inward so the loose debris moves toward the vacuum rather than disappearing into the cabinet.
GE Appliances’ Refrigerator – Cleaning Condenser Coils instructions specifically call for removing dust and pet hair from the floor after brushing accessible condenser surfaces. Vacuum the area under the fridge and along the baseboard, especially if pet hair accumulates there. A cleaner surrounding floor slows the next buildup, but clearing only the floor is not a substitute for brushing an accessible dirty condenser when the manual recommends it.
Step 5: Gently Brush Exposed Coil Surfaces
Choose a coil brush with soft, flexible bristles and guide it along surfaces you can see and reach without pressure. Whirlpool’s maintenance guidance names its 4210463RW brush for accessible refrigerator condenser cleaning. For a lower-mounted design, several shallow passes can loosen packed lint while a nearby vacuum catches the material. For rear exposed tubing, support the brush lightly and follow the tubing’s path rather than prying between loops.
Do not bend fins, dislodge sensor wires, detach a fan, or try to scrub every hidden row. GE’s support article describes the PM14X51 brush as approximately 27 1/2 inches long, including about 12 inches of bristles; that length helps reach into narrow spaces but does not grant access behind fixed guards. Visible dust reduction and an unobstructed inlet are better stopping points than scraping until every surface looks new.
Step 6: Restore the Grille and Airflow Path
After vacuuming away the dislodged debris, place the approved grille back exactly as it came off. Whirlpool instructs owners of its applicable lower-grille design to line up the support tabs with the metal clips and press the grille into its proper seated position. If the grille does not fit flush, inspect its alignment instead of forcing it. A loose or misaligned panel can rattle or interfere with intake airflow.
Return a safely movable refrigerator to its original level position without rolling over tubing or the power cord. Restore the manufacturer’s specified ventilation clearances; they vary by model and installation, so do not invent a one-size-fits-all number. Verify that no cloth, vacuum attachment, cardboard, packaging, or cleaning tool was left behind the unit. Recheck the water-line connection visually for kinks or new drips before reconnecting power.
Step 7: Restore Power and Check Cooling
Reconnect the refrigerator and check that normal controls, interior lighting, and permitted operating indicators return. Do not assume a compressor should start instantly; cooling cycles and startup behavior vary. Keep the doors closed while the unit stabilizes, and use a separate appliance thermometer to determine whether it is maintaining appropriate food-storage temperatures instead of judging by the sound of the motor alone.
According to the FDA’s Refrigerator Thermometers guidance, the refrigerator compartment should remain at 40°F or colder and the freezer at 0°F. If you find food has spent more than 2 hours above 40°F, the FDA’s food-safety guidance calls for caution about perishable foods; never assume a successful cleaning makes improperly stored food safe. If temperatures fail to recover or the appliance continues running abnormally, coil dust may not be the underlying problem.
Products That Help
The Whirlpool 4210463RW Multi-Use Cleaning Brush is a relevant option if your manual permits brush access. Whirlpool’s official product page identifies soft bristles and use on refrigerator coils, while its condenser-maintenance guide names that exact part number. Its product page showed temporary unavailability as of October 2026, so confirm a current seller before purchasing. Avoid buying it for an appliance with a sealed, no-clean condenser.
The GE Appliances PM14X51 Coil Brush is another model-specific reference for long-reach cleaning. GE’s product page describes an approximately 27 3/4-inch overall length and lists $9.99 as of October 2026, although GE also identifies it as no longer manufactured and out of stock on its own site. A genuine brush still has to fit your authorized access point; a household vacuum with a soft attachment may be all you need if the manufacturer calls for external-cover cleaning only.
Common Mistakes to Avoid
Do not remove a sealed rear mechanical cover just because you can see screw heads. LG’s official rear-cleaning advice warns that disturbing this cover can damage internal refrigerant tubing. Do not spray water, degreaser, or compressed air into the electrical compartment, and do not use sharp wire brushes that can deform thin fins. Aggressive cleaning creates a larger repair risk than ordinary surface dust.
Also avoid promising instant energy savings. If the condenser was already clean or the model has a protected, maintenance-free arrangement, coil brushing may change nothing. Whirlpool recommends checking owner-specific directions and, in homes with pets, heavy kitchen traffic, or construction dust, inspecting the accessible area every 3 to 6 months. That interval is conditional, not a universal monthly requirement for every refrigerator.
Frequently Asked Questions
Routine maintenance depends on condenser location, cabinet design, and how quickly dust collects around the refrigerator. The answers below address the decisions that commonly come up after the immediate cleaning steps.
How Often Should Refrigerator Coils Be Cleaned?
There is no universal interval. Whirlpool’s condenser-care instructions say normal household conditions usually do not call for regular condenser cleaning, while homes with pets, frequent kitchen traffic, or construction dust should inspect and clean accessible areas every 3 to 6 months. If you do not know whether your model needs coil maintenance, locate the owner’s manual first rather than following a blanket calendar reminder.
Can I Clean Refrigerator Coils Without Moving It?
Yes, if your appliance has a model-approved front base grille or accessible external ventilation screen. Whirlpool describes a lower-grille procedure that does not require pulling the refrigerator into the room. Rear-exposed coils usually require enough space for safe access, but do not move a plumbed-in or built-in refrigerator if the water connection, power lead, anchoring, or weight makes movement unsafe. Some models can only be serviced by a professional.
Should I Use Compressed Air or Water?
Use a vacuum and a soft brush unless the model’s cleaning instructions specifically say otherwise. Compressed air can drive fine dust deeper into a fan compartment or spread debris around the kitchen. Water and liquid cleaners near electrical parts can introduce avoidable hazards. Both Whirlpool and GE’s coil-cleaning directions favor controlled vacuuming and brushing for the surfaces homeowners are allowed to reach.
Will Cleaning Coils Fix a Refrigerator That Is Warm?
It might help when blocked airflow is the actual cause, but cleaning cannot repair a failed condenser fan, defective sensor, refrigerant leak, or door-seal problem. GE’s support article says cleaning can be relevant when a running refrigerator is not cold enough; it also notes that some condensers are not owner-accessible. Check actual cabinet temperatures with a thermometer, then seek diagnosis if the appliance remains too warm after safe exterior maintenance.
Final Thoughts
After learning how to clean refrigerator coils, make the next decision based on the manufacturer’s access instructions rather than the amount of dust you can see. A washable lower grille and brush-accessible condenser call for simple maintenance; a sealed compartment or NeverClean design calls for restraint. Keep the model number and the temperature reading together in your household maintenance notes. That record helps distinguish a future airflow problem from a cooling fault that requires service instead of another round of cleaning.