A bathtub edge needs a flexible seal where the tub meets tile, an acrylic surround, or another finished wall. Learning how to caulk a bathtub means removing failed sealant, drying the joint thoroughly, laying one continuous bead, and letting the new material set before normal use. The project is manageable with basic hand tools when the tub and wall are sound; leaking walls, loose tiles, or soft material behind the seam need more than a cosmetic repair.
Quick Answer: Remove every loose strip of old caulk, clean and dry both bonding surfaces, tape the seam if desired, then apply and smooth a bath-rated waterproof sealant. Pull tape before the bead forms a skin. Follow the exact product label for water exposure, because a manufacturer’s short water-ready time is not the same as complete curing.
As an Amazon Associate we earn from qualifying purchases.
By DIY Ideas 4 Home Editorial Team
Before You Start: Tools, Materials and Safety
A successful tub seal depends more on preparation and compatible material than on squeezing out a large bead. DAP Global’s January 2025 bathtub-caulking guidance starts with total removal of old sealant and a clean, dry surface. Identify the tub material and the type of wall surround before selecting the replacement; not every remover or sealant is approved for acrylic, stone, or painted finishes.
| Tool or Material | Size or Spec | Why You Need It | Substitute or Caution |
|---|---|---|---|
| Kitchen-and-bath sealant | Waterproof; compatible with tub and wall | Closes the tub-to-wall joint | Do not substitute painter’s caulk without wet-area approval |
| Caulk removal tool | Plastic scraper or appropriate blade | Lifts failed old material | Metal blades may scratch acrylic |
| Warm soapy water and clean cloth | Nonabrasive cleaning supplies | Removes soap residue and debris | Rinse and dry completely afterward |
| Caulking gun | Fits cartridge selected | Delivers a steady bead | Squeeze tube works for a short seam |
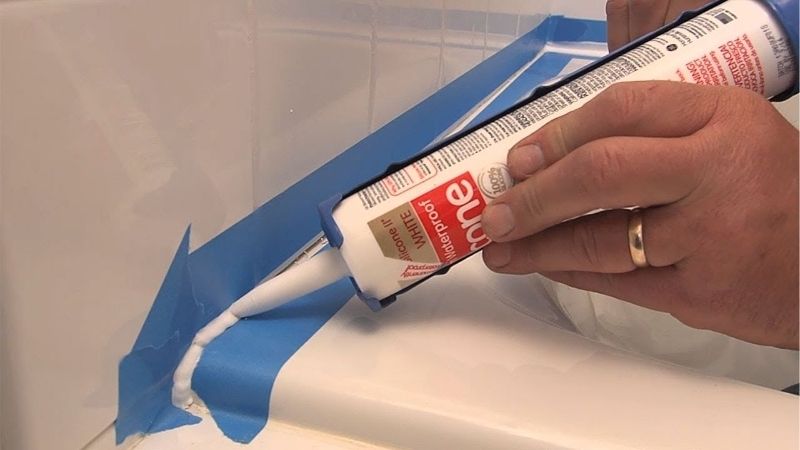
| Painter’s tape | Low-tack, finish-safe type | Defines both edges of the bead | Optional if you can tool neatly |
| Finishing tool and gloves | Shape suitable for the joint | Presses sealant into both surfaces | Use only tooling method approved by product |
| Foam backer rod | Matched to joint dimensions | Supports an unusually deep gap | Do not use caulk to conceal a moving or damaged joint |
Pick the Right Sealant for Both Surfaces
For a routine tub-to-tile seam, a kitchen-and-bath silicone labeled for the surfaces usually supplies useful flexibility and water resistance. GE Sealants identifies its Advanced Silicone 2 Kitchen & Bath as 100% silicone and nonpaintable. DAP’s KWIK SEAL ULTRA is a different, water-cleanup formula, so preparation and tooling directions must not be borrowed indiscriminately from a silicone package. Paint adjacent trim before choosing nonpaintable silicone rather than expecting wall paint to adhere to the bead later.
Check the manufacturer’s adhesion list if your enclosure includes acrylic, fiberglass, natural stone, or metal trim. Some acidic-cure silicones are unsuitable for particular metals or delicate finishes, while products marketed for stone have their own application limits. Where you cannot confirm compatibility, choose a material explicitly supported by both the sealant label and the tub or surround manufacturer; an inconspicuous material test may also be prudent.
Decide Whether the Joint Is Ready to Seal
Peeling caulk alone is a reasonable do-it-yourself project. A tub rim that pulls away from the wall when weight is added, crumbling grout, a musty cavity, or swollen drywall suggests a movement or moisture problem that sealant will not correct. Look for a joint that was intentionally left open as a drain or weep path on a specific surround system and do not cover it without checking the installation manual.
For drop-in bathtub installations, Kohler’s bathtub installation guide recommends filling the tub with water before caulking, so the seal is formed with the tub under load. That is a manufacturer-specific installation approach rather than a universal rule for every alcove or freestanding bathtub. Refer to the instructions for your unit before deciding whether it should be loaded during application, and keep the finished bead undisturbed for the designated drying period.
Protect the Room and Yourself
Open a window or run the bathroom exhaust fan, wear suitable gloves, and protect finished surfaces before using a knife or chemical remover. Choose a plastic scraper on delicate acrylic unless the fixture maker expressly permits a metal blade. Do not mix cleaners to accelerate mildew removal. The U.S. Environmental Protection Agency advises against routine bleach use for mold cleanup and warns that combining bleach with ammonia-containing products can release hazardous fumes.
If you find persistent mold, a wet substrate, or water damage extending past the bead, correct the moisture source first. The EPA’s homeowner mold guidance treats areas larger than roughly 10 square feet as needing added precautions and potentially professional help. Resealing visible edges while moisture remains trapped behind a wall can hide deterioration instead of solving the cause.
How to Caulk a Bathtub Step by Step
Work from a bare, dry joint toward the finished seal rather than trying to disguise damaged material with fresh caulk. For the seven steps below, use the particular sealant’s package instructions whenever they differ from a general technique. The meaningful result is a bead bonded to both sound surfaces, with no pinholes, torn edges, or skipped sections.
Step 1: Remove the Old Caulk Completely
Score carefully along the two edges of the failing bead and lift an end with a plastic removal tool. Pull out long sections without levering against the wall panel or cutting into the tub. A commercial caulk remover may soften stubborn residue, but check its instructions and the bathtub finish first; a product safe on ceramic tile may not be safe on acrylic or some stone surfaces. Dispose of loose strips as you work so they cannot be pushed back into the seam.
Inspect the exposed joint with a flashlight. Shiny films, rubbery fragments, and softened patches still count as old sealant. DAP’s 2025 tub-and-shower guidance emphasizes removing all previous material because new caulk needs to bond to the actual fixture and wall, not a failing layer beneath it. Stop scraping when you have a clean, intact contact surface; gouging the finish to remove the last speck creates another repair problem.
Step 2: Wash, Rinse, and Dry the Joint
Wash the tub rim and nearby wall with a gentle cleaner suitable for both finishes. Scrub off soap scum and body-oil residue, rinse away cleaning product, and wipe up standing water. Do not leave cleaner trapped inside the joint. DAP recommends letting the cleaned surfaces air-dry for several hours when needed; extra drying matters in a deep crevice where a towel reaches only the visible edge. The gap should look and feel dry all the way along before sealing.
If dark material remains, determine whether it is removable surface staining or an indication of a wet, damaged backing. The EPA’s mold guidance says visible mold must be removed and the moisture problem addressed; simply covering it does not solve the problem. When the joint is too damp to dry because water continues entering from behind the wall, postpone the caulk application and locate the leak rather than trapping the moisture with a new bead.
Step 3: Check the Gap and Mask Its Edges
Examine the seam at the corners, along the long wall, and near the faucet end. A narrow, stable change-of-plane joint is different from a wide cavity caused by a loose surround. GE Sealants’ published Advanced Silicone 2 application directions call for backer rod in gaps larger than about one-half inch in both width and depth; that guidance describes joint preparation, not permission to bridge a failing installation. If the wall or tub shifts noticeably, repair or stabilize it before selecting a joint filler.
Place low-tack painter’s tape on the tub and wall if you need straight borders. Leave enough exposed surface for the bead to contact both sides rather than drawing two tape lines so close that the seal becomes a fragile thread. Press tape down gently and test that removal will not strip paint or a fragile wall finish. At intersections, plan the order of work so you can smooth the corner without dragging a finger across a finished section.
Step 4: Prepare the Cartridge and Test the Flow
Choose a nozzle opening appropriate to the actual joint; begin smaller because a large cut cannot be undone. DAP’s 2025 caulking instructions and its current product guidance describe cutting a cartridge tip at approximately a 45-degree angle. Pierce the inner foil seal if the cartridge has one and set it into a fitting caulking gun. Check that the plunger advances smoothly and that the cartridge is not expired or damaged before approaching the finished surfaces.
Make a short test bead on disposable cardboard. It should emerge without spurts, dry lumps, or excessive gaps in the flow. Use steady trigger pressure and release pressure when pausing, particularly with a drip-prone manual gun. Keep rags and a finishing tool nearby: once a silicone bead is applied, there is a short window to shape it cleanly, and walking across the room for a missing tool can leave a visible splice.
Step 5: Apply One Continuous Bead Along the Rim
Hold the nozzle at a comfortable angle and move along the seam with even pressure. Aim to put enough material into the joint to contact the bathtub and wall, not to build a bulky ridge on top of both. DAP’s instructional material describes a roughly 45-degree gun angle as a useful starting position, but the exact wrist position matters less than a consistent flow. Work in manageable lengths if access behind a faucet or shower screen interrupts your reach.
Pay attention to the corners, where the wall-to-wall seam meets the bathtub. Do not skip the joint and assume smoothing will spread caulk into an empty section later. However, do not seal drainage openings intentionally designed into a tub surround. Check the relevant surround instructions before caulking near trim, spout escutcheons, or other components that may require a specific drainage or service-access path. Remove any large blobs while the material is still workable.
Step 6: Tool the Bead and Remove Tape
Immediately press a finishing tool or product-approved gloved fingertip along the fresh sealant, forming a neat, slightly concave face with consistent contact on each side. A finishing pass should close small voids rather than scrape the entire joint empty. Use the sealant maker’s guidance on whether a tool can be dampened; techniques recommended for a water-based acrylic formula do not automatically apply to every silicone chemistry. Clean the tool between passes so cured residue or dirt cannot be dragged into the bead.
DAP’s Silicone Max product instructions place the usual initial skin-formation window at around 2 to 5 minutes for that specific formula. For a taped seam, lift the tape before the bead skins, pulling at an angle that does not tear the fresh edge. Do not interpret those minutes as the time available for a lengthy second pass after a skin has appeared. If you spot a large skip immediately, repair it within the product’s working window; if the bead has begun curing, follow the manufacturer’s repair directions.
Step 7: Respect Water-Ready and Cure Times
Read the actual package rather than applying a generic 24-hour rule to every modern bathroom sealant. GE’s Advanced Silicone 2 Kitchen & Bath product page states a 30-minute water-ready time. DAP makes a similar 30-minute shower-ready claim for Silicone Max Kitchen & Bath, while its KWIK SEAL ULTRA product page lists water exposure after 4 hours. These figures describe specific formulations and conditions; they should not be swapped between products or interpreted as proof that a thick bead has fully cured.
For the most conservative schedule, leave the bathtub unused for the longer period recommended on its sealant label, particularly in a cool, poorly ventilated bathroom or at a thick joint. DAP’s January 2025 installation guide advises aiming for 24 hours before normal use with KWIK SEAL ULTRA when practical, even though the maker lists earlier water readiness. Once service resumes, inspect the joint after the first normal bath or shower. A sound bead should remain attached on both faces rather than peel, bubble, or pull into a gap.
Products That Help
GE Advanced Silicone 2 Kitchen & Bath Sealant is a 100% silicone option sold in a 10.1-fl-oz cartridge and a smaller 2.8-fl-oz squeeze tube, according to GE Sealants’ current product page. Choose it when the tub and surround are compatible with its published adhesion list and a nonpaintable finish is acceptable; the manufacturer states 30-minute water readiness. DAP Silicone Max Kitchen & Bath Sealant also comes in a 10.1-fl-oz cartridge, with white, clear, and almond options listed for that size. DAP’s product page describes 100% silicone and a 30-minute shower-ready claim, making the product worth comparing when matching an existing seam color matters.
DAP Kwik Seal Ultra Advanced Siliconized Sealant offers a different cleanup experience: DAP lists a water-based formula, soap-and-water cleanup, and a 4-hour water-ready time, with a 10.1-fl-oz cartridge or 5.5-fl-oz tube. It is an option when the compatible surface, indoor use, and water-cleanup convenience outweigh the shorter water-ready claims of the silicone products. Before buying any of these, compare the actual color, container size, substrate approval, and cure directions on the package rather than choosing based on a mold-resistance slogan alone.
Common Mistakes That Shorten Seal Life
Trying to save time by applying a thin new coat over cracked old silicone is a common failure point because the new material never reaches the underlying clean surface. Another is leaving rinse water or cleaner in a corner and blaming the caulk for poor adhesion. Too much material creates a raised ridge that catches grime; too little leaves an unfilled joint that may separate as the tub moves. Repeated tooling after the surface skins can tear the bead instead of improving its shape.
Finally, remember that caulk is not a substitute for loose tile, a warped surround, or damaged waterproofing. If the new bead repeatedly splits at the same location, inspect movement and hidden moisture before buying another tube. A good-looking seal is useful only when the structure and the joint behind it remain sound.
Frequently Asked Questions
Bath-edge repairs raise different questions once the new bead is down: how to handle old silicone, whether the material can be painted, and which adjacent seams need attention. The answers depend on the caulk chemistry and the fixture design rather than on appearance alone.
Can I Put New Silicone Over Existing Caulk?
Do not rely on it for a failing bathtub seam. Remove peeling material and residue so the replacement bonds directly to clean, dry tub and wall surfaces. GE Sealants and DAP both instruct users to remove old sealant before applying their kitchen-and-bath products. Covering a cracked strip may look acceptable for a short time while the original attachment failure remains underneath.
Is Clear Caulk Better Than White Around a Tub?
No color is automatically better for waterproofing. White can blend into white fixtures, while clear may suit patterned tile or unusual finishes, but a clear bead can also show underlying debris or unevenness more readily. DAP’s Silicone Max product page lists white, clear, and almond options for its 10.1-fl-oz cartridges. Choose the finish that looks appropriate and confirm it is the same sealant formula with approved adhesion to your materials.
Can Bathtub Caulk Be Painted After It Dries?
Not all formulas can be painted. GE lists Advanced Silicone 2 Kitchen & Bath as nonpaintable, so wall paint should be completed before applying that silicone. Some acrylic or siliconized formulations are marketed as paintable, but they have separate waterproofing and curing directions. If a neat paint edge is central to your project, choose the product before painting rather than assuming any bathroom sealant will accept a topcoat.
Should I Caulk Every Seam Around a Tub Surround?
No. Seal the joints the tub or wall-system manufacturer identifies for sealing, particularly the tub-to-wall joint, but leave any designed weep openings or drainage passages clear. Caulking over a drainage point can trap water where the surround was designed to release it. If the installation instructions are missing, identify the fixture model or ask the manufacturer before closing an unfamiliar slot, channel, or trim opening.
Final Thoughts
Knowing how to caulk a bathtub is useful only when the repair ends with a dry, stable joint rather than a freshly covered leak. Take a photo of the clean, exposed seam before applying caulk; it gives you a baseline if separation or staining returns at the same spot. Choose a compatible kitchen-and-bath formula, follow its own water-ready instructions, and inspect the finished edge after the room goes back into service. If the wall becomes soft or the caulk fails repeatedly, the next step is an underlying moisture or movement inspection, not another cosmetic bead.