Knowing how to lubricate a garage door properly can reduce squeaking, friction, and premature wear. The important word is properly: garage door tracks are normally cleaned, not greased, and sealed nylon rollers generally do not need lubricant on the wheel itself. A quiet door should also move smoothly and remain safe to operate.
Quick Answer: Close the door, disconnect automatic power, and inspect for damaged springs, cables, rollers, and tracks. Clean loose dirt from accessible metal parts. Apply a small amount of the lubricant specified by the door maker to hinge pivots, appropriate metal roller bearings, and other approved lubrication points. Wipe away overspray, leave tracks free of grease, restore power, and test normal door and opener safety operation.
Lubrication is maintenance, not a fix for a broken spring, bent track, frayed cable, unbalanced door, or failed opener safety system. If the door suddenly becomes heavy or moves unevenly, stop before applying spray. Have the underlying fault evaluated by a qualified garage-door professional.
As an Amazon Associate we earn from qualifying purchases.
By DIY Ideas 4 Home Editorial Team
Know Which Garage Door Parts Need Lubrication
Clopay and Amarr both describe regular lubrication as part of garage-door care but differ in the exact product recommendations and frequencies for their hardware. This is a useful reminder: door construction, bearing design, climate, and manufacturer guidance matter. A single lubricant is not universally approved for every part.
| Component | Usual Homeowner Action | Important Limit |
|---|---|---|
| Metal hinge pins | Small application at pivot if manufacturer recommends | Do not loosen hinge fasteners under load |
| Exposed metal roller bearings | Light lubricant where accessible and approved | Do not pry rollers out of track |
| Sealed nylon or plastic rollers | Usually clean only; follow manual for bearings | Do not coat plastic tread in oil |
| Metal track channels | Wipe away dirt and debris | Do not spray grease along track |
| Torsion or extension spring surfaces | Only if manufacturer expressly instructs; keep clear of tensioned hardware | Never adjust, loosen, or handle loaded springs |
| Pulleys and bearing plates | Use approved product at safe, exposed bearing points | Call a professional for hard-to-reach or worn parts |
| Opener rail or drive | Follow opener’s separate service schedule | Not all rails, belts, or chains are lubricated alike |
Hinges and Exposed Roller Bearings
Hinges connect sectional door panels and allow them to pivot as the door travels around the curved tracks. A little lubricant on the pivot pin can reduce friction and metallic squeaking. Some rollers contain exposed metal bearings that can also benefit from a small amount of approved lubricant. Keep spray away from decorative surfaces and grip areas.
Do not remove a roller shaft, take apart a hinge, or loosen any bottom bracket. Some hinges and rollers are under different loads at different door positions, and disassembly can make the door unstable. A seized roller, cracked hinge, or missing fastener warrants inspection rather than extra spray.
Nylon Rollers and Sealed Bearings
Nylon rollers often have a plastic wheel that should not be sprayed. The bearing construction varies: some are sealed and maintenance-free, while others have metal shafts or exposed bearing points. Read the product and door instructions to decide whether any lubrication is needed at all.
Grease on the nylon tread attracts grit, which can increase rolling resistance and create a sticky track. If a nylon roller is cracked, wobbly, or grinding due to bearing failure, replacement by a qualified service person is a better remedy than soaking it in oil.
Springs, Pulleys, and Cable Areas
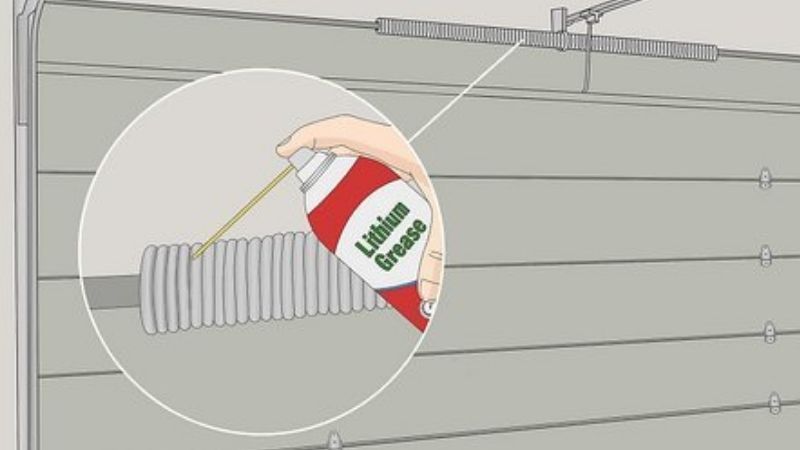
Some manufacturers instruct owners to lightly lubricate spring surfaces or pulleys as routine maintenance. Others specify a particular lubricant and may advise different treatment for different spring systems. Because the spring-and-cable assembly stores dangerous energy, do not assume every visible component is safe to touch.
Never loosen spring winding cones, cable drums, bottom brackets, or loaded extension-spring fasteners. If a lubrication point is not accessible without putting your hand near moving or tensioned hardware, leave it to a technician. Lubrication cannot restore a broken or failing spring.
Choose a Lubricant Compatible With Your Door
Garage-Door Spray Versus White Lithium Grease
Many garage-door makers recommend a specialty lubricant designed to stay on exposed moving parts without attracting excessive dirt. Clopay discusses silicone-based and garage-door-specific options, while Amarr provides product-specific guidance that can differ. Use your model’s care sheet as the primary authority.
White lithium grease may be appropriate for certain garage-door or opener mechanisms where the manufacturer calls for it, but it is not an invitation to coat every rail and moving surface. Some opener rails need a specific lubricant at a particular interval; others use belts, sealed bearings, or designs that require minimal owner lubrication.
Why Ordinary Penetrating Spray Is Not Always Enough
A general-purpose penetrating product may temporarily silence a squeak but may not provide the durable lubrication the hardware requires. Avoid treating water-displacing sprays as a universal substitute for the lubricant specified in the door manual. Where dirt is already built up, cleaning comes before adding more fluid.
Use products in a ventilated area, keep away from ignition sources, and follow aerosol label requirements for gloves, eye protection, and flammability. Avoid applying spray to brakes, photo-eye lenses, electrical terminals, rubber gaskets not rated for contact, or painted surfaces when the chemistry is incompatible.
What About Oil for Garage Door Springs?
Some manufacturers recommend a lightweight oil or proprietary lubricant for certain systems; others prefer a silicone or garage-door spray. These instructions are not interchangeable. If the spring maintenance section is unclear, ask the manufacturer or a qualified door dealer rather than using automotive engine oil at random.
Do not apply excess product. Dripping oil can stain a vehicle, floor, or door panel and collect dirt. A light, deliberate application at an approved point is more useful than soaking the entire mechanism.
How to Lubricate a Garage Door in 7 Steps
Step 1: Stop the Door, Clear the Area, and Disconnect Power
Fully close a properly functioning door, then disconnect power to the opener to prevent an unexpected activation. Keep children and pets away from the workspace. If the door is stuck open, uneven, or visibly damaged, do not pull the emergency release or attempt lubrication beneath it. Have the assembly inspected first.
Set out your cloth, soft brush, recommended lubricant, gloves, and eye protection. A small amount is usually sufficient. Avoid working from an unstable chair or reaching between door sections; pinch points exist even when the motor is off.
Step 2: Inspect Before You Spray
From a safe distance, visually inspect the springs, cables, rollers, hinges, and track for obvious problems. Look for cracked roller wheels, loose cables, bent tracks, missing fasteners, or separated spring coils. If anything appears damaged, stop and request professional service instead of masking noise with lubricant.
A scraping sound caused by metal rubbing an incorrectly aligned track does not disappear safely with more oil. Likewise, a door that feels unusually heavy needs a balance evaluation. Routine lubrication should be performed only on a door without apparent structural defects.
Step 3: Clean the Tracks and Exposed Hardware
Use a soft brush or clean rag to remove dust, cobwebs, leaves, and accumulated grime from the accessible inner track surface. For stubborn dirt, use a lightly dampened cloth and dry the area afterward. Do not pack grease into the track. Rollers should travel freely along the track rather than skid through oily debris.
Wipe dirt from hinge areas and exposed shafts without sticking hands into pinch points. Avoid strong solvents on plastic rollers, painted doors, or rubber seals unless specifically approved. If a track has a deep groove, dent, or obvious misalignment, stop rather than trying to straighten it.
Step 4: Lubricate the Hinges Sparingly
Apply a short, controlled amount of product directly to an accessible metal hinge pivot as directed by the manufacturer. Keep the nozzle aimed at the pin instead of spraying the whole panel. Wipe overspray off door surfaces, especially those that will be painted or refinished later.
Repeat at the remaining accessible hinge pins. Do not loosen any hinge bolt or bracket to improve access. If a hinge is cracked or pulls away from its panel, it needs repair, not lubrication. More spray will not restore a broken attachment point.
Step 5: Treat Appropriate Metal Roller Bearings
For rollers with manufacturer-approved accessible bearings, apply a small amount at the bearing or shaft location rather than coating the wheel or track. Avoid spraying nylon roller treads and fully sealed bearings. The roller should continue to move freely without leaving wet streaks along the rail.
Do not reposition the door by hand to expose a difficult roller if the balance is unknown. A homeowner should never pry a roller from the track or remove a retaining hinge on a loaded assembly merely to reach a lubrication point.
Step 6: Follow the Manual for Springs and the Opener
If the door maker specifically calls for spring-surface lubrication, follow those directions without touching, repositioning, or adjusting the spring hardware. Where there is uncertainty, use professional service. Similarly, openers have independent maintenance requirements: some rails receive white lithium grease at scheduled intervals while belt-drive systems have different restrictions.
Never spray lubricant onto the photo-eye lenses, opener electronics, or drive-belt materials without explicit approval. A door that has a chain, belt, or screw drive does not imply the same lubrication method for each system.
Step 7: Wipe Excess, Restore Power, and Test
Check for drips and wipe away surplus lubricant. Remove rags and tools from the opening, restore opener power, and watch the door complete normal travel from a safe position. Listen for improved motion rather than treating complete silence as a required outcome; some normal motor and roller sounds remain.
Finish by testing safety sensors and the contact-reversal feature according to your model’s instructions. Chamberlain advises monthly reversal testing and retesting after any opener adjustments. If the door stalls, jerks, or fails to reverse when required, stop automatic operation and seek repair.
How Often Should You Lubricate Garage Door Hardware?
Follow the Manufacturer’s Maintenance Schedule
Recommendations vary by door and hardware. Some manufacturers call for annual lubrication, while others suggest more frequent checks under heavy use, severe weather, or abrasive environments. Rather than applying a fixed six-month rule to every door, follow the manufacturer’s published schedule and inspect when noises change.
High-cycle garage doors or properties exposed to road salt and dust may need more frequent cleaning and inspection. If parts require constant spraying to prevent grinding, that is a sign to investigate wear or alignment rather than continually adding lubricant.
Look for Symptoms That Lubrication Cannot Fix
Metal grinding, loud popping from the spring area, a door that tilts, broken strands in cables, or rollers that visibly derail are not ordinary lubrication tasks. Stop using the door and obtain service. A healthy door may still make some noise because panel joints and opener drives inherently move under load.
FAQs About Garage Door Lubrication
Should I Lubricate Garage Door Tracks?
Generally no. Clean tracks so rollers can move smoothly; avoid coating the track with grease or spray that traps grit. Follow any specific exception in the door’s official manual, but do not assume track lubrication is routine.
Can I Use WD-40 on My Garage Door?
General-purpose penetrating or water-displacing sprays are not a universal replacement for proper long-term lubrication. Use a product approved for the specific hinge, bearing, or opener mechanism instead. Read both the door manual and lubricant label.
Do Nylon Garage Door Rollers Need Lubrication?
Usually not on the nylon tread. Some designs have serviceable metal bearings; others are sealed and require no lubricant. Consult the roller and door instructions to avoid turning the track into a sticky debris collector.
Can I Spray the Garage Door Springs Myself?
Some manufacturers include spring-surface lubrication in their maintenance guidance, but springs are under extreme tension. Never touch, loosen, or adjust spring hardware. If safely applying the specified product is not clearly covered by your manual, leave the task to a professional.
Why Is My Door Still Noisy After Lubrication?
The sound may come from worn rollers, loose or broken hardware, an out-of-balance door, or the opener drive. Stop repeated operation if movement is jerky or the door binds. A professional inspection can identify mechanical problems that lubricant cannot solve.
Final Thoughts
The safe approach to lubricating garage door components is selective maintenance: clean tracks, apply the correct product sparingly at approved moving points, and keep sealed nylon rollers and electronic parts free from unnecessary spray. The owner’s manual is more reliable than a one-size-fits-all lubricant recommendation.
Never use spray as a substitute for spring, cable, or track repair. After cleaning and lubrication, confirm smooth motion and functioning reversal protection. Those checks matter more than achieving a perfectly silent garage door.